
7 Unforgettable Ways to Experience Emerald Bay, Lake Tahoe
Emerald Bay, a stunning destination in Lake Tahoe, sits among the Sierra Nevada Mountains with its crystal-clear waters, dramatic landscapes, and captivating history. This enchanting bay draws visitors from around the world, and it’s easy to see why. If you’re planning a trip, here’s what you can look forward to.
Emerald Bay, a stunning destination in Lake Tahoe, sits among the Sierra Nevada Mountains with its crystal-clear waters, dramatic landscapes, and captivating history. This glacially carved bay draws visitors from around the world, and it’s easy to see why, just look at that view! If you’re planning a trip, here’s what you can look forward to.
Around Emerald Bay, there’s a world of outdoor adventures and stunning photo spots. You can explore the historic Vikingsholm Castle, hike scenic trails to Eagle Falls and Eagle Lake, kayak or take a boat tour for unmatched views of Fannette Island. With activities like kayaking, paddleboarding, scuba diving, and, in winter, skiing and snowboarding, this area has something for everyone all year round.
Whether you’re an outdoor lover, history fan, or simply seeking relaxation, Emerald Bay and its surroundings offer endless experiences. Here are seven must-try adventures to add to your itinerary:
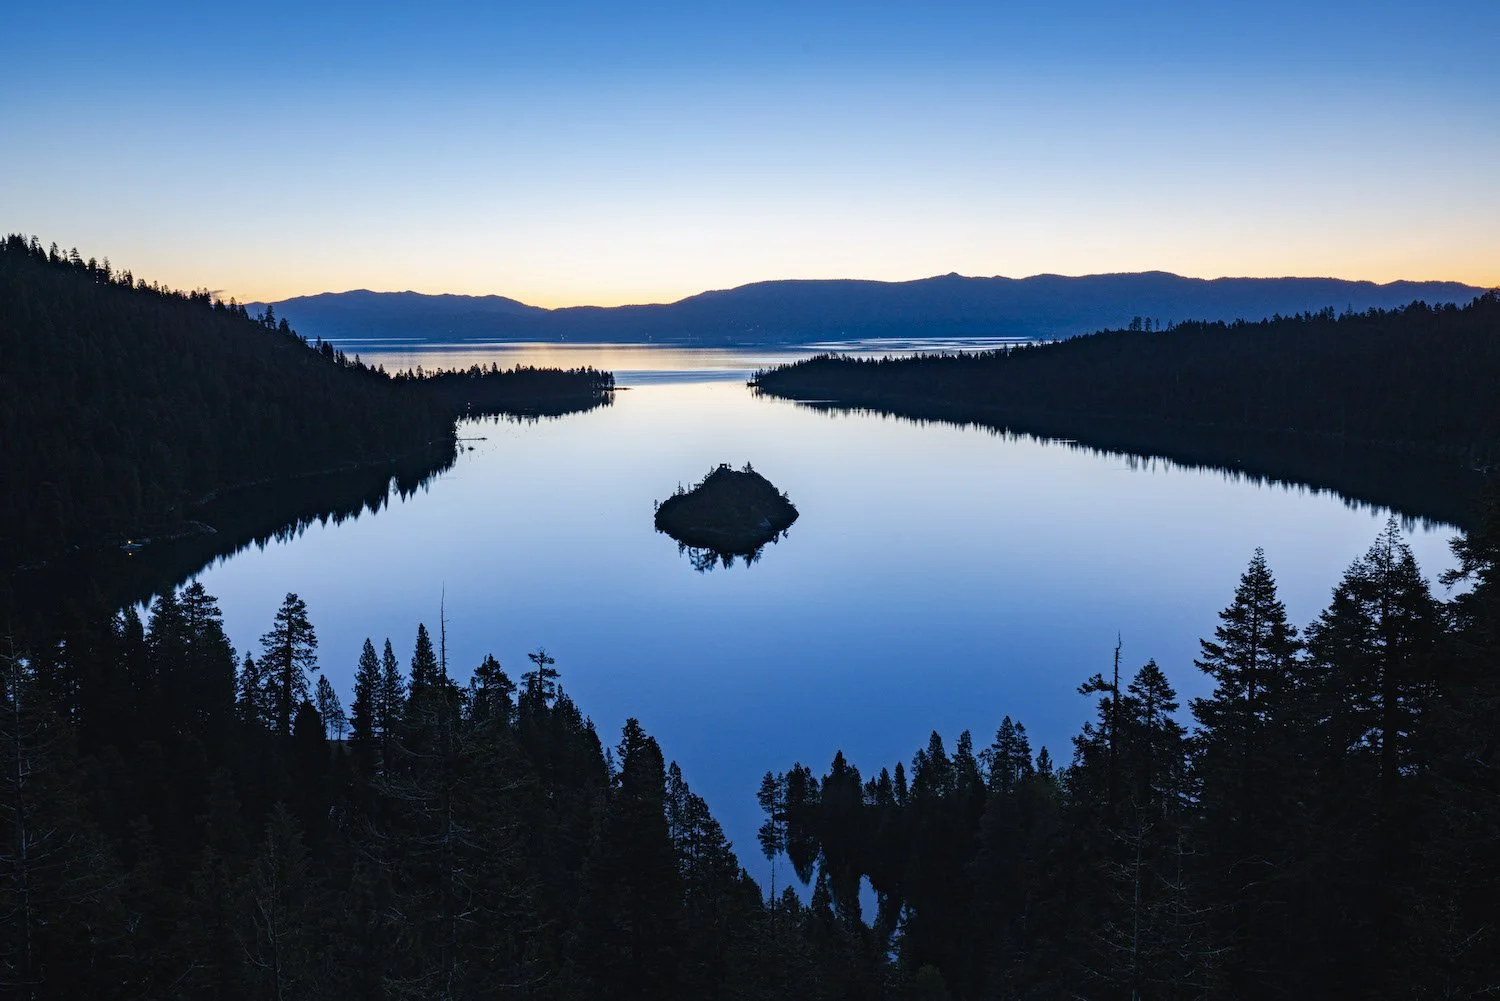
Emerald Bay glowing blue just before the sunrises. Photograph by Dalton Johnson
1. Visit the Vikingsholm Castle
Step back in time at Vikingsholm Castle, an architectural gem within Emerald Bay State Park. Built in the 1920s, this Scandinavian-style mansion was inspired by Mrs. Lora Josephine Knight’s travels through Scandinavia, and it showcases intricate medieval and Viking influences. Inside, you’ll find hand-carved woodwork, unique furniture, and tapestries that reflect its rich heritage.
Open for guided tours in summer, Vikingsholm invites visitors to explore its fascinating interiors and learn about its history. Nestled among panoramic views of Lake Tahoe and the surrounding mountains, the castle offers an unforgettable experience for history enthusiasts, architecture fans, and nature lovers alike. Don’t miss the chance to wander the grounds, enjoy awe-inspiring views of Emerald Bay, and imagine life in this magnificent setting.
2. Take a Boat Tour
Explore the beauty of Emerald Bay from the water on a scenic boat tour. Surrounded by towering mountains and crystal-clear waters, these tours offer an up-close view of iconic landmarks like Fannette Island and its historic tea house. Choose from a range of tour options, from relaxed cruises to guided experiences that share insights into the area’s history, geology, and wildlife.
A boat tour is an ideal way to take in Emerald Bay’s breathtaking landscapes and hidden gems. Some tours even include stops for swimming or exploring secluded coves. Perfect for families, couples, or solo travelers, this experience provides a unique perspective of Lake Tahoe’s stunning natural beauty. Be sure to check the schedule, tour length, and amenities, and prepare for an unforgettable journey through one of Tahoe’s most picturesque spots.
Fine art photographic print of Eagle Falls at sunrise over Emerald Bay in Lake Tahoe. Photograph by Dalton Johnson
3. Hike to Eagle Falls and Eagle Lake
Put on your hiking boots and explore the scenic trail to Eagle Falls and Eagle Lake, located near Emerald Bay. This 2.5-mile round-trip hike offers a mix of towering pines, flowing creeks, and granite rock formations. Along the way, you’ll enjoy the sound of rushing water as you approach the stunning Eagle Falls—a perfect spot for photos and a quick rest.
Continuing on, the trail ascends to Eagle Lake, a peaceful alpine lake surrounded by granite cliffs. Here, you can pause to enjoy a picnic, take in the serene views, and soak up the wilderness. Remember to bring sturdy shoes, sunscreen, and water for this moderate hike, which is suitable for most fitness levels.
This trail provides a refreshing outdoor experience with the tranquil beauty of Lake Tahoe. The sight and sound of cascading waterfalls, combined with the calm waters of Eagle Lake, create an ideal escape into nature. It’s an unforgettable journey for all hiking enthusiasts, offering memorable moments and serene landscapes in the heart of the Sierra Nevada.
4. Explore the Rubicon Trail
For a thrilling outdoor adventure, head to the Rubicon Trail near Emerald Bay. This 4.5-mile trail hugs the shoreline of Lake Tahoe, offering stunning views, hidden coves, and the gentle sounds of waves. As you wind through forests and along granite cliffs, you’ll be treated to breathtaking sights at every turn.
The Rubicon Trail is a moderate hike that suits hikers of varying skill levels. Pack essentials like water, sunscreen, and snacks, and wear sturdy footwear to navigate changing terrain. Along the trail, you’ll find ideal spots for a picnic by the lake or a refreshing swim in Tahoe’s clear waters. Remember to stick to marked paths to protect the ecosystem.
This hike captures the essence of Lake Tahoe’s beauty, with serene lake views, the fresh scent of pine, and an invigorating connection to nature. Whether you're capturing photos, seeking solitude, or simply enjoying the fresh air, the Rubicon Trail promises an unforgettable adventure in one of Tahoe’s most scenic areas.


5. Scuba Dive in Emerald Bay
Explore the underwater beauty of Emerald Bay with a scuba diving adventure. Beneath Lake Tahoe’s crystal-clear waters, you’ll discover sunken treasures, unique rock formations, and vibrant aquatic life, including rainbow trout and crawfish.
Before diving, ensure you have proper certification, as this is essential for safety. Emerald Bay’s clear waters offer excellent visibility, allowing you to take in submerged cliffs, caves, and historical artifacts. Dive with a local guide or certified instructor familiar with the area to maximize your experience.
Scuba diving here offers a rare chance to explore Tahoe’s hidden depths, perfect for both experienced divers and those eager to try a unique underwater adventure. This unforgettable experience will connect you to Lake Tahoe in a whole new way.
6. Enjoy Water Sports
Emerald Bay offers fantastic water sports for all skill levels. Whether you’re kayaking, paddleboarding, or jet skiing, Lake Tahoe’s clear waters and stunning scenery provide the perfect backdrop.
Local vendors offer rentals for a range of activities. Kayak and paddleboard rentals let you explore hidden coves and shoreline views at a relaxed pace. For more excitement, rent a jet ski to zip across the open waters. Always wear safety gear, follow local regulations, and be mindful of others on the lake.
Water sports in Emerald Bay deliver memorable experiences, whether you’re seeking thrills or a peaceful paddle. Take in the beauty of Lake Tahoe while enjoying fun on the water.
7. Skiing and Snowboarding
In winter, Lake Tahoe becomes a haven for skiing and snowboarding enthusiasts. The area around Emerald Bay offers access to top backcountry ski areas like Jake’s Peak. Jake’s Peak is known as one of the premier backcountry ski areas in Lake Tahoe because of the stunning views of Emerald you get as you boot pack to the top and stare at while carving your way back to your car.
Two notes to make about backcountry skiing in this:
Avalanche awareness is of the upmost importance. If you don’t know, don’t go!
Access to this area in the winter is often closed as Caltrans does not plow the Emerald Bay section of road, so make sure to check road closures online.
Getting ready to kayak on Emerald Bay in Lake Tahoe. Photograph by Dalton Johnson
Emerald Bay, Lake Tahoe, offers something for every traveler. From outdoor adventures to historical sites and peaceful retreats, this destination promises unforgettable experiences. Immerse yourself in the stunning landscapes, explore the rich history, and make lasting memories from an adventure filled day at Emerald Bay.
Discover more Adventures


Your Adventure Guide For Yosemite Valley National Park
There is no better place to visit for an adventure than Yosemite National Park. A bold statement no doubt, but here’s why? From jaw dropping views to rock climbing to hiking to backpacking to skiing to photography, Yosemite is the perfect place to immerse yourself in raw nature. These seemingly unlimited options lead to one main issue, paralysis by analysis. Meaning, there is so much to do in Yosemite knowing where to begin is a challenge.
There is no better place to visit for an adventure than Yosemite National Park. A bold statement no doubt, but here’s why? From jaw dropping views to rock climbing to hiking to backpacking to skiing to photography, Yosemite is the perfect place to immerse yourself in raw nature. These seemingly unlimited options lead to one main issue, paralysis by analysis. Meaning, there is so much to do in Yosemite knowing where to begin is a challenge.
So, we took on the ambitious feat of laying out for you all the best things you should do, and could do, while you visit Yosemite. We will cover the best views of Yosemite, how to find the best hiking trails, where to visit the best waterfalls, and how to try rock climbing in Yosemite. Make sure to pack your camera, you’ll want to snap photographs of everything, this land is gorgeous!
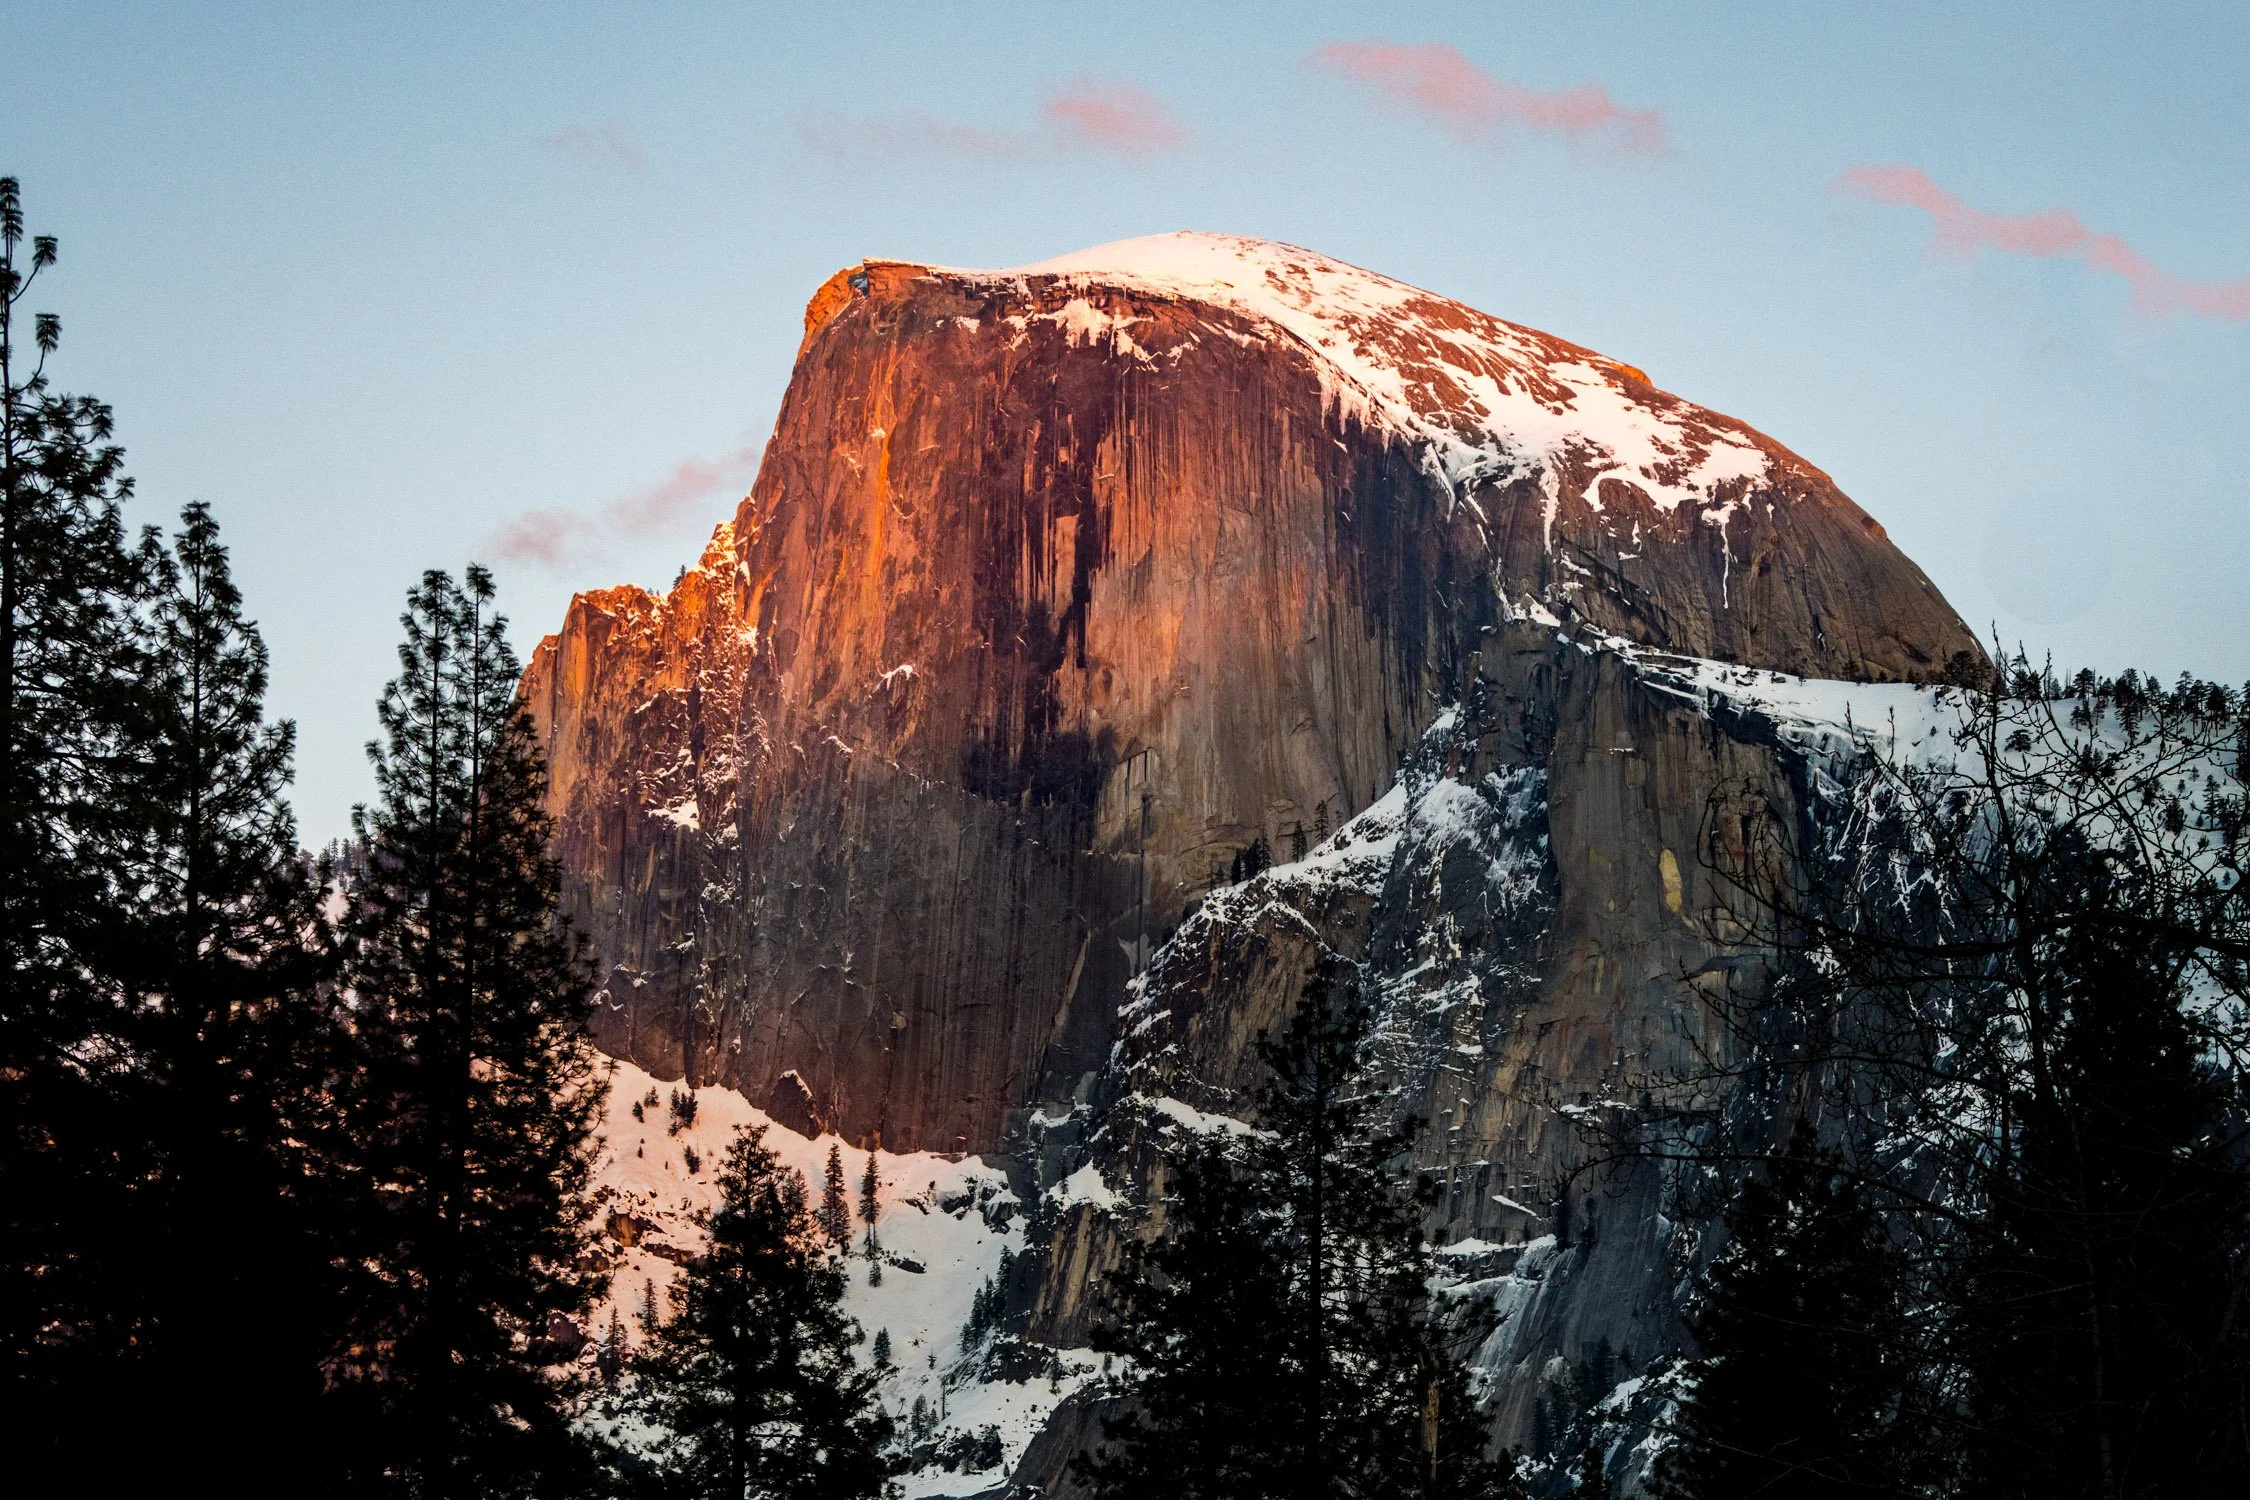
Half Dome at sunset as seen from the iconic Bridge View. Photograph by Dalton Johnson
Best Views of Yosemite Valley
When planning your To Do list for Yosemite National Park, checking out the views of the park ahead of time are critical to having a good time. Yosemite National Park is a large place and can be difficult to navigate with it’s circular driving. If you miss a turn and the traffic is bad, that could be a two hour detour. So, here are some iconic views that you should put on your To Do list and plan out.
Tunnel View
Tunnel View might be the most iconic vista in all of Yosemite National Park and I know that I try to stop here at least once every time I visit this magical place of granite walls and waterfalls. For me, this spot is full of adventures and photo locations.
From Tunnel View you can quickly access the rim after a couple miles of hiking, providing you access to some of the most incredible photo locations like Artist Point, Crocker Point, and Inspiration Point.
Want to know more about Tunnel View? I wrote a full article about Tunnel View, read it by clicking here.
How do I get to Tunnel View?
How long is the hike to Tunnel View?
The hike to Tunnel View is very short once you park, less than one minute. This hike is handicap accessible and you will often see crowds of humans all around the viewpoint. Pro tip, there are several areas to view if you get on the trail and walk for 5-10 minutes.
Check out Prints of Tunnel View
Why should I visit Tunnel View?
Tunnel View is a road side attraction that everyone should add to their Yosemite To-Do list. The view is iconic and has made the park famous. In addition to the beauty of location, you will get a good grasp on the diversity of people who come to Yosemite National Park every year. I recommend having a picnic at Tunnel View
Best Adventures Around Tunnel View:
Winter Hiking to Dewey Point from Tunnel View (make sure to bring snow-shoes)
Astrophotography at Tunnel View
Bridalveil Fall
Bridalveil Fall is one of Yosemite Valley's most striking waterfalls, cascading 620 feet down a cliffside and creating a captivating mist that often catches the sunlight, forming beautiful rainbows. The waterfall is one of the first prominent landmarks you’ll see when entering the valley, setting the tone for Yosemite’s grandeur. Its easy access from the valley floor, along with the mesmerizing view of water veiling down the rock face, makes Bridalveil Fall a memorable stop. Visiting during the spring, when the flow is strongest, enhances the experience, allowing visitors to feel the mist and appreciate the full power of this natural wonder.
How do I get to Bridalveil Fall?
Get directions to Bridalveil Fall
How long is the hike to Bridalveil Fall?
Hiking to Bridalveil Fall takes roughly 10 minutes. The hike to Bridalveil Fall on a paved path, low incline, and accessible to all (current renovations are making this path wheelchair accessible). To get to the base of Bridalveil Fall, you will have to leave the path and walk on a rocky path.
Why should I visit Bridalveil Fall?
Plunging 620 feet (189 meters), Bridalveil Fall is often the first waterfall you'll see when entering Yosemite Valley. In spring, it thunders; during the rest of the year, look for its characteristic light, swaying flow. This swaying flow is what gives the Bridalveil Fall it’s name, for it looks like a Bridalveil moving in the wind.
Check out Prints of Bridalveil Fall

Firefall
The Firefall at Horsetail Fall is one of Yosemite's rarest and most spectacular phenomena, drawing photographers and nature lovers each February. During this time, the setting sun aligns perfectly to cast a golden-red glow on Horsetail Fall, making it look like molten lava is flowing down the cliff. This effect only happens for a few days each year, depending on weather and snowfall, making it an awe-inspiring and often elusive experience. Catching the Firefall is like witnessing nature's magic firsthand, and for those lucky enough to see it, it’s an unforgettable highlight of Yosemite.
How do I get to Firefall?
How long is the hike to Firefall?
Firefall, also known as Horsetail Fall, can not be hiked to, but you can watch the spectacle from most places in the park. The fall comes from a seasonal flow that is based upon the years snowpack in mid to late February.
Why should I visit Firefall?
Firefall is a natural wonder of this world. Why? Well, you have to be in the right place, at the right time, and California has to have had a good year of snow. In other words, to see Firefall everything has to align. Hence, putting this natural wonder of a molten lava looking water fall on your To-Do list is a must.
Check out Prints of Firefalls

Half Dome from Glacier Point
For one of the best panoramic views in Yosemite, Glacier Point is unbeatable. Perched 3,200 feet above the valley floor, this overlook provides sweeping views of Half Dome, Yosemite Falls, and the expansive high country. Glacier Point is particularly stunning at sunrise and sunset, when the light paints the granite peaks in vibrant hues of orange and pink. The scenic drive to Glacier Point is an experience on its own, winding through lush forests and offering glimpses of Yosemite’s rugged beauty. It’s a must-visit for anyone seeking a bird’s-eye view of the park’s iconic landmarks.
How do I get to Glacier Point?
Get Directions to Glacier Point
How long is the hike to Glacier Point?
Hiking to Glacier Point is a 15-20 minute walk from the Glacier Point trailhead parking. The hike is paved and wheelchair accessible, however there are parts of the trail that become unpaved as you go beyond the visitor center and overlook.
Why should I visit Glacier Point?
Glacier Point should be on everyone’s To-Do list when visiting Yosemite Valley. Why? This point overlooks the upper portion of the valley and provides a wonderful view of Half Dome. If you arrive to Glacier Point for sunset, Half Dome will the glowing red. I recommend coming for sunset, staging a picnic, and watching the stars late into the night as the milky way shines over Half Dome. Glacier Point is a magical place to visit while in Yosemite National Park. Additionally, the drive is long in comparison to other Yosemite locations, so the crowds are smaller.
Check out Prints of Half Dome

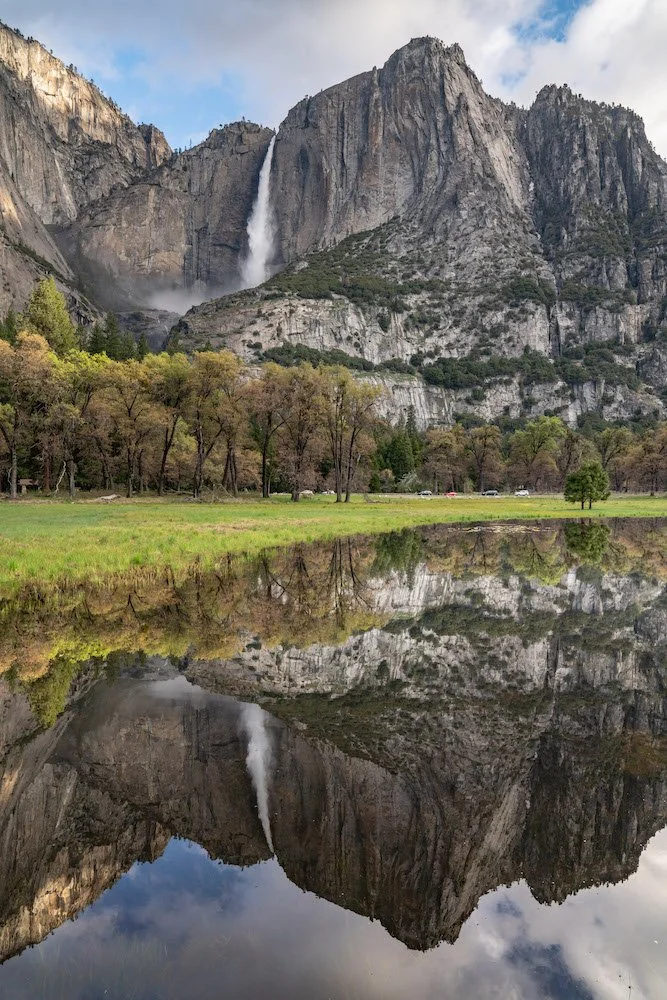
Yosemite Falls
Yosemite Falls is a showstopper, standing as North America’s tallest waterfall with a total drop of 2,425 feet. The falls are divided into Upper Yosemite Fall, Middle Cascades, and Lower Yosemite Fall, each offering its own unique perspective. Visiting in the spring, when snowmelt is at its peak, provides an unforgettable sight and sound experience as the water thunders down. The easy-access Lower Yosemite Fall trail is perfect for families, while the strenuous hike to the top rewards adventurers with sweeping views over the valley and an up-close look at this natural marvel.
How do I get to Yosemite Falls?
Get Directions to Yosemite Falls
How long is the hike to Yosemite Falls?
Yosemite Falls has lower and upper falls. The base of the lower falls is challenging hike taking 1-2 hours round trip. Upper Yosemite falls is a strenuous hike that will take 6-8 hours round trip. Please, make sure to bring water and some snacks. Every year there are a few rescues on this trail from dehydration.
Curious about hiking Yosemite Falls? Check out this blog that covers everything you need to know about hiking Yosemite Falls.
Why should I visit Yosemite Falls?
Yosemite Falls is made of the upper fall, middle cascades, and lower fall, all dropping a total of 2,425 ft. (740 m), and is one of the tallest waterfalls in the United States. So, if you want to see the tallest waterfalls in the United States, you should add this to your To-Do list when visiting Yosemite. If you are feeling up for it, the steep climb is well rewarded with close-up views of Upper Yosemite Fall and distant views of Half Dome and other Sierra mountain peaks. Along the hike, enjoy a bird's eye view of Yosemite Valley's meadows and the meandering Merced River.
Check out Prints of Yosemite Falls
El Capitan
A global icon for rock climbers, El Capitan’s imposing granite face is both awe-inspiring and humbling. Rising over 3,000 feet above the valley floor, this monolithic cliff is a natural wonder that dominates the landscape. Even if you’re not a climber, standing at its base and observing its sheer scale is a surreal experience. For those interested in climbing culture, El Capitan Meadow offers an ideal spot to watch climbers as they make their way up the cliff. Visiting at sunset is particularly magical, as the rock face lights up in shades of gold and red.
How do I get to El Capitan?
How long is the hike to El Capitan?
The hike to the base of El Capitan is 30 minutes round trip. However, if you would like to hike to the top of the granite wall, expect to hike for 12-15 hours round trip if you are going via Yosemite Falls trail.
Why should I visit El Capitan?
Rising more than 3000 vertical feet from the floor of Yosemite Valley, El Capitan is sheer rock granite and a must see in Yosemite National Park. If that isn’t enough for you to add to your To Do list when visiting Yosemite National Park, the history and recent boom in rock climbing should. Not long ago, a movie was put out called Free Solo where Alex Honnold climbed the 3000 foot wall without a rope. To understand how crazy that is, walk to the base and look up, he climbed that.
Check out Prints of El Capitan
Mirror Lake
Mirror Lake offers a peaceful retreat with unique reflections of Yosemite’s famous cliffs, especially Half Dome. In the spring, the lake lives up to its name, providing a near-perfect mirror image of the granite monoliths around it. As the seasons change, the lake may dry up, transforming into a meadow, which presents a different but equally beautiful landscape. The hike to Mirror Lake is family-friendly and provides a chance to see Yosemite from a quieter, more serene angle, making it an ideal stop for those seeking tranquility amidst Yosemite’s grandeur.
How do I get to Mirror Lake?
How long is the hike to Mirror Lake?
The hike to Mirror Lake can take one hour if you stay on the paved path. However, most people take 2-3 hours as there are several side trails and viewing points that you will want to stop.
Why should I visit Mirror Lake?
With a fresh perspective looking up at Half Dome directly from its base, you'll be rewarded with views of Tenaya Canyon, Mount Watkins, Washington Column, and more. This reflective pool is a magical place to sit and ponder. I would suggest bringing a sack lunch and a journal to sit alone for a little TLC.
Check out Prints of Mirror Lake
Nevada Fall and Vernal Fall as seen from Glacier Point in Yosemite National Park. Photograph by Dalton Johnson
Little Yosemite Valley
Little Yosemite Valley offers a secluded escape and serves as a stepping stone for those venturing to Half Dome and other high-country trails. The valley is nestled along the Merced River, surrounded by towering granite cliffs and serene forests, creating a perfect setting for backpackers and hikers. Its campground is a popular base for those wanting to extend their Yosemite adventure into the wilderness, allowing for early morning starts on iconic hikes. Visiting Little Yosemite Valley offers a taste of the park’s backcountry beauty and the chance to experience Yosemite away from the main crowds.
How do I get to Little Yosemite Valley?
Directions to Little Yosemite Valley
How long is the hike to Little Yosemite Valley?
Many people overnight camp in Little Yosemite Valley, however if you want to day hike to Little Yosemite Valley, expect to spend 8-10 hours round trip. If you are feeling ambitious, check out Little Yosemite Valley during the winter!
Why should I visit Little Yosemite Valley?
Little Yosemite Valley is the most popular area in the Yosemite Wilderness, mainly because it provides easy access to Half Dome. If you plan to summit Half Dome, you will pass through here. If you are looking for a challenging hike with access to a swimmable river, Little Yosemite Valley is a great place to go. Since the Little Yosemite Valley hike takes you into the wilderness of Yosemite National Park, the crowds will be smaller. Often, you wont see many people unless a water fall is close.
Check out Prints of Little Yosemite Valley
Topping out the Nutcrack just before dark while rock climbing in Yosemite Valley. Photograph by Dalton Johnson
Rock Climbing in Yosemite Valley
If you can, try to plan a long weekend of climbing while you visit Yosemite Valley. If you don’t know how to climb, that isn’t a problem, there are several guide services who can and will take you rock climbing. So, make sure to add rock climbing to your To-Do list when you visit Yosemite Valley. Why? Yosemite Valley is the home of American rock climbing and is known for long routes and hard traditional climbing. However, the rock climbing in Yosemite is accessible to everyone. So, I put together a list of classic rock climbs that everyone should try in the 5.7 - 5.10 range.
The Surprise (5.10a)
Where is the rock climb Surprise located?
The Surprise is located on the Five Open Books
Why add the rock climb Surprise to your To Do list?
The rock climb The Surprise (5.10a) is a stellar first valley 10. Why? Well, if you are looking to break into the 5.10 climbing in Yosemite Valley as one of your “To-Do’s” while you visit, this crack is perfect because you get a few warm up pitches to get your head screwed on. Then, you Exciting to open the door to a new milestone for climbing. The finger crack was really fun and what a surprise, hence the route’s name The Surprise, it is when the crack just disappears for a hot second and you make a few moves across some slab to a jug.
Want to climb surprise, but still need more information? Here is a full write up on the climb with everything you need to know.
Rock climbing the last few pitches of The Nose (5.9 C2) on El Capitan in Yosemite Valley. Photograph by Dalton Johnson
The Nose (5.9 C2)
Where is the rock climb The Nose located?
The Nose is located on El Capitan
Why add the rock climb The Nose to your To Do list?
Let’s all be honest, if we are climbing in Yosemite Valley, there is one route we all wish to climb, The Nose. While the grade of the nose goes at 5.9 C2, most climbers see this climb as unattainable, but it isn’t. If you spend the time learning your systems, this granite monolith can be climbed!
Absolutely Free (5.9)
Where is the rock climb Absolutely Free located?
Absolutely Free is located at Camp 4
Why add the rock climb Absolutely Free to your To Do list?
The rock climb Absolutely Free (5.9) in Yosemite Valley is the quintessential adventure route for it’s grade. This gorgeous route definitely did me in on the route finding! Going WAY off route on the "first" pitch up a random gully, because I misread the topo like a dolt, forcing myself to down climb the 90 feet I had just climbed. Not to mention, my partner was like, "hey man, maybe the route is to the right?" so, I went up again, another 120 feet, only to turn around and get my fill of down climbing for breakfast. Yup, about 210 feet of up and down-climbing. On the bright side, all gear was saved!
How do you avoid this? We shouldn't have roped up at the first gully that goes to the right as the route went left through a grove of trees and meandered around for about 200 feet more to the base of the climb. I'm just shaking my head at myself right now.
However, once we got to the base of the first pitch we were ready for some bomber hands and Absolutely Free provided just that! A classic Yosemite adventure route with splitter hands and low-angled, finger lie-backing. Not only was the climb stellar, the view up valley staring at Half Dome and Royal Arches was phenomenal!
Bishops Terrace (5.8)
Where is the rock climb Bishops Terrace located?
Bishops Terrace is located on Church Bowl
Why add the rock climb Bishops Terrace to your To Do list?
Bishops Terrace is a classic climb in Yosemite Valley located in Church Bowl. Some times this climb has a long queue and sometimes you have this climb to yourself. Why is that? Well, this climb doesn’t have much else around that compares to the quality and grade, so all of the 5.8 classic climbers want to hop on Bishops Terrace. If you do come to climb Bishops Terrace, I suggest climbing it in one pitch instead of the two pitches the book says. Logistically, this climb will become much easier for you if you climb it in one go.
Nutcracker (5.7)
Where is the rock climb Nutcracker located?
Nutcrack is located on Manure Pile Buttress
Why add the rock climb Nutcracker to your To Do list?
In terms of classic climbs in Yosemite Valley, climbing Nutcracker, should be on your “To-Do” list. Why climb Nutcracker? The bulge pull. Yup! There is a rad bulge pull that is immediately intimidating upon arrival. However, once you step up to the overhead bulge, you find it has several weaknesses that will allow you pass. The Nutcracker is to be respected, meanwhile having a splendid time!
A bunch of goofballs enjoying to sumnmit of The Grack Center (5.6) while rock climbing in Yosemite Valley. Photograph by Dalton Johnson
The Grack Center (5.6)
Where is the rock climb The Grack Center located?
The Grack is located on Glacier Apron
Why add the rock climb The Grack Center to your To Do list?
In terms of wonderful first rock climbs in Yosemite Valley, climbing The Grack Center, might be the perfect answer. Why? The Grack Center has a grade of 5.6 and goes in three pitches, where the crux is a slab move that is relatively well protected. Additionally, the rappels are straight forward and well bolted. So, if you are looking to climb your first Yosemite multi-pitch rock climb, give The Grack Center a try. Personally, I have not had to wait in line for this climb, but I have heard stories of a long queue.
Waterfalls of Yosemite valley
While Yosemite National Park is forever linked to Half Dome, the massive granite monolith immortalized by landscape photographer Ansel Adams, it’s also home to many fabulous flowing waterfalls. Bridalveil and Yosemite Falls are two of the most famous Yosemite waterfalls, but here are several others you’ll want to check out when you visit Yosemite National Park. Plunging hundreds of feet into rivers and creeks below, the waterfalls at Yosemite National Park thunder past a smooth granite backdrop. Yosemite waterfalls are powered by melting snow and spring rains, so the flowing falls are at their prime in May. Most of the waterfalls at Yosemite are easily spotted from designated viewpoints or after a short walk along paved paths. While it’s difficult to see all of the waterfalls in Yosemite, these five falls are the most spectacular to add to your To-Do list while visiting Yosemite Valley:
Yosemite Falls
Directions to Yosemite Falls:
Click here for driving directions to Yosemite Falls
Fun Facts about Yosemite Falls:
Yosemite Falls can be seen throughout a large portion of Yosemite Valley including from the Yosemite Chapel, Yosemite Valley Lodge and even high above the valley from Glacier Point. One of the tallest in the world at a total of 2425 feet and the tallest in all of North America, it is actually made up of three separate drops:
Upper Yosemite Fall (1,430 feet)
Middle Cascades (675 feet)
Lower Yosemite Fall (320 feet)
Total Height of Yosemite Falls: 2,425 feet
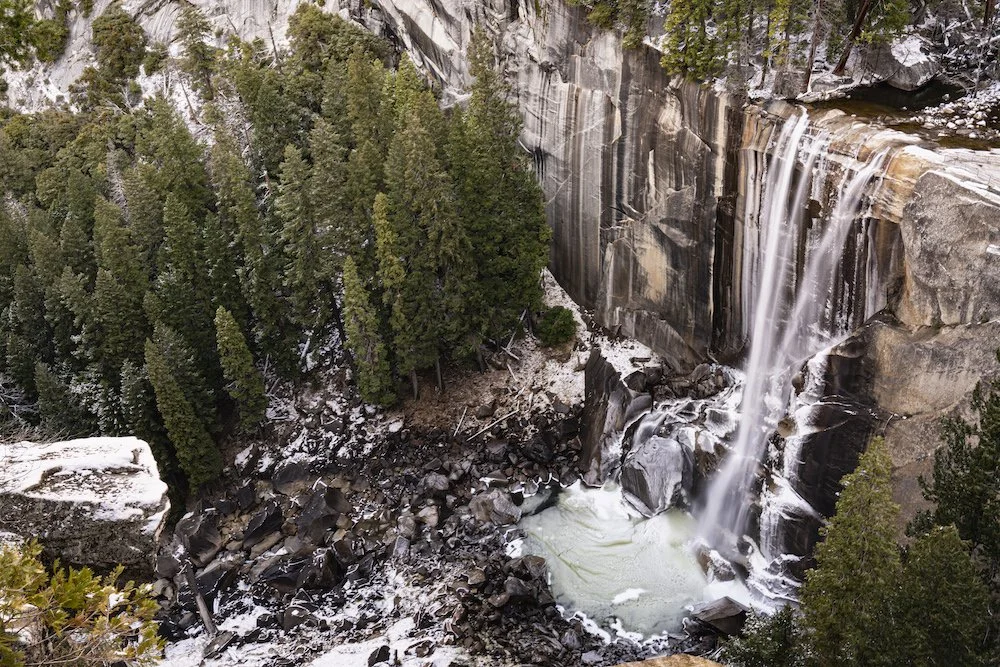
Vernal Fall cascading during the frozen months. Photograph by Dalton Johnson
Vernal Fall
Directions to Vernal Fall
Click here for driving directions to Vernal Fall
Fun Facts about vernal Fall
Just below the frothy Nevada fall is Vernal Fall. The first of the waterfalls in the legendary Mist Trail. Especially in the spring, you’ll truly understand why this hike is called the “Mist Trail.” In short, be sure to bring a raincoat even if it’s sunny. These two mighty waterfalls form a cascade in which the Merced River flows down into the valley and create what is called the “giant staircase.”
Total Height of Vernal Fall: 317 feet
Bridalveil Fall
Directions to Bridalveil Fall:
Click here for driving directions to Bridalveil Fall
Fun Facts about Bridalveil Fall:
As you enter Yosemite Valley from Tunnel View, one of the first falls you’ll see if Bridalveil. It should come as no surprise it's one of the most prominent within the granite walls of the valley. As the name describes it, when there’s a breeze flowing, the mist that wafts off it creates something that would be similar to a 'bride's veil' and thus the name Bridalveil.
Total Height of Bridalveil Fall: 620 feet
Horsetail Fall on El Capitan plummeting 1000 feet to Yosemite Valley floor during Fire Fall season. Photograph by Dalton Johnson
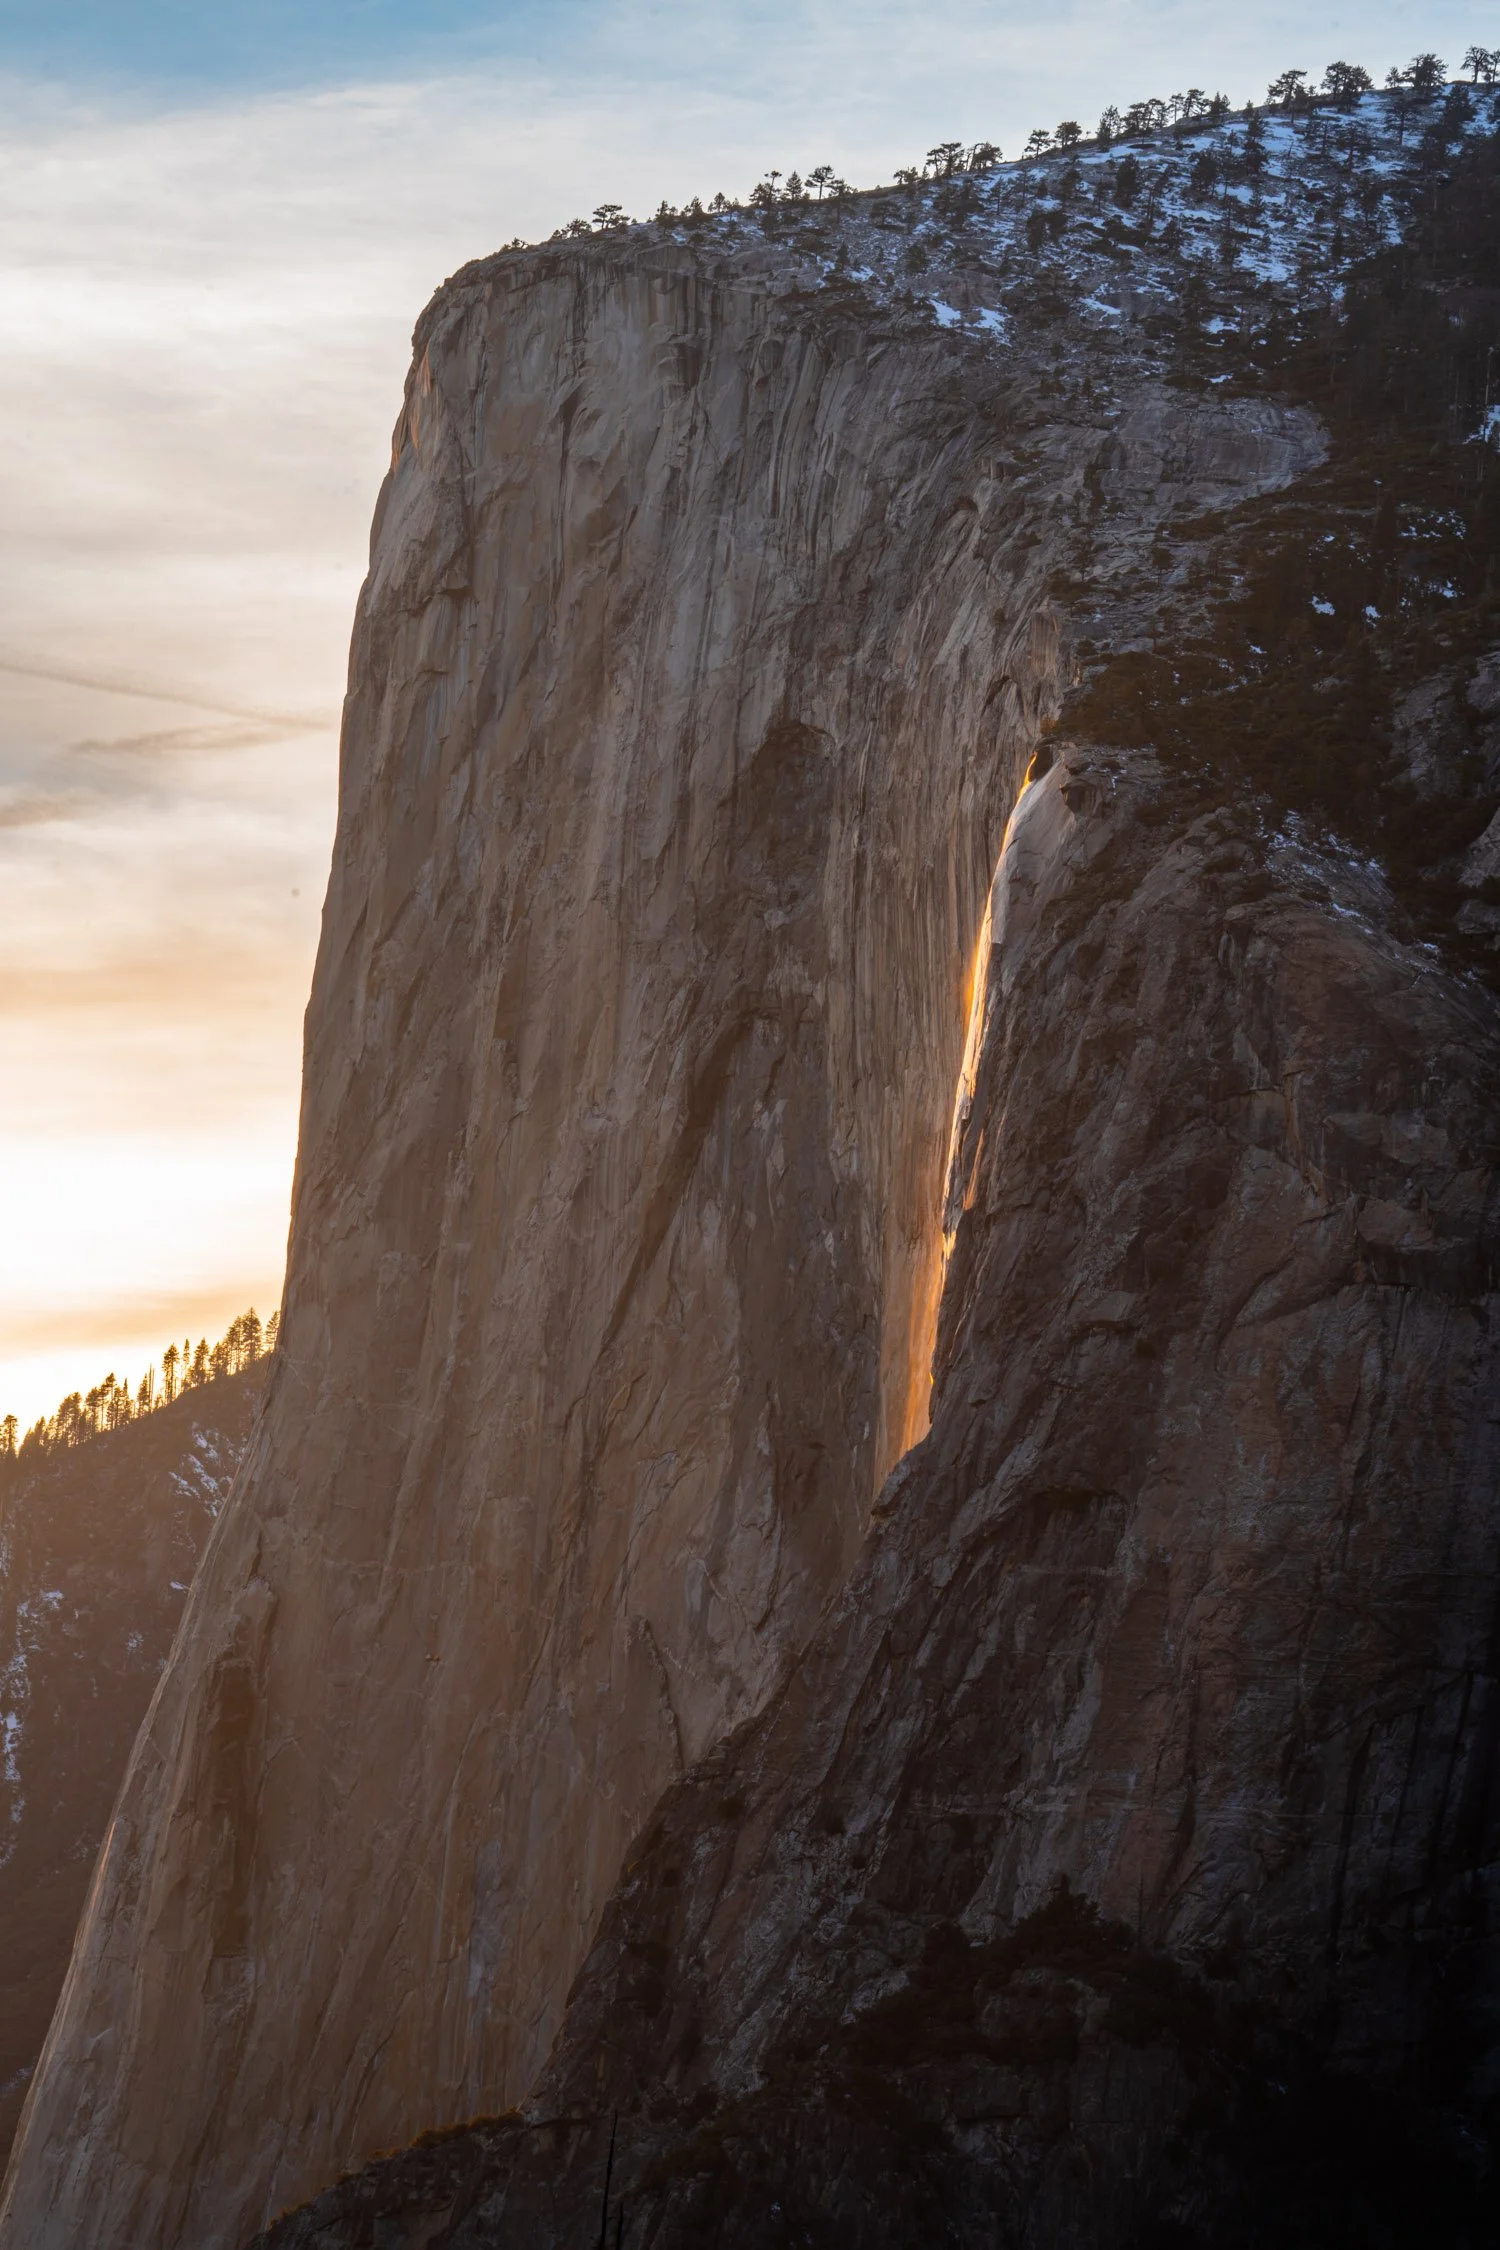
Horsetail Fall (aka fire fall)
Directions to Horsetail Fall:
Click here for driving directions to Horsetail Fall
Fun Facts about Horsetail Falls:
Horsetail Fall's claim to fame is the legend of the Horsetail Fall Event. It's a natural phenomenon that occurs typically in mid-February when all meteorological and hydrological formations align to create what looks like a ribbon of fire when the rays of the setting winter sun light up the water and mist first golden and then fiery red Horsetail Fall drops off the east side of El Capitan and was known in Ansel Adams's time as El Capitan Fall. Now, this event is called Fire Fall.
Total Height of Horsetail Fall: 1,000 Feet
Nevada Fall
Directions to Nevada Fall
Click here for driving directions to Nevada Fall
Fun Facts about Nevada Fall
The pinnacle of the Mist Trail, it is one part of what many call nature’s “giant staircase.” Located below the giant granite dome known as Liberty Cap, Nevada’s unique shape is one that will help you identify it quickly. The first third of the water falls freely finishing off on a steep slick-rock slope. The water hits the granite with such a force creating a turbulent, whitewater appearance and a great deal of mist... which led to its current name (Nevada is a Spanish word meaning "snowy").
Total Height of Nevada Fall: 594 feet

Hiking in Yosemite Valley
Yosemite Valley is home to some of the best hiking because you can access all of Yosemite National Park from Yosemite Valley. Hikes can range from a few minutes to weeks, the option is there for you. But, the variety of options makes selecting hikes difficult. So, I selected four of the best hikes of Yosemite Valley.
Yosemite Valley Loop Trail
If you want to hike the entirety of Yosemite Valley, this is your hike. Fully paved, the Valley Loop Trail was created to allow visitors a path to explore the entire valley by foot, or bike. While on this hike, you will find hidden gems along the Merced River, wildlife, and be able to soak in the gorgeous granite views Yosemite offers.
How long is the Valley Loop Trail?
21.1 miles
What is the elevation gain of the valley loop Trail?
1,335 feet
How long does it take to hike the valley loop trail?
7 hours and 23 minutes on average to walk
Nevada and Vernal Falls via Mist Trail
Hike to two breathtaking waterfalls, Vernal and Nevada Falls, along some of Yosemite Valley's most popular hiking trails. If you only have time for one hike while in Yosemite look no further - the Mist Trail is the hike for you. While you hike the Mist Trail, you will feel a cold breeze of mist from the waterfalls, making this of the most traveled hikes in Yosemite National Park. You may get wet from the mist, so make sure to bring a rain jacket. The best time to hike this trail is in Spring or early Summer, while the snow runoff is high and the falls are full of water.
How long is the Mist Trail?
6.0 miles
What is the elevation gain of the Mist Trail?
2,162 feet
How long does it take to hike the Mist Trail?
4 hours on average to walk
Panorama Trail
For those who are motivated for a full-day of hiking there’s arguably not a better trail to showcase the park’s natural treasures. There are several ways to enjoy this trail. For a moderate hike, start at Glacier Point and hike down to the Valley Floor. For a personal challenge, hike the Panorama trail from the Yosemite Valley floor out and back for a total of 18 miles, often taking all day. Regardless of how you hike this trail, the panoramic views of Yosemite Valley give the Panorama Trail its namesake.
How long is the Panorama Trail?
9 miles (one way) | 18 miles (out and back)
What is the elevation gain of the Panorama Trail?
2,257 feet
How long does it take to hike the Panorama Trail?
5-6 hours (one way), or 12-13 hours (out and back), on average to hike
Half Dome via John Muir Trail
Half Dome is a serious endurance hike taking you 4800 feet above the Yosemite Valley to spectacular views of Vernal and Nevada Falls, Liberty Cap, the Yosemite Valley, and the High Sierra. This is one of Yosemite National Park’s most iconic hikes and draws a serious crowd. Because of these crowds, you must obtain a permit to hike to the summit of Half Dome via the cable route.
How long is the Half Dome hike?
15 miles
What is the elevation gain of the Half Dome hike?
5,193 feet
How long does it take to hike the Half Dome hike?
10-11 hours on average to hike

Good Spots to Hang with Friends in Yosemite Valley
When visiting Yosemite Valley, there is often a desire to try to see everything; I’ll be frank with you, you just can’t see it all in a single trip. Yosemite Valley is special because of this fact, drawing us back time and time again. The view never get old. In fact, the views of Yosemite are like a fine wine, getting better with age. As you plan your visit to Yosemite Valley, make sure to add in some time to just sit and observe. Try not to run around from dusk till dawn, so you can hang with friends and appreciate the gorgeous views Yosemite Valley has to offer. My suggestions on place to hang with friends are Glacier Point, the Merced River Bank, and the El Capitan Meadow.
Glacier Point
Why is Glacier Point a good place to hang with friends?
Glacier Point is a fantastic place to hang with friends because there are fewer people in the area with several places to kick back and enjoy. Additionally, Glacier Point offers several locations with 360 degree views to see the magnificent Yosemite Valley from above. These views often leave me speechless.
Merced River Bank
Why is Merced River Bank a good place to hang with friends?
The Merced River winds through the entire Yosemite Valley, acting as the center piece. During the summer, you can find several people swimming, jumping off bridges, and enjoying a picnic on any of the many beaches along the Merced River. It is here, along the Merced River Bank, that I have had some of my favorite conversations and most relaxing times in Yosemite Valley. Make sure you bring a towel… just in case you feel the urge to take a dip.
El Capitan Meadow
Why is El Capitan Meadow a good place to hang with friends?
For climbers and tourists alike, the El Capitan Meadow can feel like the center of the universe while visiting Yosemite Valley. This large green meadow is a place where you can escape the crowds gawking at the rock climbers on El Cap or join them. Often you will find rock climbers sitting with binoculars looking up at the massive granite wall and pointing out their friends. Many other climbers will come here just to relax and soak up the sun on a rest day. Tourist are very welcome in the meadow as well because it is here that you can learn all about rock climbing in Yosemite Valley. Additionally, this is the best picnic spot in all of Yosemite Valley.
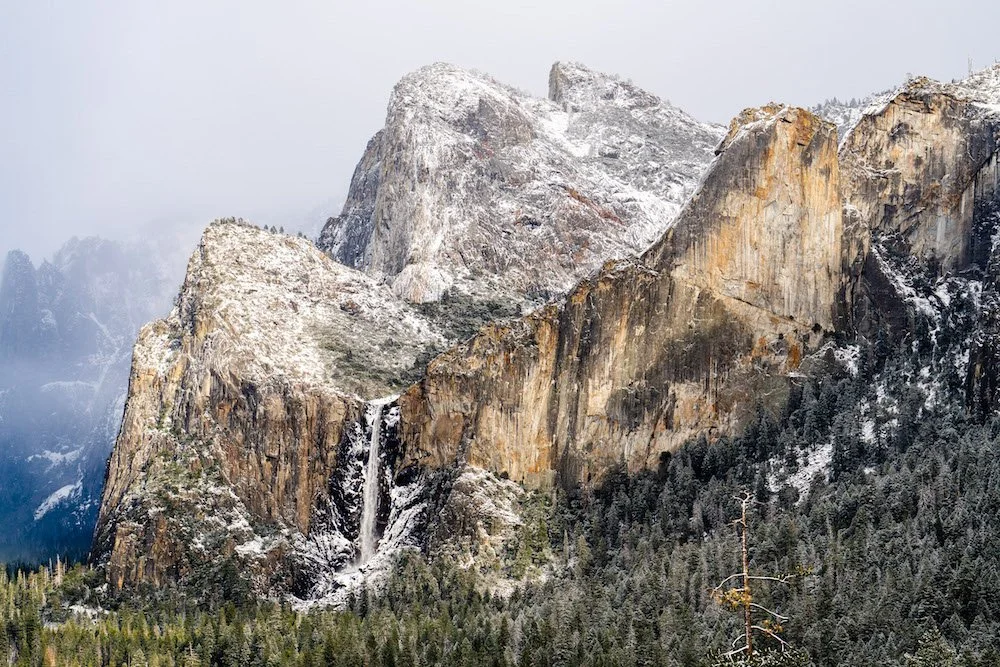
A very snowy Bridalveil Fall as seen just after a winter storm in Yosemite Valley from Tunnel View. Photograph by Dalton Johnson
Now that you have discovered the best views Yosemite Valley has to offer, where to day hike, places to hang with friends, and how to safely explore all of the waterfalls, it is your turn to get outside and explore Yosemite Valley. If this article helped you, or you wish to add some information that would be helpful to other adventurers exploring Yosemite Valley, please leave a comment below.
Discover More of Yosemite National Park

2025 Photography Guide to Firefall in Yosemite
Capturing the mesmerizing Yosemite Firefall in 2024 is a photography dream come true as the lava-like waterfall glows in the sunset light. However, to make the most of this incredible experience, it's crucial to be prepared. If you have never been to Yosemite Valley in the winter, planning is going to be key as weather changes quickly, sometimes permits are required, and knowing where to point your camera can always be overwhelming in this awe-inspiring landscape.
Capturing the mesmerizing Yosemite Firefall in 2025 is a photography dream come true as the lava-like waterfall glows in the sunset light. However, to make the most of this incredible experience, it's crucial to be prepared. If you have never been to Yosemite Valley in the winter, planning is going to be key as weather changes quickly, sometimes permits are required, and knowing where to point your camera can always be overwhelming in this awe-inspiring landscape.
Here are some essential tips to ensure you have a successful and memorable photography adventure:
Firefalls pourig over the east ledges of El Capitan. Photo by Dalton Johnson
1. Reservations and Planning:
Check for the latest information on reservations. During peak weekends in February, reservations may be required to enter Yosemite National Park. It's wise to plan your visit well in advance, especially if you're considering a weekend excursion.
If permits are required, you can reserver your spot here: www.recreation.gov
2. Crowd Control and Viewing Locations:
Yosemite is implementing measures to control crowds and protect the environment. During the peak Firefall season (between February 10 and 27, 2025), Southside Drive will be closed to pedestrians. The recommended viewing location during this period is the El Capitan picnic area on Northside Drive, where one lane will be closed to vehicles to allow pedestrians to safely access the viewpoint.
To reach the viewing area, you have two options:
Walk the 1.5 miles from the Yosemite Falls parking lot, which is near the Yosemite Valley Lodge.
Take advantage of the free shuttle service from Yosemite Village or Curry Village, which covers the 5 to 6 miles to the viewing point. The shuttle provides a convenient and eco-friendly way to reach your destination.
3. Weather Preparedness:
Yosemite in February can be chilly, sometimes snowy, especially after sunset. Be sure to dress warmly in layers to stay comfortable during your evening photography session. Be mindful of average February temperatures in Yosemite, which range from 28 to 53 degrees Fahrenheit. Preparedness is key to enjoying the experience to the fullest. Recommended clothing includes:
A scarf, or several hoods
Ensure your footwear is suitable for potentially icy or wet conditions, as you may encounter snow or moisture on the ground, like the Columbia Landroamer boot
Also, don't forget to bring a flashlight or headlamp as Firefall occurs at sunset and it will be dark after viewing. So, when you walk back to your car, 1.5 miles, it will be in low light or in the dark.


4. Equipment and Camera Settings:
Photographing Firefall in Yosemite National Park might seem like a straight forward landscape photography outing, but it isn't. There are a few tools and tricks that are important to bringing along on this photoshoot. Some you already know, but some pieces of gear you would not expect:
A sturdy tripod is essential for capturing long-exposure shots during low-light conditions
A wide-angle lens is ideal for capturing the expansive beauty of the Firefall and its surroundings, but this is not my go to lens while shooting Firefall
Bring an ultra-zoom lens, my favorite is the Tamron 150-500mm, so you can frame the waterfall without all the distracting surroundings
Bring a circular polarizer, maybe a VND, so you can utilize a long exposure to smooth out the waterfall and get the lava flow look (make sure to order the correct size filter for your lens)
Familiarize yourself with your camera settings, including manual mode, so you can nail your shots in Yosemite National Park. Here are some of the best settings to use while shooting Firefalls:
ISO: 160-400
Aperture: f/2.8-4.0
Shutter speed: .5" to 1.5" (the slower the better, unless it is windy)
Some shot types to consider are: long exposure, pulled back to showcase crowd, use trees to frame waterfall
Lastly, consider using a remote shutter release or the camera's built-in timer (2-5 second delay) to minimize camera shake when taking long-exposure shots
5. Patience, Timing, and Exploring:
If it is your first time photographing Firefalls in Yosemite, make sure to bring your patience. If you are going to photograph in the popular spot, the experience will not be secluded, nor will it be void of humans, so make sure you play nice with others while photographing/viewing the falls.
If you are looking for a more secluded experience, consider hiking some of the nearby trails to elevate your view and change your perspective to capture a unique image without many people around. This may feel strange, but there is nothing better than exploring the splendors of Yosemite.
Regardless, of where you are, timing is going to be key. The best shots often happen in the moments just before the sun dips below the horizon, creating a warm, fiery glow on Horsetail Falls. Take multiple shots with varying exposures and compositions to ensure you capture the Firefall's full splendor.
Don't be afraid to experiment and get creative with your photography!
Firefall in Yosemite National Park from Taft Point. Photo by Dalton Johnson
By following these essential tips, you'll be well-prepared to capture the Yosemite Firefall in all its natural splendor. Remember that this experience is not just about photography; it's a chance to connect with the beauty of Yosemite National Park and witness one of nature's most remarkable spectacles.
Discover more of Yosemite valley

Northern Lights Over Lake Tahoe
My phone binged with an alert from Aurora, an app I had downloaded when I started chasing the Northern Lights in 2023. The message read, “Do to high aurora activity, it might possible to see the aurora in your location right now.” However, since it was 2 pm in the afternoon and the skies were cloudy I knew it wasn’t going to happen, but the alert made me ask the questions; If I could see the aurora tonight in Lake Tahoe, CA where would I want to see it? Could I photograph it?
I got thinking…
Best Places to See The Northern Lights In Lake Tahoe
The Northern Lights, also known as aurora borealis, will be in the northern part of the sky. While that sounds intuitive, it did take me longer than it should have to notice. So, as I jumped off the rock at Bonsai Beach along the eastern shore of Lake Tahoe I brain-stormed the ideal locations in Lake Tahoe that would face north, but also be a good spot for photography. This is what I came up with:
Donner Summit (not Lake Tahoe, but still a good spot)
D.L. Bliss
Pope Beach
Camp Richard
Fallen Leaf Lake Overlook
As I scrolled through the Aurora app to see when the KP index would peak for ideal viewing and photography, I started to narrow down my decision on where to go. Honestly, it was easy for me; Emerald Bay. This area is the most visited area, which can be a challenge, but it is also a stunning location because of Fannette Island and the shape of the bay. Now, I just needed to pack my gear, wait a few hours, and head to the bay.
Gear I packed to Photograph the Northern Lights In Lake Tahoe
Camera gear can become cumbersome, so I wanted to keep things simple, especially if Emerald Bay was going to be busy. My guess, it was going to be! With that said, I knew the low light was going to be an issue, so selecting my camera body I made a decision I typically would not when shooting landscape photography. The gear I went with was:
Sony A7s3: with the dual ISO I knew I could crank it to 12,800 and maintain image quality
Tamron 17-28 f/2.8: this lens has been my go to for all landscape photography
Peak Design Tripod: I really like this tripod because of the ball swivel head, making it easy to level the camera without having to move the legs around all that much
A headlamp: the northern lights happen in the dark, so this was a must
With the gear loaded up in my van, I needed to wait a little while so I could head out, but soon enough I would be snapping images of the Northern Lights over Emerald Bay in Lake Tahoe, CA.
Getting the Shot: Northern Lights Over Emerald Bay
From my past experiences photographing the Northern Lights in Canada and Norway, I’ve found the best time to see the aurora are between 10pm and 2am. While this general rule of thumb doesn’t always work, so keep an eye on the KP index radar, I use it as a guideline. So, I ate a little bit of dinner and asked my girlfriend if she wanted to join. “Of course!” she proclaimed.
“Ready in 20 minutes?” I asked
“Yup!”
We ate some food and hoped into the van around 9:15pm, leaving our home in South Lake Tahoe driving along Emerald Bay Highway. Keeping an eye out the window for signs of activity, the towering evergreens blocked our view, so we kept driving. The song, Astrovan, blasted throughout the speakers as we wound up the west shore of Lake Tahoe. Cars driving in all direction, not normal for this area, was certainly because of the potential aurora. As we drove out the trees, gaining a clear view of the sky, we pulled over, just to take a look.
Pulling out our phones, we snapped some hand held long exposures just to see if the camera could pick anything up. While we couldn’t see anything with the naked eye, we could see a slight pink in the images our phones captured.
“Oh, this could be good, we should head to Emerald Bay.”
“Yeah, let’s go.” Kristin confirmed.
Loading back into the van we made our way to the bay and attempted to find parking. The place was crowded. Cars parked along the road, people walking along the road without a shoulder, it was a bit scary driving the van. The good news, my favorite pull out had plenty of room to squeeze the van along the shoulder and out of the fog line. I pulled in my mirrors and grabbed the camera gear.
Walking a hundred yards, I set up my camera next to a few older photographers sharing stories and drinking beer. Their stories kept me entertained as I got my camera together in the dark.
10 pm came and went, but as 10:30 rolled around, a red column of Northern Lights began reaching towards the sky.
Dialing in my focus, changing my settings around a little bit, I snapped. Not good enough. A few more tweaks to the settings and I snapped again. That one looks good, I said to myself.
Northern Lights over Emerald Bay. Photo by Dalton Johnson
As quickly as the red column came, it faded away. Kristin and I sat around for another 30 minutes hoping something would happen, but the KP index was fading and the radar was showing the Northern Lights were moving away from Lake Tahoe. So, we packed up and headed home, back to a warm cup of tea, a quick edit, and sleep.
Discover more Adventures
Jimmy Chin and Jim Morrison Return to Everest to Ski the Hornbein Couloir
In a bold and emotionally charged endeavor, renowned American ski mountaineer Jim Morrison, along with acclaimed filmmaker Jimmy Chin, is set to tackle one of the most challenging ski descents on Mount Everest: the Hornbein Couloir. This ambitious project, part of a multi-million dollar initiative funded by the National Geographic Society and The North Face, aims to pay tribute to Morrison’s late partner, Hilaree Nelson, who tragically died attempting a similar feat on Mount Manaslu in 2022.
In a bold and emotionally charged endeavor, renowned American ski mountaineer Jim Morrison, along with acclaimed filmmaker Jimmy Chin, is set to tackle one of the most challenging ski descents on Mount Everest: the Hornbein Couloir. This ambitious project, part of a multi-million dollar initiative funded by the National Geographic Society and The North Face, aims to pay tribute to Morrison’s late partner, Hilaree Nelson, who tragically died attempting a similar feat on Mount Manaslu in 2022.
Wikipedia
An Emotional and High-Stakes Project
The Hornbein Couloir, a notoriously difficult route named after Thomas Hornbein of the 1963 US Everest Expedition, will be the focus of this high-profile ski descent. The project is being closely monitored by the climbing community and adventure enthusiasts worldwide, with significant resources invested in ensuring its success.
Jimmy Chin, the Academy Award-winning director known for his work on Free Solo and The Rescue, is slated to film the descent under the National Geographic Society and The North Face's multi-million dollar project. "ABC is set up and the fixing team will soon head for the Hornbein Couloir route to fix the Camp I," sources confirmed. This extensive preparation highlights the complexities and risks involved in the descent.
Tribute to Hilaree Nelson
The endeavor is a heartfelt tribute to Hilaree Nelson, a celebrated extreme skier who, along with Morrison, made the first ski descent of Lhotse in 2021. Nelson’s tragic death while attempting to ski down from the summit of Mt Manaslu in 2022 cast a shadow over the climbing community. Morrison’s return to Everest, therefore, carries a deep personal significance, honoring Nelson’s legacy and the profound impact she had on the world of ski mountaineering.


Project Challenges and Preparations
The Everest Ski Project faced significant hurdles last year when Chinese authorities refused to issue necessary permits for the expedition. Despite these setbacks, Jimmy Chin's persistent lobbying with Chinese authorities has secured the Tibet entry permit for this season. However, the team still encountered obstacles, as Conrad Anker, the original expedition leader, was unable to join due to visa issues.
This season's team includes Morrison, Chin, and cinematographer Mark Fisher, who will be supported by a dedicated group of Sherpa climbers, including Mingma David Sherpa, co-owner of Elite Exped/Sherpa Extremes Pvt Ltd. These climbers have already reached base camp in Tibet to assist with ground preparations. A few Chinese members are also expected to join the guiding team, underscoring the collaborative effort involved in this challenging project.
As the team gears up for the descent, the Everest Ski Project promises to be a remarkable and emotional journey. The combination of high-altitude skiing, a tribute to a beloved climber, and the dramatic backdrop of Everest ensures that this project will be closely watched by the climbing community and outdoor enthusiasts alike.
The success of this endeavor will not only honor Hilaree Nelson’s memory but also highlight the incredible feats that can be achieved in the world of extreme sports. As preparations continue, all eyes will be on Everest to see if Morrison, Chin, and their team can accomplish their daring goal.
Discover more Adventures
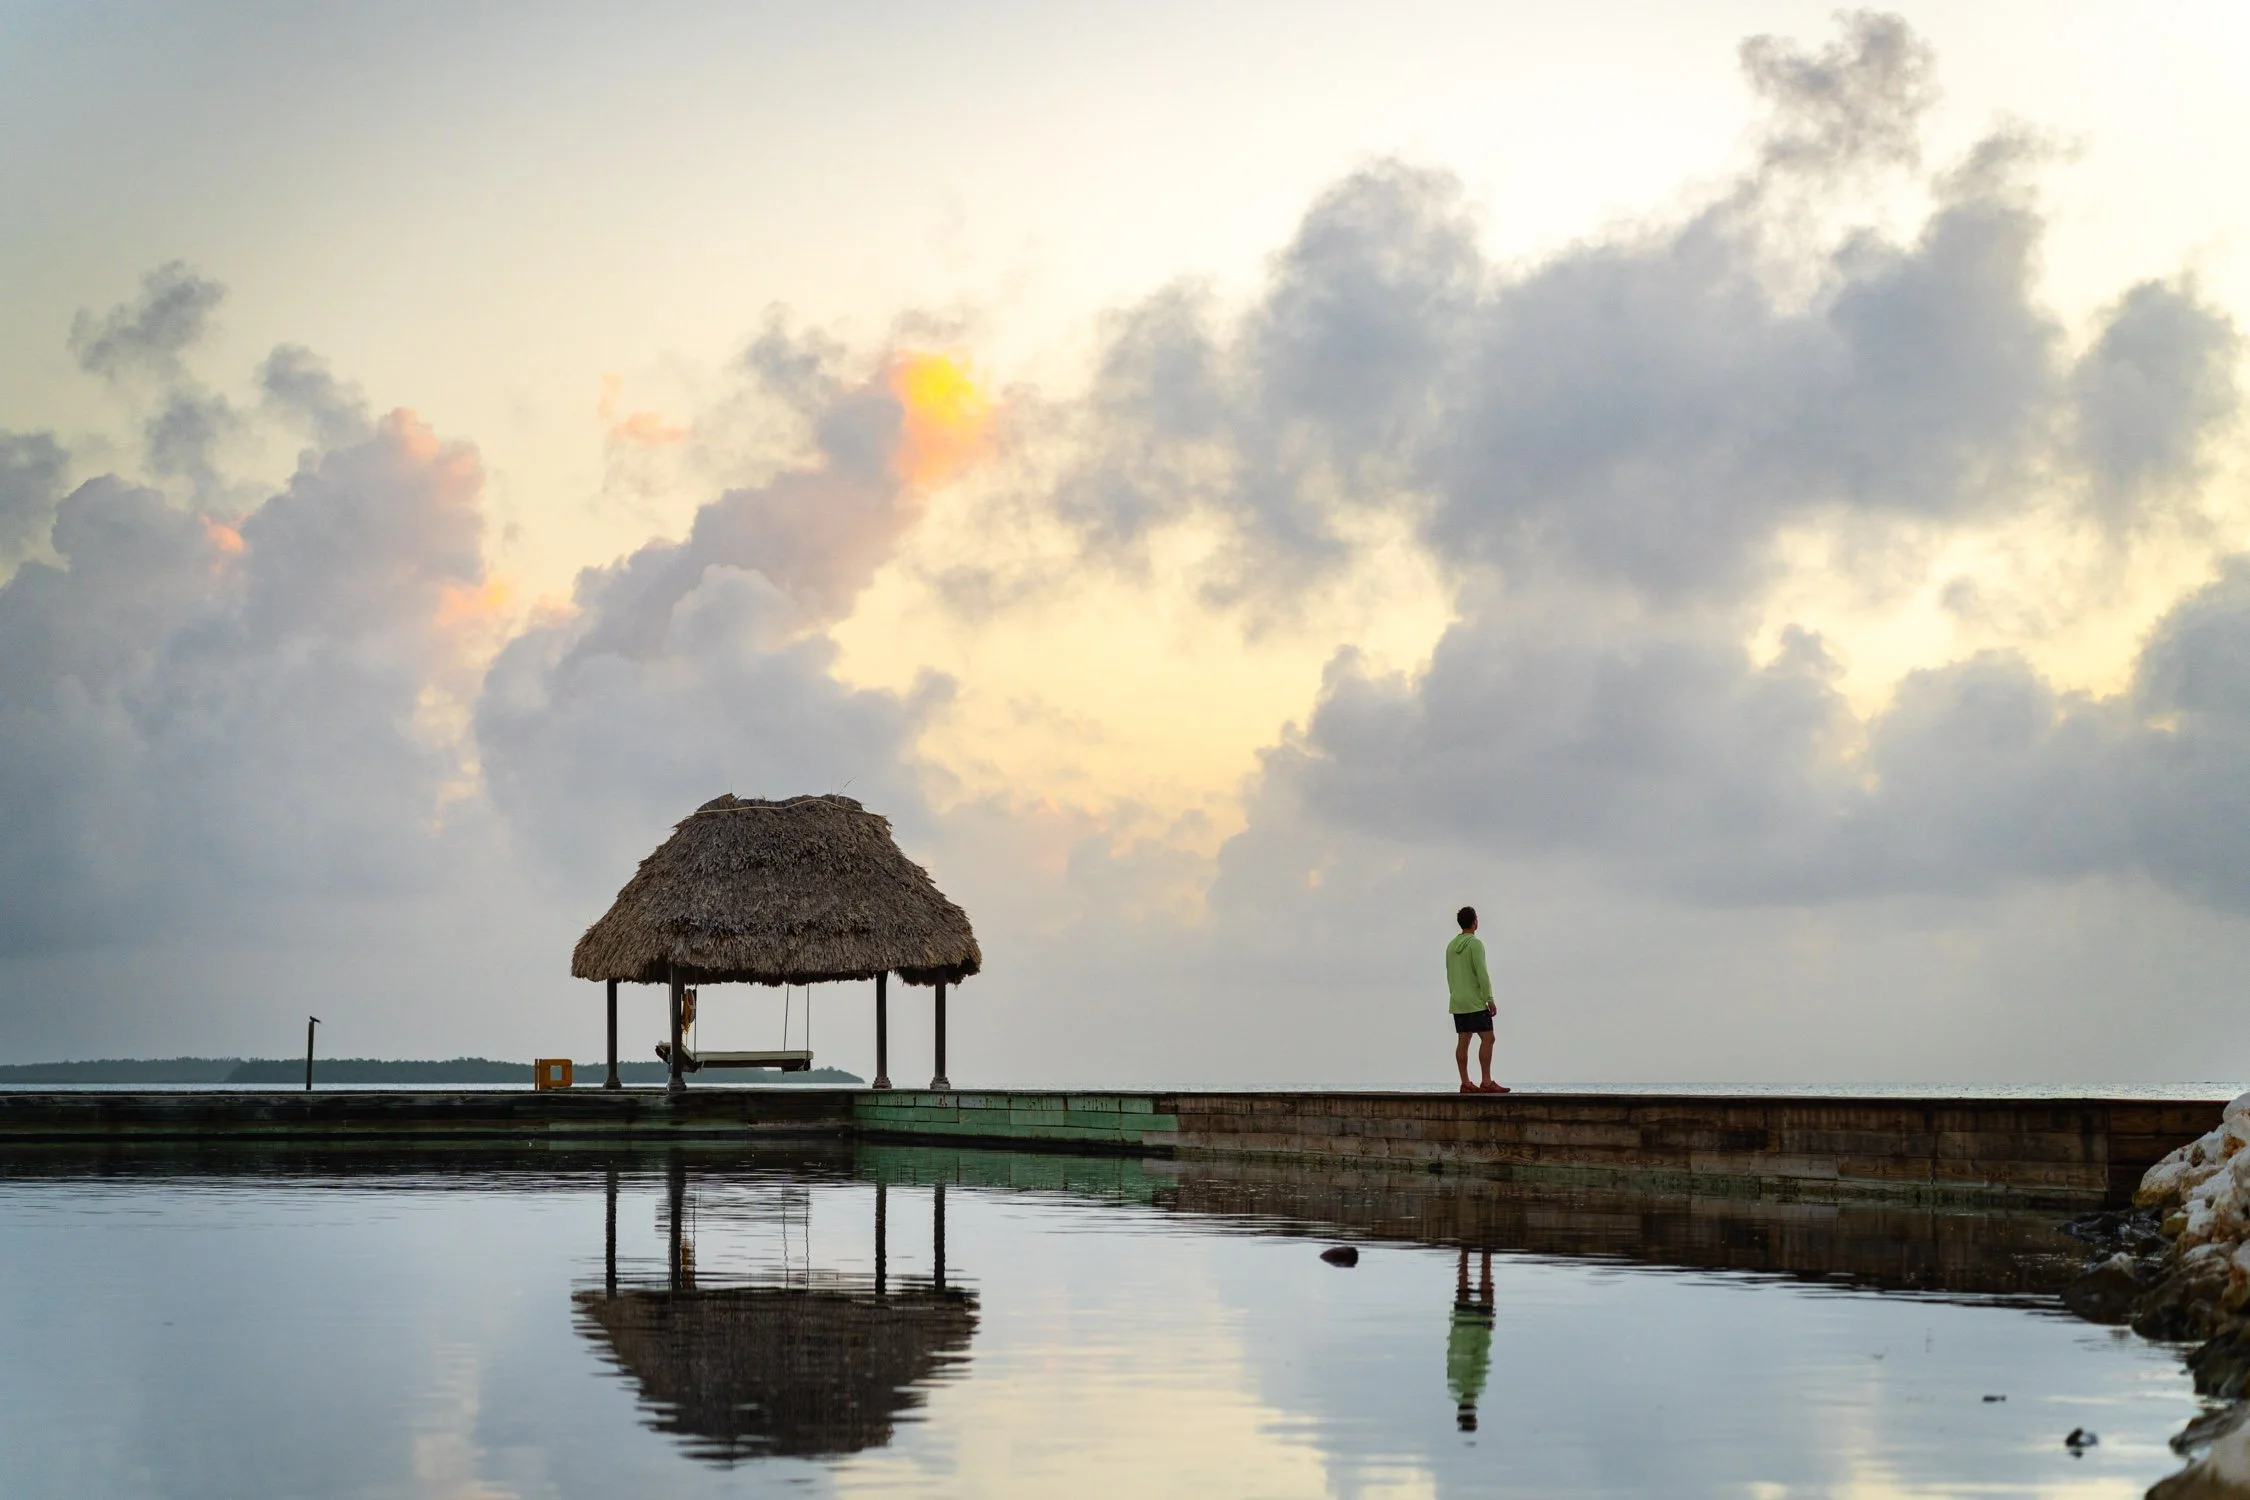
Four Tips to Becoming a Full-Time Traveler
Are you tired of the 9-to-5 grind, yearning for adventure and the freedom to explore the world on your own terms? If the idea of becoming a full-time traveler is calling to you, you're not alone. More and more people are embracing the nomadic lifestyle, trading cubicles for sunsets, and routines for new horizons. While it may seem like a dream, it's entirely possible with the right approach. Here are four tips to help you on your journey to becoming a full-time traveler.
Are you tired of the 9-to-5 grind, yearning for adventure and the freedom to explore the world on your own terms? If the idea of becoming a full-time traveler is calling to you, you're not alone. More and more people are embracing the nomadic lifestyle, trading cubicles for sunsets, and routines for new horizons. While it may seem like a dream, it's entirely possible with the right approach. Here are four tips to help you on your journey to becoming a full-time traveler.

Enjoying the sunrise while in Belize, traveling and working full-time. Photo by Dalton Johnson
Pros
Freedom: You have the freedom to go wherever you want, whenever you want.
Adventure: Constantly exploring new places and cultures can be thrilling and enriching.
Learning: You'll learn a lot about different cultures, languages, and ways of life.
Flexibility: You can adapt your travel plans based on your interests and preferences.
Networking: Meeting new people from around the world can lead to valuable connections.
Personal Growth: Traveling can push you out of your comfort zone and help you grow as a person.
Memorable Experiences: You'll create unforgettable memories and experiences.
Minimalist Lifestyle: Living out of a backpack or suitcase can teach you to live with less.
Escape from Routine: You can avoid the monotony of everyday life and experience something new each day.
Inspiration: Traveling can inspire creativity and new ideas.
Cons
Financial Costs: Traveling full-time can be expensive, especially if you're not working while traveling.
Uncertainty: Plans can change quickly, leading to uncertainty and stress.
Healthcare: Accessing healthcare services can be more challenging while traveling long-term.
Language Barriers: Communicating in foreign languages may be difficult in some places.
Missing Home: Being away from family and friends for extended periods can be tough.
Safety Concerns: Some destinations may pose safety risks or have unstable political situations.
Work-Life Balance: Balancing work (if you're working remotely) and travel can be challenging.
Environmental Impact: Constant travel can have a significant environmental impact, contributing to carbon emissions.
Find Your Source of Income on the Road
The first and foremost challenge for becoming a full-time traveler is ensuring you have a sustainable source of income. Fortunately, there are various ways to make money while on the road, and your unique skills and passions can be the key to financial independence.
For many travelers, combining their love for photography and writing has proven to be a successful income source. Whether you're a talented photographer or a skilled wordsmith, these creative skills can open doors to opportunities. Consider freelancing as a travel photographer or travel writer, selling your photographs to stock photo websites, or even starting your own blog or vlog to document your adventures and generate income through advertising and sponsorships.
However, it's essential to keep in mind that the journey to financial stability may take time. Be prepared for fluctuations in your income and, during the initial stages, have a backup plan in case things don't go as expected. Also, having some savings before embarking on your full-time travel adventure can provide you with a safety net while you establish your income streams.
Travel Smart: Short Distances and Inexpensive Routes
Traveling full-time does not mean breaking the bank. In fact, the key to sustaining a nomadic lifestyle is to be frugal and resourceful. Opt for short distances and less expensive destinations to manage your finances wisely. This approach allows you to make your travel funds last longer, and you can enjoy more extended adventures without draining your resources.
By traveling shorter distances, you can reduce transportation costs and minimize the wear and tear on your travel gear. Explore budget-friendly countries, regions, or off-the-beaten-path destinations, where the cost of living is lower. Also, consider alternative modes of transportation, like buses or trains, which can be more economical than flying.
Moreover, embrace the concept of slow travel, which involves staying in one place for a more extended period. This not only helps you save money but also allows you to immerse yourself in the local culture, connect with people, and build meaningful experiences.


Build a Network of Clients and Connections
To sustain a full-time traveler lifestyle, it's essential to have a network of clients and connections who appreciate your work and can provide you with opportunities on the road. Networking is crucial for freelancers and entrepreneurs, and building relationships can lead to a steady stream of income and new experiences.
Maintain a professional online presence through websites, social media platforms, and freelance platforms. Showcase your work and engage with potential clients and fellow travelers. Always be on the lookout for new opportunities and collaborations that can help fund your travels. Many travelers find success by reaching out to local businesses or travel agencies in the destinations they visit, offering their services as photographers, writers, or content creators.
Regularly update your network about your travel plans, as clients or collaborators may want to take advantage of your presence in a specific location. Be reliable, deliver quality work, and build a reputation as a professional in your field to ensure repeat business and referrals.
Have a Rig to Live Out Of
As you embark on your journey to become a full-time traveler, having a comfortable rig to live out of is essential. The rig you choose will largely depend on your budget, personal preferences, and travel style. Some travelers start with a simple setup, while others opt for more luxurious accommodations.
If you're starting on a budget, consider a setup like a backpack, a tent, or even a bicycle (that is where I started). These options can be highly cost-effective, allowing you to save on accommodation and transportation expenses. As you gain experience and more income, you can upgrade to a campervan aka van life, a small RV, or even invest in a sailing vessel for a more comfortable and versatile traveling experience.
No matter the rig you choose, make sure it aligns with your comfort and safety needs. Prioritize storage space, basic amenities, and a reliable mode of transportation if you're planning to move frequently. Ultimately, your rig should enable you to live comfortably while you explore new horizons.
Enjoying the sunset vibes while on a sailboat during a photo and writing assignment. Photo by Dalton Johnson
Becoming a full-time traveler is an exciting endeavor that requires careful planning and dedication. By finding a source of income on the road, traveling smartly, building a network of clients and connections, and selecting an appropriate rig, you can transform your dream of full-time travel into a reality. The world is full of wonders waiting to be explored, and with the right approach, you can embark on a life of adventure and discovery while maintaining financial stability.
Discover more Adventures

Lonely Planet's Best in Travel is Back
Lonely Planet's Best in Travel is back and better than ever, making a triumphant return after a one-year hiatus to celebrate the 50th anniversary of this iconic travel brand. This annual bestseller is a must-have for wanderlust enthusiasts, providing a roadmap to the most exciting and captivating destinations around the globe. With 2024 just around the corner, this edition promises to be a source of inspiration and discovery for every type of traveler.
Lonely Planet's Best in Travel is back and better than ever, making a triumphant return after a one-year hiatus to celebrate the 50th anniversary of this iconic travel brand. This annual bestseller is a must-have for wanderlust enthusiasts, providing a roadmap to the most exciting and captivating destinations around the globe. With 2024 just around the corner, this edition promises to be a source of inspiration and discovery for every type of traveler.
Inside the pages of Lonely Planet's Best in Travel 2024, readers can expect to find a treasure trove of wanderlust-inducing content. The expert panel of judges has meticulously selected and ranked 50 destinations, divided into five distinct categories, each catering to different travel preferences.
The first list, "Top 10 Countries," showcases nations that are on the brink of becoming the next big thing in travel. Whether it's an emerging cultural hotspot or a natural wonder waiting to be explored, this list is your gateway to the world's most promising destinations.
For those seeking regional gems, the "Top 10 Regions" category highlights areas that often fly under the radar. These are the places where authenticity and adventure await, away from the tourist crowds.
If you're more of a city explorer, the "Top 10 Cities" list will guide you to urban destinations that are brimming with culture, history, and excitement. These cities offer a unique blend of tradition and modernity, making them perfect for urban adventurers.
Budget-conscious travelers will find the "Top 10 Best Value Destinations" indispensable, as it features destinations that offer an exceptional experience without breaking the bank.
In an era where sustainable travel is gaining importance, the "Top 10 Sustainable Travel Destinations" list highlights places that are taking significant steps to protect the environment and support responsible tourism.
But Lonely Planet's Best in Travel 2024 is more than just lists. Each destination profile is packed with timely reasons to visit in 2024, expertly curated itineraries to help you make the most of your trip, and practical advice to ensure a seamless travel experience. Furthermore, the stunning travel photography captures the essence of these 50 incredible locations, from the people and landscapes to the activities that make them truly exceptional.

With Lonely Planet's Best in Travel 2024 in hand, you'll be ready to embark on a year filled with remarkable adventures, unforgettable experiences, and the joy of exploring the world's best destinations. Whether you're an intrepid explorer, a culture enthusiast, a budget-savvy traveler, or an eco-conscious globetrotter, this book has something for everyone, making it an indispensable guide for planning your next great escape. Don't miss the chance to celebrate the 50th anniversary of Lonely Planet by discovering the world anew in 2024.
Discover More Gear

Q&A With Filmmaker of The Backyard Bears
Q: Why did you make The Backyard Bears?
A: I made The Backyard Bears simply because I love bears. Black bears are what kick started my love for documenting wildlife, and when I first saw a bear gorging himself with trash, consuming plastic and other waste that no creature should be trying to digest, I knew I needed to do something and help these bears find their way back to the wild. Documenting these problems and bringing them to the world through this film was the first step for me, and there’s much more coming!
Q: Where can people watch it?
A: The Backyard Bears is available for free to everyone on YouTube!
Q: What camera gear did you shoot on?
A: This film was entirely shot on the Sony A7iv, Sony FX3, and DJI drones. When filming wildlife it’s important to be light and to be able to keep up with the animals in the terrain that they live in. So keeping things light with compact Sony cameras was important!
Q: How long did it take for you to make the film?
A: I spent about 6 months documenting the bears for this specific project. In total it was probably 8 months from start to finish with pre production, editing etc.
Q: Any words of advice for aspiring videographers?
A: Advice is hard, as I still feel that I’m at the very beginning stages of this journey of mine as a wildlife filmmaker. But what I’d say for anyone looking into becoming a filmmaker or photographer, is find something that you are incredibly passionate about.
It took me a while to connect the dots and realize that combining my love for animals and my love for filmmaking was where I needed to be and where I belonged as a creative. Once I found this sweet spot, I knew this is exactly where I needed to be and what I needed to do for the rest of my life.
At that point you just have to do it, you can’t wait for a network or an organization to give you a check to make it happen, you have to do whatever you can to make it happen for yourself and show the world what you can do.
This documentary was entirely a passion project, to tell this important story that needed telling and an outlet for me to show what I can do as a wildlife filmmaker. Putting yourself out there and just doing it is the best thing you can do, in my opinion. This documentary has led to some amazing opportunities that I honestly never thought would come to me.
I can’t say much about these opportunities, now, but you can follow along on my journey to find out!
Discover more Adventures

These 6 Tips Will Help You See the Northern Lights This Year
The ethereal dance of the Northern Lights, also known as the Aurora Borealis, is a breathtaking natural phenomenon that captivates anyone fortunate enough to witness it. But, the Northern Lights are not the easiest light show to witness first-hand. If you're planning to chase this mesmerizing light display this year, we have you covered, here are six tips to enhance your chances of experiencing this celestial spectacle.
The ethereal dance of the Northern Lights, also known as the Aurora Borealis, is a breathtaking natural phenomenon that captivates anyone fortunate enough to witness it. But, the Northern Lights are not the easiest light show to witness first-hand. If you're planning to chase this mesmerizing light display this year, we have you covered, here are six tips to enhance your chances of experiencing this celestial spectacle.

The aurora glowing over a Sami home in Norway. Photo by Dalton Johnson
Choose the Right Time and Location:
Seeing the Northern Lights is heavily dependent on the time of year and your geographical location. The best times to witness this phenomenon are during the winter months, particularly from September to March when the nights are longest. Opt for locations situated within or near the Arctic Circle, such as Scandinavia, Canada, Alaska, and Iceland, where the lights are most active. One stand out location is Eleven's Deplar Farm in Iceland, where you can watch the Northern Lights from a soaking tub!
Monitor Solar Activity:
The intensity of the Northern Lights is linked to solar activity. Keep an eye on solar forecasts and sunspot activity to predict when the auroras will be at their most vibrant. Websites like the Space Weather Prediction Center provide real-time data on solar flares and geomagnetic storms, helping you plan your trip for optimal viewing conditions.
Stay Away from Light Pollution:
To fully appreciate the Northern Lights, it's crucial to escape light pollution from urban areas. Head to remote locations or designated dark sky areas where artificial lights are minimal. This not only enhances the visibility of the auroras but also allows you to enjoy the cosmic display in all its glory.
Be Patient and Plan for Multiple Nights:
Nature can be unpredictable, and seeing the Northern Lights is not guaranteed even in prime conditions. Plan for multiple nights at your chosen location to increase your chances of catching the auroras. Patience is key, as the lights may appear and disappear quickly, requiring vigilance and a bit of luck. I've found a great cup of coffee or tea is helpful to stay awake while waiting for the light show.
Pack Warm Clothing and Essential Gear:
Many Northern Lights destinations are in cold climates, so it's crucial to dress appropriately. Pack insulated layers, waterproof clothing, and sturdy footwear to stay warm and comfortable during long nights of star-gazing. Additionally, bring a tripod for your camera to capture stunning long-exposure shots of the auroras.
Capture the Moment:
If you're a photography enthusiast, equip yourself with a camera capable of capturing low-light conditions. Learn the basics of night photography, including long-exposure settings and manual focus, to capture the Northern Lights in all their glory. Be prepared to experiment with your camera settings to find the optimal configuration for the unique conditions of the auroras.
Northern Lights over the ocean in Norway. Photo by Dalton Johnson
Experiencing the Northern Lights can be a magical and unforgettable adventure. By choosing the right time and location, monitoring solar activity, avoiding light pollution, being patient, packing appropriately, and capturing the moment with your camera, you'll maximize your chances of witnessing this celestial dance in the night sky. Embrace the beauty of the auroras and create memories that will last a lifetime.
Discover more of The Night Sky
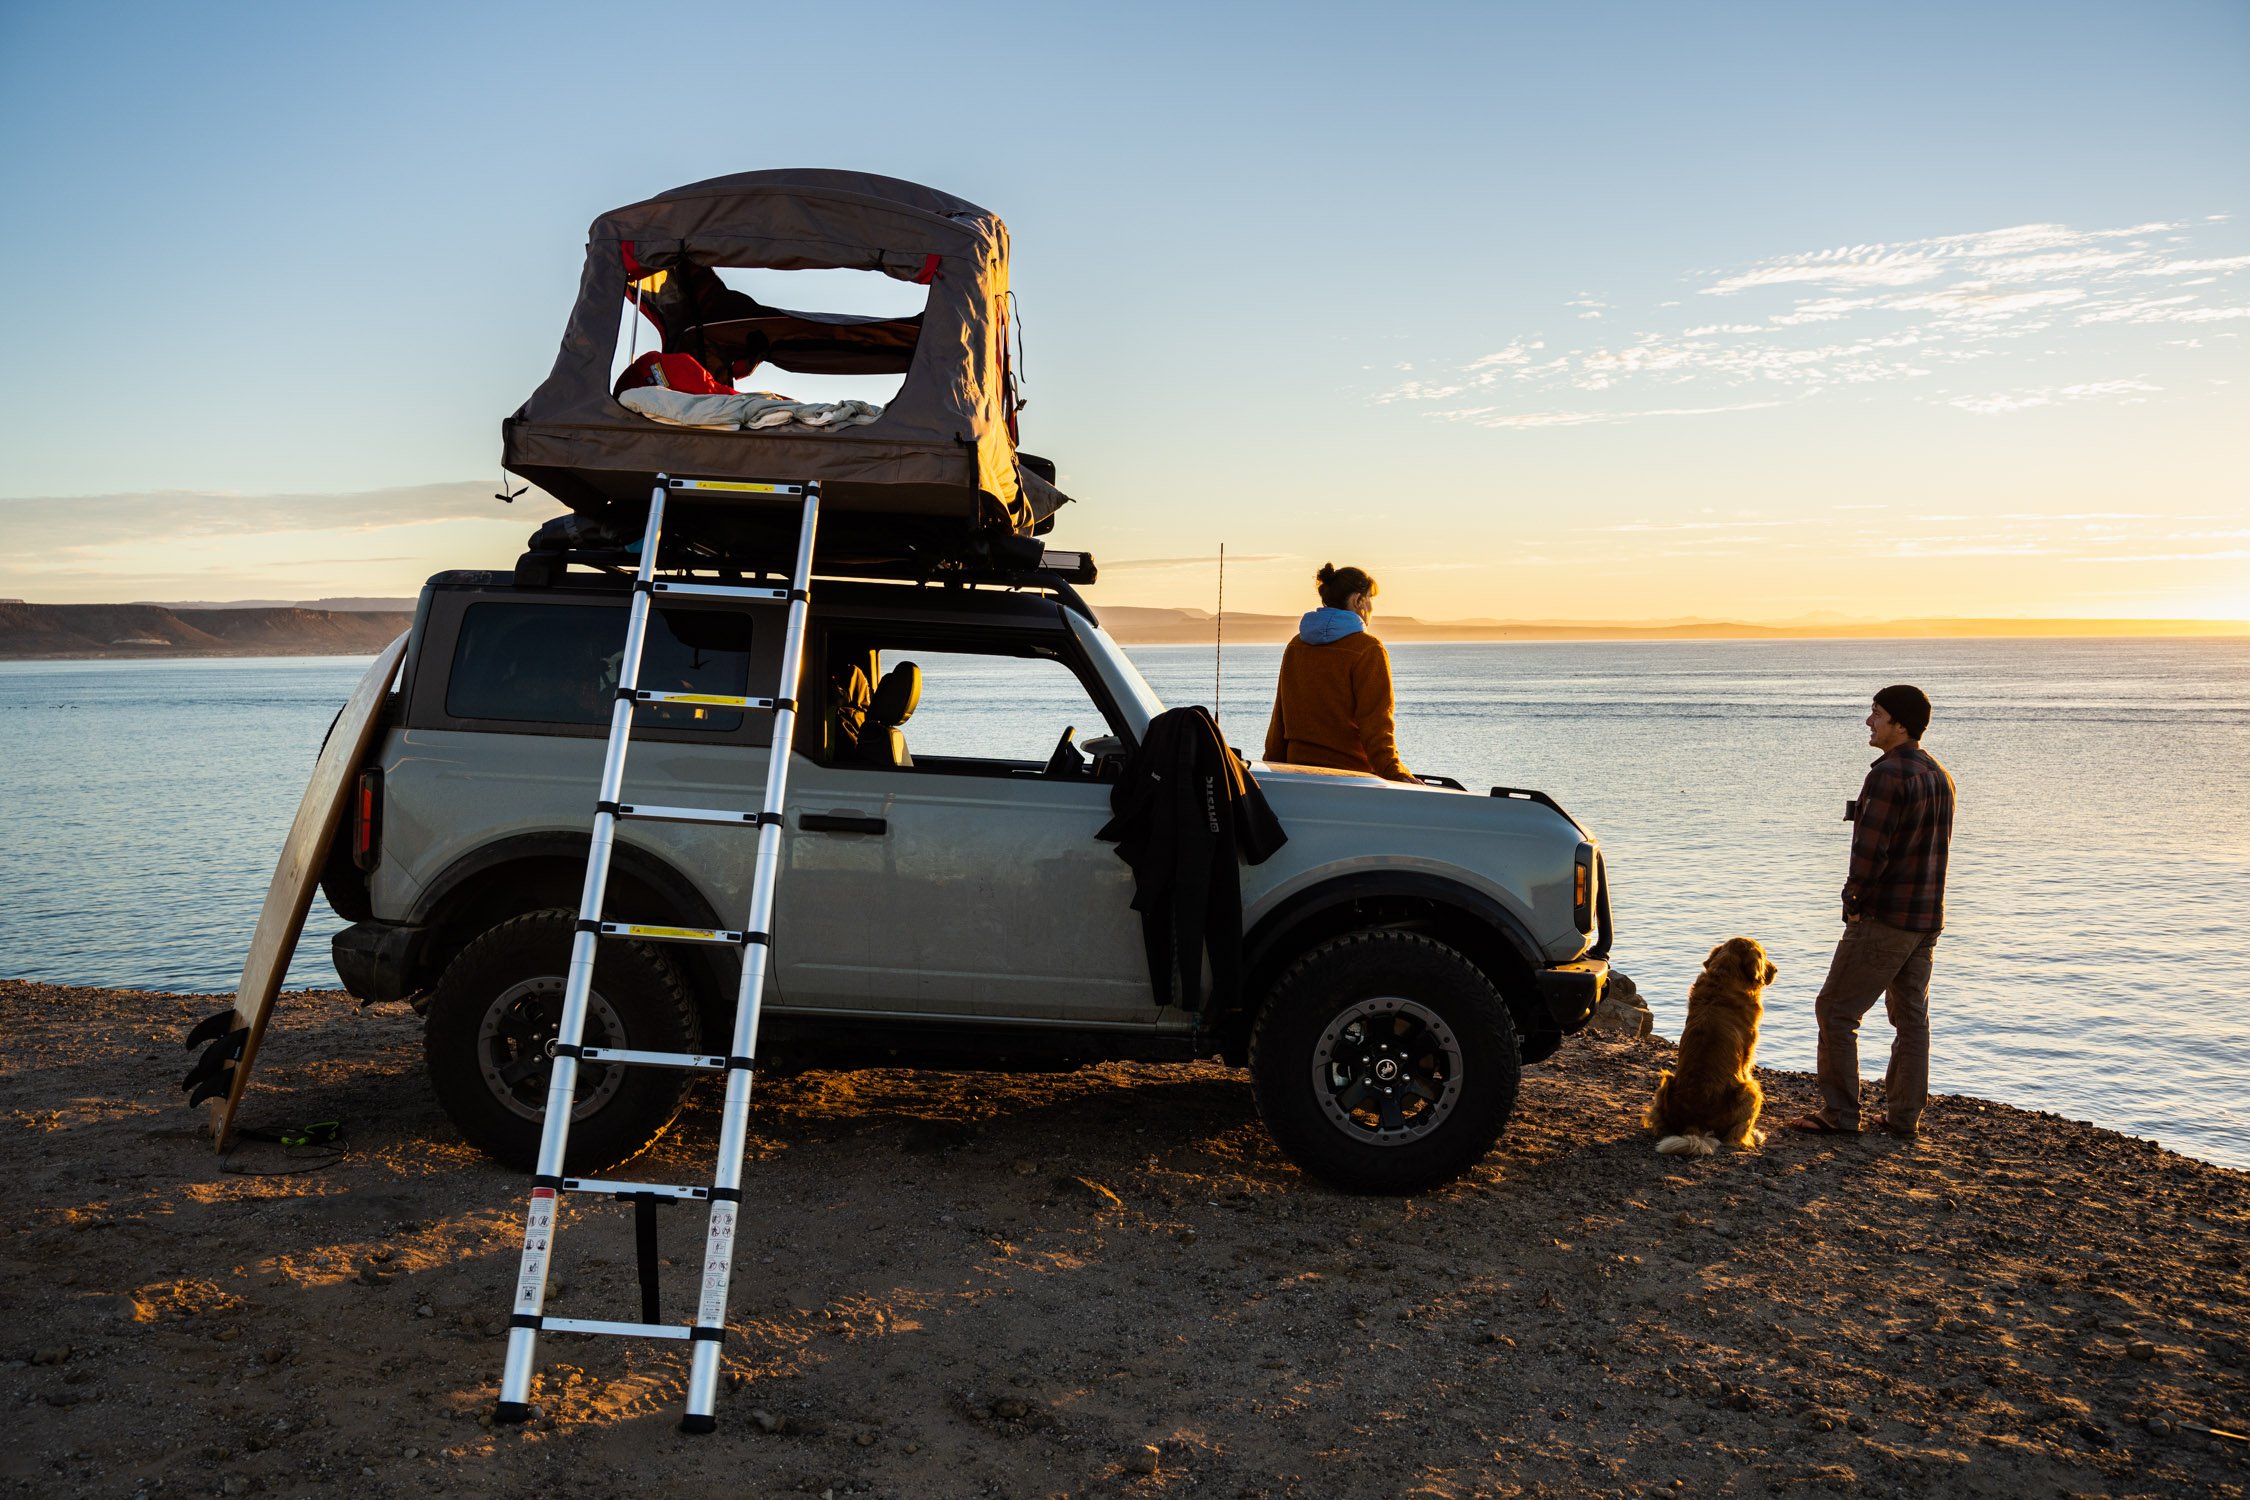
Beach Camping in Baja, Mexico for Ford
We had been in Baja, Mexico surfing and camping on the beach for the 9 days creating content for the Ford Bronco ambassador hype video. However, this morning was a bit different. We had no plans. As a group, we had been photographing and recording video every day for the bulk of each day in hopes of creating the best content we possibly could. But, we had some down days.
We had been in Baja, Mexico surfing and camping on the beach for the 9 days creating content for the Ford Bronco ambassador hype video. However, this morning was a bit different. We had no plans. As a group, we had been photographing and recording video every day for the bulk of each day in hopes of creating the best content we possibly could. But, we had some down days.
Ironically, when you are in a routine of creating content all day, every day, your camera never leaves your side. At least that is the case for myself. So, what do you think happened? Well, the Bronco was already in the perfect spot on the cliff and the coffee cups were steaming, so I left the conversation and started snapping away. Not much needed to change, liked the natural feel of the set. Heck, it was natural, which is why the beach camping vibes probably worked so well.
Jump forward ten months. I am sitting behind my computer going through my archive, specially looking at Baja, Mexico photographs to research and build a pitch deck for another project. Even though I have taken over 100,000 images since this morning on the beach, I still remember it… kinda. Being on shoots like this one, you get tired and a bit delirious. Your brain has been working so hard for so long, you honestly forget what you have shot. So, you keep shooting because you think you haven’t taken the image before. You’re deep in the flow state.
The morning was cool and crisp as a golden light broke the horizon line. I shuffled around quickly, directing Kristin and Andrew into position. A half step here, open your chest, and push your hand out a little bit more. Yes, images like this are staged, but just a little. We were actually there in Baja. We were actually camping on the beach. This wasn’t a set. We still had to cook our own breakfast and make our own coffee. It was like we were just friends, hanging out on the beach, ready to catch some waves.
The only difference, I had a camera to capture it.
Discover more Baja Adventures
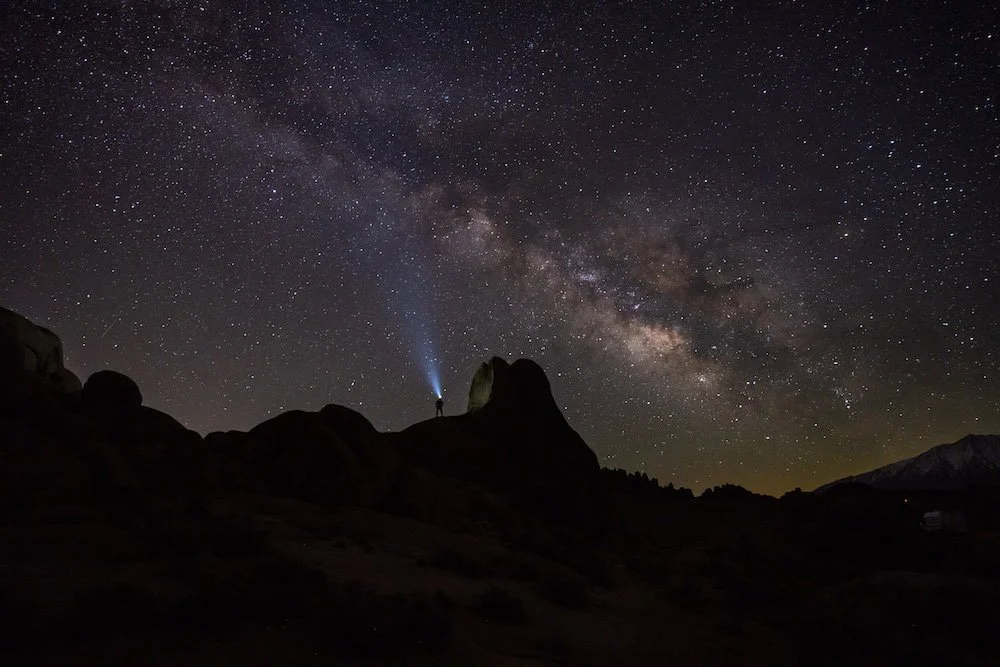
How To Photograph the Stars
Capturing the breathtaking beauty of the cosmos requires more than just pointing your camera at the night sky. Astrophotography is a captivating blend of science and art that demands the right equipment, meticulous preparation, and a keen understanding of camera settings and techniques.
Whether you're gazing at the stars from the serene landscapes of Alabama Hills or any other dark-sky location, this guide will provide you with all the insights you need to embark on an unforgettable astrophotography journey.

The milkyway over Bonsai Rock in Lake Tahoe, Nevada. Photo by Dalton Johnson
Essential Equipment
Embarking on an astrophotography adventure begins with the right gear. The following essential equipment forms the foundation of successful astrophotography sessions:
Camera Body: Invest in a camera with manual settings and strong low-light performance. Mirrorless cameras are popular choices due to their ability to use interchangeable lenses and control settings like ISO, aperture, and shutter speed. My favorite camera to use is the Sony a7r5.
Wide Angle Lenses: A wide-angle lens with a low aperture (f/2.8 or lower) is essential for capturing the vastness of the night sky and incorporating the unique rock formations of locations like Alabama Hills. Tamron lenses such as the 17-28mm and 20mm provide excellent choices.
Tripod: Stabilizing your camera during long exposure shots is crucial. Opt for a lightweight yet sturdy tripod that can withstand challenging conditions, ensuring sharp and detailed images free from camera shake.
Remote Shutter Release (optional): Minimize vibrations by using a remote shutter release or an intervalometer to trigger your camera without physical contact. This is particularly valuable for long exposures and star trail photography. If you are using a mirrorless camera, use the 2 second or 10 second delay.
Headlamp or Flashlight: Navigating in the darkness necessitates a reliable light source. A headlamp with a red light mode is recommended to preserve night vision while allowing you to manage camera controls and equipment.
Extra Batteries and Memory Cards: Extended astrophotography sessions can drain your camera battery quickly. Carry fully charged spare batteries and ample memory cards to capture every enchanting moment.
Constellation Book or Mobile Apps: Acquaint yourself with the night sky using a star chart or mobile apps that identify stars, constellations, and celestial objects. These tools enhance your understanding and appreciation of the cosmic wonders above. Here are two of our favorite books to learn the night sky:
Night Sky - A Field Guide to the Constellations my personal favorite book to learn the night sky. Easy to use, lightweight (making it easy to take backpacking), and great graphics
National Geographic Backyard Guide to the Night Sky, 2nd Edition is a staple, but it can be hard to use and understand for novice/kids.
Remember, these essentials serve as a foundation; more advanced equipment like filters, telescopes, or portable tracking mounts can further elevate your astrophotography capabilities.


Camera Settings and Techniques
Mastering the art of astrophotography involves more than just having the right equipment. Understanding camera settings and techniques is key to producing stunning celestial images. Here's a step-by-step guide to get you started:
Location and Timing
Choose a location with minimal light pollution, such as Alabama Hills, to ensure a dark and clear sky for optimal results.
Research celestial events, moon phases, and weather conditions to select the best times for stargazing and astrophotography.
Equipment Preparation
Set up your camera on a stable tripod to eliminate camera shake during long exposure shots.
Attach a wide-angle lens with a low aperture to capture a broad field of view and maximize light gathering.
Ensure your camera battery is fully charged and carry spare batteries and memory cards.
Camera Settings
Switch to manual mode to have complete control over camera settings.
Set the ISO to as low of a value as possible (e.g., ISO 600 or 800) to minimize noise in your images.
Choose a wide aperture (e.g., f/2.8 to f/4) to allow more light to reach the sensor.
Experiment with different shutter speeds, starting with 10 to 30 seconds for pinpoint stars or longer durations for captivating star trail photography.
Focus
Switch your lens to manual focus mode.
Utilize the camera's live view and zoom in on a bright star or distant light source.
Adjust the focus ring until the stars appear as sharp points of light, ensuring optimal focus for your shots.
Composition
Incorporate unique foreground elements such as rock formations to add depth and interest to your images.
Experiment with various angles, perspectives, and framing to create visually engaging compositions.
Exposure
Utilize a remote shutter release or timer delay to minimize camera shake when capturing images.
Capture test shots and review results on the camera's LCD screen to fine-tune exposure settings.
Adjust ISO, aperture, and shutter speed as needed to achieve desired exposure and balance between the foreground and the sky.
Review and Refine
Regularly review images on the camera's LCD screen to evaluate focus, exposure, and composition.
Make necessary adjustments to camera settings or composition based on your assessments.
Capture multiple exposures and experiment with various techniques to produce a diverse range of captivating shots.
The milkyway high in the night sky. Photo by Dalton Johnson
Astrophotography is an awe-inspiring pursuit that combines technical expertise, creativity, and patience. With the right equipment and a solid grasp of camera settings and techniques, you can unlock the hidden beauty of the night sky.
Each session presents unique challenges and opportunities, allowing you to refine your skills, experiment, and develop your own distinctive style.
As you immerse yourself in the celestial wonders above, remember that practice and persistence are the keys to capturing breathtaking astrophotos that reveal the magic of the cosmos. Whether you're in Alabama Hills or any other celestial hotspot, the night sky awaits your artistic interpretation.
Discover more about our stars

Best Places to Photograph the Teton Range
Nestled within the breathtaking landscape of the American West, the Teton Range stands as an iconic symbol of natural beauty and rugged majesty. With their towering peaks, serene lakes, and diverse wildlife, the Tetons offer photographers an unparalleled opportunity to capture the essence of untamed wilderness.
In this article, we'll guide you through the best places to photograph the Tetons, ensuring that you can capture the magic of this stunning region.
So, you are headed to the Tetons and want to bring home some banger images from your trip? Well, luckily for you, I have been to the Teton's more than I can count and nestled within the breathtaking landscape of the American West, the Teton Range stands as an iconic symbol of natural beauty and rugged majesty. With their towering peaks, serene lakes, and diverse wildlife, the Tetons offer photographers an unparalleled opportunity to capture the essence of untamed wilderness.
In this article, we'll guide you through the best places to photograph the Tetons, ensuring that you can capture the magic of this stunning region.
Full sun and still waters at Schwabacher Landing. Photo by Dalton Johnson
Pros
Stunning Landscape Diversity: The Teton Range offers a diverse range of landscapes, from towering peaks and serene lakes to dense forests and meandering rivers, providing endless opportunities for unique and captivating shots.
Iconic Views: The Tetons are known for their iconic vistas that have been immortalized in photography for decades, allowing photographers to capture scenes that have become part of the cultural landscape.
Wildlife Photography: The region is home to a variety of wildlife, including moose, elk, bears, and eagles. This presents photographers with the chance to capture incredible shots of animals in their natural habitats.
Changing Seasons: Each season brings its own charm, with the vibrant colors of fall, the snowy landscapes of winter, the blooming flora of spring, and the lush greenery of summer, offering photographers diverse seasonal perspectives.
Cons
Crowded Seasons: During peak tourist seasons, popular photography locations can become crowded, making it harder to capture shots without people in the frame.
Time Constraints: Achieving the best lighting conditions often requires early mornings and late evenings, limiting the time available for photography during these periods.
Access Challenges: Some of the best photography spots may require hiking or navigating rough terrain, which could be a challenge for photographers carrying heavy equipment.
Snake River Overlook: An Ansel Adams Classic
Made famous by the legendary photographer Ansel Adams, the Snake River Overlook provides one of the most iconic vistas of the Tetons. Located just north of Moose, Wyoming, this spot offers a panoramic view of the Teton Range rising dramatically above the meandering Snake River. The best times to shoot are during sunrise and sunset when the soft, warm light bathes the mountains in a golden glow.
Overview:
Trailhead/Parking: Snake River Overlook Parking Area
Suggested Lens Focal Length: Wide-angle (Tamron 17mm - 28mm is my go-to)
Best Time of Day: Sunrise and sunset for soft, warm light
Oxbow Bend: Reflections in Stillness
For those seeking mirror-like reflections of the Tetons in tranquil waters, Oxbow Bend is a prime location. Situated along the Snake River, this spot is especially photogenic during the fall when the surrounding foliage turns vibrant shades of red and gold. Misty mornings can create an ethereal atmosphere, and wildlife, such as moose and waterfowl, often add extra interest to your compositions.
Overview:
Trailhead/Parking: Oxbow Bend Pullout on US Highway 89/191
Suggested Lens Focal Length: Wide-angle to standard (Tamron 28mm - 75mm G2 is my go-to)
Best Time of Day: Sunrise for calm waters and vibrant reflections, also consider sunset
Schwabacher Landing: A Photographer's Paradise
Schwabacher Landing is a hidden gem cherished by landscape photographers. Offering access to beaver ponds and calm waters, this location is perfect for capturing reflections of the Tetons as well as intimate shots of flora and fauna. Sunrise is the prime time here, as the soft light bathes the landscape and the Tetons are often adorned with alpenglow.
Overview:
Trailhead/Parking: Schwabacher Landing Road Parking Area
Suggested Lens Focal Length: Wide-angle to standard (24mm - 70mm)
Best Time of Day: Sunrise for soft light and potential alpenglow on the Tetons


Jenny Lake: Alpine Serenity
Jenny Lake is not only a popular destination for hikers but also a haven for photographers. The surrounding peaks provide a stunning backdrop, and the clear waters of the lake create captivating reflections. Explore the shoreline, hike to Inspiration Point for a higher vantage point, or rent a canoe to capture the Tetons from unique perspectives. The versatility of Jenny Lake makes it a must-visit spot for any photographer.
Overview:
Trailhead/Parking: Jenny Lake Visitor Center
Suggested Lens Focal Length: Standard to telephoto (Tamron’s 28mm - 200mm all-in-one is my go-to)
Best Time of Day: Early morning and late afternoon for reflections and clear lighting
Signal Mountain Summit: Panoramic Splendor
For breathtaking panoramic views of the entire Teton Range and Jackson Hole Valley, a visit to Signal Mountain Summit is essential. A short drive or hike will lead you to the summit, where you can capture sunrise or sunset shots that encompass the vastness of the landscape. This location offers the chance to capture the Tetons in the context of their surrounding environment.
Overview:
Trailhead/Parking: Signal Mountain Summit Parking Area (also reachable by car)
Suggested Lens Focal Length: Nifty-fifty to telephoto (Tamron 50mm - 400mm is my go-to)
Best Time of Day: Sunrise or sunset for panoramic views and changing light

Mount Moran reflected on String Lake in the Tetons. Photo by Dalton Johnson
The Tetons present a treasure trove of photographic opportunities that span from iconic vistas to intimate details. Whether you're drawn to the serene reflections in still waters, the grandeur of towering peaks, or the play of light during the golden hours, this region has it all.
As you embark on your photographic journey through the Tetons, remember that each season and time of day brings its own unique charm. Plan ahead, be patient, and let your creative vision unfold in one of the most captivating landscapes on Earth.
Discover more About Photography

What Type of Adventure Photography Do You Create?
Adventure photography has grown and expanded over the years, but the overall look/feel of adventure photography remains the same. Adventure photography is rooted in adventure, which means dirty hands, sore bodies, and wonderful stories to tell. As the genre of adventure photography expands there have been five distinct types of adventure photography which are:
Editorial
Commercial
Lifestyle
Artistic
Influencer
Read on to discover what type of content is created in each of these groups.
Taking a leap of faith off the peak at Mavericks in Half Moon Bay, CA. Photo by Dalton Johnson
Documentary/editorial
Editorial adventure photographers specialize in capturing images that tell a story or convey a specific narrative related to outdoor adventures, exploration, and travel. They aim to document the spirit of adventure, showcasing unique landscapes, activities, and the people involved in these experiences. The types of photos created by editorial adventure photographers can vary, but here are some common themes and subjects:
Epic Landscapes: These photographers excel at capturing expansive and breathtaking natural landscapes such as mountains, deserts, forests, and coastlines. They often use wide-angle lenses to emphasize the grandeur and scale of the surroundings.
Outdoor Activities: Editorial adventure photographers document a wide range of outdoor activities, including hiking, rock climbing, skiing, surfing, kayaking, camping, and more. They strive to capture the action, adrenaline, and passion of these activities, often freezing moments of intense focus or physical exertion.
Travel and Exploration: These photographers frequently embark on expeditions to remote and lesser-known destinations, capturing the essence of exploration and discovery. They document the journey, the interactions with local cultures, and the unique experiences encountered along the way.
Adventure Portraits: Editorial adventure photographers not only capture the environment but also the people involved in these adventures. They aim to portray the character, determination, and spirit of individuals engaged in outdoor pursuits, showcasing their passion and the challenges they overcome.
Environmental Conservation: Many editorial adventure photographers are deeply committed to raising awareness about environmental issues. They may capture images that highlight the beauty of nature and the need for its preservation, showcasing the fragile balance between humans and the natural world.
Storytelling and Narrative: These photographers often create a series of images that collectively tell a story or convey a specific narrative. Through their photographs, they aim to evoke emotions, inspire viewers, and immerse them in the adventure or travel experience.
Overall, the photographs created by editorial adventure photographers capture the thrill, beauty, and raw essence of outdoor adventures, while also emphasizing the connection between humans and the natural world.
Commercial/advertising
Commercial adventure photographers focus on capturing images that promote and advertise products, services, or destinations related to outdoor adventures and travel. Their photographs are intended to be used in marketing campaigns, advertisements, websites, brochures, and other commercial materials. Here are the types of photos commonly created by commercial adventure photographers:
Product Showcasing: Commercial adventure photographers often work closely with brands and companies to capture compelling images of their products in action. This could include showcasing outdoor gear, apparel, adventure equipment, or any other products related to outdoor activities.
Destination Marketing: These photographers aim to capture the essence and allure of specific destinations or travel experiences. They create visually stunning images that promote the beauty, adventure, and unique aspects of a particular place, encouraging viewers to visit and explore.
Lifestyle and Aspirational Imagery: Commercial adventure photographers often focus on creating aspirational and lifestyle imagery. They capture moments that evoke a sense of adventure, freedom, and an active lifestyle, aiming to inspire viewers and create a desire to be part of those experiences.
Action and Sports Photography: Commercial adventure photographers excel in capturing high-energy and dynamic images of outdoor activities and extreme sports. They freeze moments of intense action, showcasing the excitement, skill, and adrenaline associated with these pursuits.
Brand Storytelling: Commercial adventure photographers work closely with brands to tell their story and convey their brand values through visual storytelling. They create a series of images that represent the brand's identity, ethos, and desired messaging.
Stock Photography: Commercial adventure photographers also contribute to stock photography platforms, where their images can be licensed by businesses, publications, and individuals for various commercial uses. These images often cover a wide range of adventure and travel-related themes, providing a diverse selection for potential buyers.
It's important to note that there can be overlap between editorial and commercial adventure photography, and some photographers may work in both realms. While editorial photographers focus on storytelling and capturing the spirit of adventure, commercial photographers cater to the marketing and promotional needs of brands and businesses within the adventure industry.


Lifestyle
Lifestyle adventure photographers specialize in capturing images that showcase the spirit, experiences, and everyday moments of individuals engaged in adventurous and active lifestyles. They focus on documenting real-life scenarios and activities, often blurring the lines between candid and posed shots. Here are the types of photos commonly created by lifestyle adventure photographers:
Candid Moments: Lifestyle adventure photographers excel at capturing authentic and spontaneous moments. They aim to document the genuine emotions, interactions, and expressions of individuals involved in adventurous activities, creating images that feel natural and unscripted.
Storytelling and Narrative: These photographers tell stories through their images, documenting the journey and experiences of individuals within the context of their adventurous lifestyle. They capture a series of photographs that collectively portray a narrative, showcasing the progression, challenges, and triumphs of the subjects.
Everyday Adventures: Lifestyle adventure photographers focus on showcasing the adventure in everyday life. They capture individuals participating in outdoor activities, exploring local landscapes, and engaging in hobbies and pursuits that bring them joy and fulfillment. These images aim to inspire others to find adventure and beauty in their own surroundings.
Authentic Portraits: Lifestyle adventure photographers take portraits that go beyond traditional posed shots. They strive to capture the essence and personality of the subjects in an adventurous context. These portraits often feature individuals in their natural environments, showcasing their connection to nature and their passions.
Exploration of Local Culture: Lifestyle adventure photographers not only focus on the activities but also the cultural aspects of adventurous lifestyles. They capture images that portray the intersection of adventure and local culture, showcasing the unique experiences and interactions with diverse communities.
Environmental Awareness: Many lifestyle adventure photographers are passionate about environmental conservation and sustainability. They capture images that highlight the beauty of nature, as well as the need to protect and preserve the natural world. These photographs may convey messages of environmental awareness and inspire viewers to take action.
Overall, lifestyle adventure photographers document the adventurous spirit and experiences of individuals in a way that feels genuine, relatable, and aspirational. Their images capture the joy, passion, and sense of exploration that come with embracing an adventurous lifestyle.
Artistic
Artistic adventure photographers approach their craft with a creative and artistic vision, focusing on pushing the boundaries of traditional photography and exploring new techniques, styles, and interpretations. Their goal is to create visually captivating and thought-provoking images that evoke emotions and inspire viewers. Here are the types of photos commonly created by artistic adventure photographers:
Abstract and Experimental: Artistic adventure photographers often employ abstract and experimental techniques to create unique and visually striking images. They may experiment with unconventional angles, compositions, long exposures, multiple exposures, intentional camera movement, or other creative methods to transform the subject matter into a more abstract representation.
Mood and Atmosphere: These photographers excel at capturing the mood, atmosphere, and the essence of a scene or adventure. They use light, shadows, colors, and textures to create evocative and atmospheric images that convey a sense of mystery, tranquility, drama, or awe.
Fine Art Landscapes: Artistic adventure photographers capture landscapes in a way that goes beyond traditional representations. They aim to evoke an emotional response from viewers by emphasizing the artistic elements of the scene, such as composition, lighting, texture, and color. These images often have a painterly quality and may showcase unique perspectives or interpretations of well-known landscapes.
Conceptual and Symbolic: Some artistic adventure photographers delve into conceptual and symbolic representations of adventure and exploration. They incorporate metaphorical elements, symbolism, and visual storytelling techniques to convey deeper meanings and provoke thought and reflection.
Intimate Details: These photographers focus on capturing the smaller, often overlooked details of an adventure or natural environment. They may zoom in on textures, patterns, or specific elements that convey a sense of intimacy and allow viewers to experience the subject matter in a new and unique way.
Photo Manipulation and Digital Art: Artistic adventure photographers may incorporate digital manipulation and post-processing techniques to create surreal or fantastical images. They blend multiple exposures, composite elements, or manipulate colors and textures to create imaginative and visually captivating artworks.
Artistic adventure photographers often strive to evoke emotions, spark the viewer's imagination, and present a fresh and unique perspective on adventure and exploration. Their images can be highly subjective and open to interpretation, inviting viewers to engage in a deeper appreciation of the beauty and artistry of the natural world and human experiences.
Influencer
Influencer adventure photographers focus on creating visually appealing and engaging images that cater to their social media following and online audience. They combine their passion for adventure and photography with the goal of building a personal brand, gaining followers, and inspiring others to pursue their own adventures. Here are the types of photos commonly created by influencer adventure photographers:
Dynamic and Action-Oriented Shots: Influencer adventure photographers excel at capturing dynamic, action-oriented shots that showcase their own participation in various outdoor activities. These can include activities such as hiking, climbing, biking, skiing, surfing, and more. The goal is to convey a sense of energy, excitement, and skill in their own adventures.
Scenic and Awe-Inspiring Landscapes: Influencer adventure photographers often travel to stunning locations and capture scenic landscapes. They aim to showcase the beauty of nature and inspire their audience to explore these places. These images often feature iconic landmarks, picturesque vistas, and epic natural settings.
Adventure Lifestyle: Influencer adventure photographers document their lifestyle and the experiences they encounter during their adventures. They capture images that reflect the thrill, freedom, and joy of living an adventurous life. These can include camping scenes, outdoor cooking, storytelling around a campfire, or moments of relaxation amidst nature.
Inspirational Quotes and Captions: Influencer adventure photographers often pair their photos with inspirational quotes or captions that resonate with their audience. These quotes can be related to adventure, personal growth, motivation, or the beauty of nature. The goal is to provide a positive and uplifting message that encourages others to pursue their own adventures.
Sponsored Content and Brand Collaborations: Influencer adventure photographers often work with brands and companies to create sponsored content. They may showcase products, gear, or services related to outdoor adventures in their photos. These collaborations often involve promoting the brand's message or values to their audience.
Behind-the-Scenes and Personal Stories: Influencer adventure photographers offer glimpses into their personal journey and behind-the-scenes moments. They may share stories, challenges, and lessons learned during their adventures, aiming to create a sense of authenticity and connection with their audience.
It's important to note that while influencer adventure photographers may prioritize creating visually appealing content for their online presence, many are also passionate about sharing their love for nature, promoting sustainability, and inspiring others to explore and appreciate the outdoors.
An environmental portrait of a lobster fisherman in San Juanico, Baja. Photo by Dalton Johnson
As you can see, adventure photography has several sub-categories of work. While it is important to know each category, understand that you can mix and match all of them as you shoot. This outline of the types of adventure photography should be used as a guide to help you understand the industry and pitch potential clients the ideas you have for them. Please, don’t let boxes or words hold you back. Go out and shoot. Have fun. Live.
Discover more of Adventure Photography
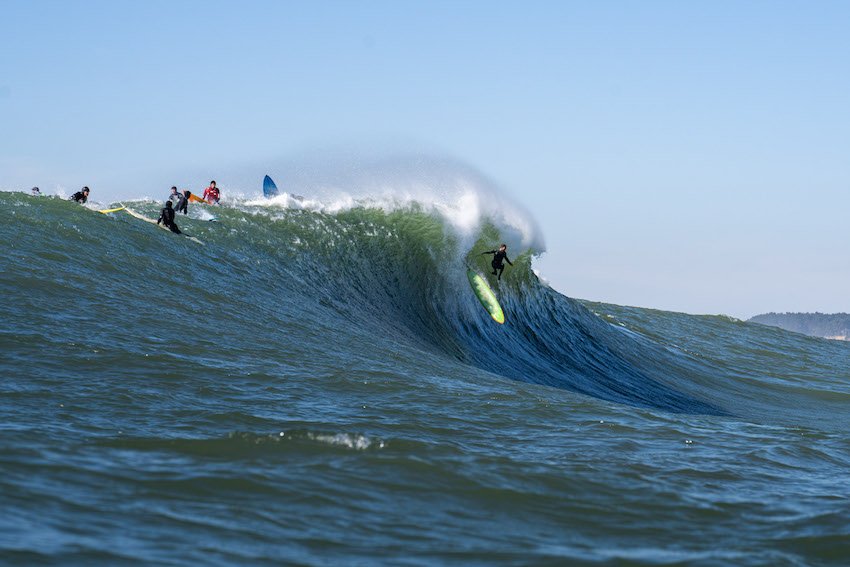
How to Become an Adventure Photographer
Adventure photography combines the thrill of exploration with the artistry of capturing breathtaking moments in nature. If you have a passion for both photography and the great outdoors, becoming an adventure photographer can be a dream come true. This exciting career path allows you to document awe-inspiring landscapes, extreme sports, and the human spirit in its most adventurous form.
Adventure photography combines the thrill of exploration with the artistry of capturing breathtaking moments in nature. If you have a passion for both photography and the great outdoors, becoming an adventure photographer can be a dream come true. This exciting career path allows you to document awe-inspiring landscapes, extreme sports, and the human spirit in its most adventurous form.
To become an adventure photographer, start by developing your photography skills and mastering the fundamentals. Invest in high-quality gear suitable for outdoor conditions, and hone your outdoor skills and physical fitness. Build a diverse portfolio showcasing your best adventure photographs and network with fellow photographers and outdoor enthusiasts. Embrace social media to showcase your work and pursue opportunities for assignments and stock photography. Stay curious, keep exploring, and constantly push your creative boundaries to capture breathtaking moments in nature.
So, if you're ready to embark on an epic journey, here's a guide on how to become an adventure photographer.
Pulling hard through the crux in Wild Iris. Photo by Dalton Johnson
Develop Photography Skills:
Begin by mastering the fundamentals of photography. Learn about composition, exposure, lighting, and post-processing techniques. Experiment with different genres, such as landscape, wildlife, and sports photography, to gain a diverse skill set. Join photography classes, workshops, or online tutorials to enhance your technical knowledge and artistic eye.
Get the Right Gear:
Invest in a good quality camera and lenses suitable for outdoor photography. Consider factors like weather resistance, durability, and portability. As an adventure photographer, you'll be exposed to challenging conditions, so ensure your gear can withstand rugged terrains, water, and extreme temperatures. Carry essential accessories like tripods, filters, and extra batteries to capture the perfect shot even in remote locations.
Hone your Outdoor Skills:
To excel as an adventure photographer, you need to be comfortable in outdoor environments. Develop your skills in hiking, climbing, or water sports, depending on the type of adventures you want to capture. Acquire knowledge about the locations you plan to explore, including weather patterns, safety protocols, and local regulations. Being physically fit and mentally prepared will enable you to endure long hours in challenging terrains and capture unique perspectives.
Build a Diverse Portfolio:
Create a portfolio showcasing your best adventure photographs. Highlight your ability to capture the essence of an adventure, convey emotions, and compose visually captivating images. Emphasize your versatility by including shots from different landscapes, sports, and cultural experiences. Develop a strong storytelling element in your portfolio to engage viewers and transport them into the heart of the action.
Network and Collaborate:
Connect with fellow adventure photographers, outdoor enthusiasts, and athletes through online platforms, photography communities, and social media. Attend photography events, exhibitions, and workshops to meet industry professionals and like-minded individuals. Collaborate with athletes, adventure brands, and travel agencies to gain exposure and expand your portfolio. Building a network will open doors to new opportunities and help you grow as an adventure photographer.
Networking and collaboration play a crucial role in the journey of becoming an adventure photographer. Here are some key points to consider:
Connect with Like-Minded Individuals: Join online photography communities, forums, and social media groups to connect with fellow adventure photographers and outdoor enthusiasts. Engage in discussions, share your work, and seek feedback. Collaborate on projects, exchange tips and techniques, and learn from others' experiences.
Attend Photography Events and Workshops: Participate in photography events, workshops, and conferences focused on adventure photography. These gatherings provide excellent opportunities to meet industry professionals, gain insights from experts, and forge valuable connections. Engage in conversations, exchange business cards, and follow up with individuals who may be potential collaborators or mentors.
Collaborate with Athletes and Outdoor Brands: Reach out to athletes, adventurers, and outdoor brands that align with your photography style and vision. Offer your services to capture their expeditions, outdoor activities, or product campaigns. Collaborating with athletes can lead to unique opportunities to document their adventures and showcase your skills. Working with outdoor brands can result in sponsored trips, equipment support, and exposure to a broader audience.
Explore Partnerships with Travel Agencies: Collaborate with travel agencies specializing in adventure tourism. Your photography can be an asset in their promotional materials, websites, and social media platforms. Building relationships with travel agencies can lead to paid assignments, destination-specific projects, and the chance to document incredible landscapes and experiences.
Build Relationships with Editors and Publications: Reach out to editors of magazines, travel publications, and websites that feature adventure and outdoor content. Submit your work for consideration in their editorial assignments. Develop relationships with these editors by delivering high-quality work, meeting deadlines, and understanding their specific requirements. Building a good rapport can lead to regular assignments, publication opportunities, and exposure to a wider audience.
Collaborate on Personal Projects: Initiate personal projects that align with your interests and vision. These projects can focus on a specific adventure sport, a remote location, or a unique cultural experience. Seek collaboration with fellow photographers, athletes, or even writers to create a multidimensional narrative. These personal projects not only help you grow creatively but also showcase your dedication and passion to potential clients.
Remember, networking and collaboration are about building relationships and supporting each other within the adventure photography community. It's a two-way street, so be open to sharing your knowledge and resources with others as well. By collaborating, you can create powerful visuals, expand your reach, and open doors to exciting opportunities in the world of adventure photography.


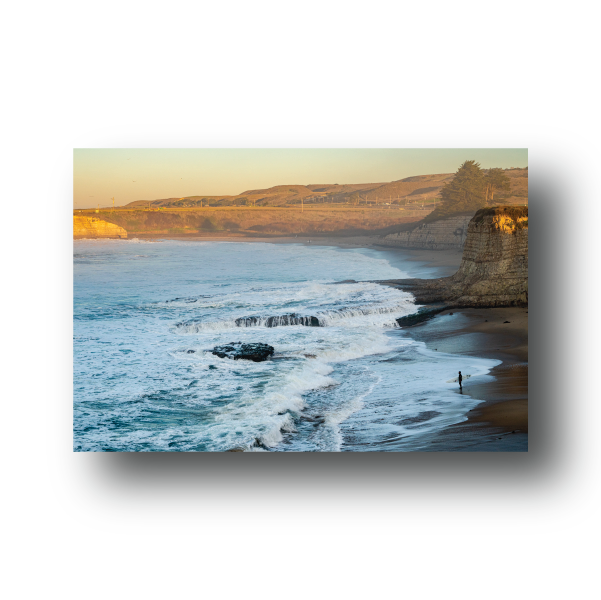
Embrace Social Media:
In today's digital age, social media is a powerful tool for promoting your work and building a personal brand. Create a strong online presence by sharing your best adventure photographs on platforms like Instagram, Facebook, and your own photography website. Engage with your audience by sharing stories behind your images, offering photography tips, and connecting with fellow adventurers. Consistency, quality content, and authentic engagement will help you grow your online following and attract potential clients.
Pursue Assignments and Stock Photography:
Reach out to magazines, travel publications, and adventure-focused websites to pitch your work. Submit your photographs for editorial assignments and explore opportunities for stock photography licensing. Building relationships with editors and agencies can lead to regular assignments and publication of your work, allowing you to share your adventures with a wider audience while earning an income.
Pursuing assignments and stock photography can be an excellent way to gain exposure, earn income, and further establish yourself as an adventure photographer. Here's more information on these avenues:
Editorial Assignments: Many magazines, travel publications, and online platforms require captivating adventure photographs to complement their articles and features. Research publications that focus on adventure, outdoor activities, and travel. Familiarize yourself with their content style and guidelines, and pitch your work to their editors. Submitting your photographs for editorial assignments can lead to paid opportunities to showcase your images and tell compelling stories.
Commercial Assignments: In addition to editorial assignments, there are commercial opportunities within the adventure photography field. Outdoor brands, tourism boards, and adventure companies often seek professional photographers to capture their products, services, and experiences. This can involve photographing gear, documenting adventure tours, or creating promotional content. Building relationships with such brands and agencies can lead to recurring assignments and paid work.
Stock Photography: Stock photography involves licensing your images for commercial use. There are numerous stock photography platforms where you can submit your adventure photographs. When choosing a platform, research their submission guidelines, licensing terms, and royalty rates. Ensure that the platform aligns with your goals and offers a fair compensation structure. Stock photography allows your images to be accessible to a wide range of clients, and you can earn royalties each time your photo is licensed.
Portfolio Development: When pursuing assignments and stock photography, it's crucial to curate a strong portfolio that showcases your adventure photography skills. Tailor your portfolio to highlight your versatility, storytelling ability, and technical expertise. Include a variety of adventure genres, such as landscapes, sports, and cultural experiences. A compelling portfolio will attract the attention of potential clients and increase your chances of securing assignments or licensing deals.
Marketing and Promotion: To increase your visibility and attract assignment opportunities, market yourself effectively. Utilize social media platforms, your website, and photography communities to showcase your work and engage with your target audience. Regularly update your portfolio and share behind-the-scenes stories or insights to create a personal connection with your followers. Actively promote your adventure photography services through targeted marketing campaigns and collaborations with relevant influencers or publications.
Professionalism and Reliability: When pursuing assignments, it's crucial to maintain a high level of professionalism and reliability. Be responsive to client inquiries, adhere to deadlines, and deliver work that exceeds expectations. Build a reputation as a dependable and talented adventure photographer, as word-of-mouth recommendations can lead to future assignments and collaborations.
By actively pursuing assignments and exploring stock photography opportunities, you can monetize your passion for adventure photography while gaining exposure and establishing your name in the industry. It's important to continuously improve your skills, stay up to date with industry trends, and maintain a proactive approach to seek new opportunities. With persistence and dedication, you can turn your passion into a fulfilling and rewarding career as an adventure photographer.
Stay Curious and Keep Exploring:
The key to being a successful adventure photographer is to remain curious and constantly seek new adventures. Embrace the unknown, explore uncharted territories, and push your creative boundaries. Continually develop your technical skills and stay updated with the latest trends in photography and adventure sports. Remember, the more you experience, the more opportunities you'll have to capture breathtaking moments and tell compelling stories through your photographs.
Going over the falls at Mavericks in Half Moon Bay. Photo by Dalton Johnson
Becoming an adventure photographer is a thrilling and rewarding journey that combines your love for photography and the outdoors. By developing your photography skills, acquiring the right gear, honing your outdoor skills, building a diverse portfolio, networking, embracing social media, pursuing assignments, and staying curious, you can carve a path towards success in this exciting field. So, grab your camera, pack your bags, and embark on an unforgettable adventure as an adventure photographer.
Discover more of Adventure Photography

7 Ways to Easily Craft Unforgettable Road Trip Photographs
Are you ready to embark on a road trip filled with unforgettable moments? Whether you're a budding influencer or simply want to capture stunning photographs to cherish your journey, this article is here to guide you. Don't worry about fancy equipment—your trusty phone will do the trick.
These tips are designed to be simple and easy to implement, ensuring that you unlock your photography potential without any stress. As a professional adventure photographer, I firmly believe that simplicity is key, and these tips will help you break through any resistance and create stellar images that will transport you back to those precious memories.
To take memorable photographs on a road trip, immerse yourself in the journey and embrace the spontaneity of the experience. Be observant and patient, seeking out unique moments and details that tell a story. Experiment with different perspectives, lighting conditions, and framing techniques to capture the essence of the places and people you encounter, creating a visual narrative that will transport you back to the memories of your road trip.
Read on to discover 7 ways to easily capture memorable photographs:
Stoking a beach bon-fire while on a surf trip in Baja Mexico. Photograph by Dalton Johnson
#1 Get close, far away, low, or high
When it comes to photography, perspective is everything. Experiment with different angles and distances to add depth and variety to your shots. Get up close to capture the intricate details of a flower by the roadside, or step back to include the vastness of a breathtaking landscape. Don't be afraid to crouch down low or find an elevated vantage point for unique perspectives that make your images stand out.
Getting close to your subject allows you to capture fine details and create a more intimate connection with the viewer. Whether it's a flower in bloom, an interesting texture, or a person's facial expression, getting up close can reveal the beauty and intricacies that might otherwise go unnoticed.
On the other hand, stepping back and capturing your subject from a distance provides a broader perspective. It allows you to showcase the subject within its environment, capturing the surrounding context and adding a sense of scale.
Furthermore, varying your camera height can dramatically alter the composition and impact of your image. By getting low to the ground, you can capture unique angles and make your subject appear larger or more dominant. Conversely, shooting from a higher vantage point can create a bird's-eye view, offering a different perspective and allowing you to include more elements in the frame.
Experimenting with these different distances and angles not only adds variety to your photographs but also helps create a sense of depth and dimension. It allows you to play with the relationship between your subject and the surrounding elements, enabling you to compose visually striking images that engage the viewer.
So, don't be afraid to get up close, step back, crouch down, or find an elevated position to explore the potential of different perspectives. By doing so, you'll discover new and captivating ways to capture the essence of your subjects and make your photographs visually compelling.
#2 Make your images 3D
While we can't literally make our photographs three-dimensional, we can create an illusion of depth. Look for leading lines, such as a winding road or a row of trees, that draw the viewer's eye into the frame. Incorporate foreground elements, like a wildflower or a rock, to add layers to your composition. This technique adds a sense of immersion and makes your images feel more alive and captivating.
Tips for making images look 3D
Incorporate foreground elements: Including objects in the foreground of your composition adds depth and creates a sense of three-dimensionality. It could be a rock, a tree branch, or even a person. These elements act as visual anchors and draw the viewer's eye into the image.
Utilize leading lines: Look for natural lines or elements that guide the viewer's gaze into the frame. Roads, pathways, rivers, or even architectural structures can serve as effective leading lines, adding depth and dimension to your image.
Use perspective to your advantage: Experiment with different angles and viewpoints to create a sense of depth. Getting low to the ground or finding an elevated position can provide unique perspectives that make your image feel more three-dimensional.
Play with depth of field: Controlling the depth of field can add a sense of depth to your images. By using a wide aperture (small f-number), you can create a shallow depth of field, blurring the background and emphasizing the main subject, which helps to separate it from the surroundings.
Pay attention to layers: Look for opportunities to create layers within your composition. This could involve positioning objects at different distances from the camera, such as a subject in the foreground, a middle ground, and a distant background. Layers add visual depth and contribute to the three-dimensional feel of the image.
Capture textures and details: Highlighting textures and details in your subject can enhance the perception of depth in your images. Whether it's the ruggedness of a mountain range, the intricate patterns of a flower petal, or the roughness of a weathered building, emphasizing these details adds depth and realism to your photograph.
Mind the lighting: Proper lighting can bring out the dimensionality of a scene. Pay attention to how light falls on your subject and the surrounding elements. Utilize side lighting or backlighting to create shadows and highlights that add depth and enhance the three-dimensional effect.
Experiment with wide-angle lenses: Wide-angle lenses have a broader field of view, which can help capture more of the scene and create a sense of depth. Be mindful of distortion, though, as wide-angle lenses can cause objects near the edges of the frame to appear stretched or distorted.
Remember, creating a three-dimensional look in your photographs is all about creating visual depth and engaging the viewer's perception. With practice and experimentation, you can master these techniques and bring your images to life.
#3 Raw and real is better than staged
Authenticity is key in photography, especially when it comes to capturing the spirit of a road trip. Instead of staging every shot, embrace the spontaneity of the moment. Capture genuine reactions, unposed interactions, and the raw beauty of the landscapes you encounter. These real moments will evoke stronger emotions and create a more powerful connection with your viewers.
Tips for Capturing Real and Raw Images:
Be Observant and Patient: To capture genuine and real moments, it's essential to be observant of your surroundings. Pay attention to the people, the environment, and the interactions happening around you. Anticipate moments that have the potential to tell a story or evoke emotions. Patience is also key, as real moments often unfold naturally, and waiting for the right opportunity can lead to more authentic and impactful photographs.
Blend In and Establish Trust: When photographing people, especially in candid situations, it's important to blend in and establish a sense of trust. By being respectful, friendly, and approachable, you can make your subjects feel comfortable and natural in front of the camera. Building a connection with them allows you to capture genuine expressions and emotions, resulting in more authentic images.
Avoid Overstaging or Posing: Authenticity shines through when your subjects feel and behave naturally. Avoid overdirecting or overly staging your shots, as it can create artificial or forced moments. Instead, encourage your subjects to be themselves and capture their true personalities and interactions. This approach often leads to more genuine and meaningful photographs.
Embrace Imperfections and Unscripted Moments: Real life is imperfect, and capturing those imperfections can add depth and authenticity to your images. Don't be afraid of blurry shots, unconventional compositions, or unexpected elements in the frame. Embrace the spontaneity and unpredictability of the moment, as it often results in images that are rich in emotion and tell a more genuine story.


#4 Become a fly on the wall
Becoming a "fly on the wall" in photography means taking a documentary or observational approach, where you blend into the environment and capture genuine moments without interfering or influencing the scene. It involves being unobtrusive and allowing events to unfold naturally, resulting in candid and authentic photographs. This approach is particularly effective for capturing the true essence of people, interactions, and environments.
To become a "fly on the wall," it's crucial to be patient, observant, and anticipate moments that have the potential to tell a story. By stepping back and allowing events to unfold without intervention, you can capture raw emotions, unguarded expressions, and candid interactions. This technique often leads to images that are rich in authenticity and offer a glimpse into genuine moments that might otherwise be missed.
To achieve this, it's important to build trust with your subjects. When people feel comfortable and unaware of the camera's presence, they are more likely to act naturally. Spend time connecting with your subjects, engage in conversations, and establish a rapport that allows them to be themselves. Being respectful, empathetic, and genuinely interested in their stories can go a long way in making them feel at ease and capturing genuine moments.
By adopting the "fly on the wall" approach, you can create a body of work that tells a compelling narrative, evokes emotions, and provides an intimate glimpse into the lives and experiences of the people and places you encounter on your road trip. It allows you to document moments as they naturally unfold, resulting in photographs that are both captivating and authentic.
#5 Your story is more important than being perfect
Remember, photography is about storytelling. Instead of obsessing over technical perfection, focus on conveying the emotions and experiences you had during your road trip. Look for moments that tell a story—be it the joy of a spontaneous detour, the awe-inspiring beauty of a sunset, or the camaraderie among your travel companions. Don't be afraid to experiment and embrace imperfections. It's the stories behind the photographs that will truly make them memorable.
Tips for telling a story with images:
Plan with a Narrative in Mind: Before setting off on your road trip, take some time to think about the story you want to tell through your photographs. Consider the themes, emotions, and experiences you want to capture. This will help you plan your route, identify key locations, and be more intentional with your photography.
Look for Moments and Details: As you embark on your road trip, keep your eyes open for moments and details that contribute to your narrative. Look beyond the obvious landmarks and tourist attractions. Pay attention to the small interactions, local culture, and unique elements that define each place. These subtle details can often convey the essence of a location and add depth to your storytelling.
Capture a Variety of Perspectives: To tell a well-rounded story, it's important to capture a variety of perspectives. Include wide-angle shots to showcase the landscapes and environments you encounter. Zoom in for intimate details and close-ups that reveal emotions and textures. Don't forget to photograph the people you meet along the way, as they are an integral part of the narrative. By incorporating different perspectives, you create a visual tapestry that paints a comprehensive picture of your road trip.
Create a Visual Sequence: Sequencing your images in a thoughtful and intentional way can enhance the storytelling aspect of your photographs. Consider the order in which you present your images to create a visual flow and narrative arc. Think about how each photograph leads into the next, building anticipation, evoking emotions, or highlighting contrasts. Pay attention to composition, color schemes, and visual elements that connect and transition from one image to another.
Include Context and Surroundings: Context is crucial for storytelling. Whenever possible, include elements in your photographs that provide context and help viewers understand the environment and culture of the places you visit. Incorporate street signs, local landmarks, street scenes, or any unique features that identify the location. These contextual images contribute to the overall narrative and create a more immersive experience for your audience.
#6 Create a frame around your subject
Creating a frame around your subject is a powerful technique that adds visual interest and draws the viewer's attention to the main focal point of your photograph. By incorporating natural elements or objects within the composition, you can create a frame within the frame, enhancing the overall impact of your image. This technique can be achieved through various means, such as using archways, windows, tree branches, or even human-made structures like doorways or fences.
A frame serves as a visual boundary that directs the viewer's gaze towards the subject, isolating it from the surroundings and giving it prominence. It adds a sense of depth and dimension to the image, making it visually captivating. Moreover, a well-placed frame can provide context, setting, or a sense of scale to the subject, enhancing the storytelling aspect of the photograph.
When using this technique, it's important to consider the placement and balance of the frame elements. They should complement and enhance the subject rather than overpowering it. Experiment with different framing options and angles to find the most compelling composition. By effectively creating a frame around your subject, you can add a creative touch to your images and elevate their visual impact.
#7 Embrace the Magic of Light
Embracing the magic of light is a fundamental aspect of photography, and it can greatly enhance the impact and mood of your images. Light has the power to transform an ordinary scene into something extraordinary, and as a photographer, understanding and utilizing different lighting conditions can elevate your work to new heights. One of the most sought-after lighting conditions is the golden hour, which occurs shortly after sunrise or before sunset. During this time, the soft, warm glow of the sun creates a magical and ethereal atmosphere, casting a beautiful light that adds depth, texture, and warmth to your photographs.
Chasing good light also involves being aware of how light interacts with your subjects. Pay attention to the direction, intensity, and quality of light, as these factors can drastically alter the mood and visual impact of your images. Side lighting, for example, can create dramatic shadows and highlights, adding depth and dimension to your subject. Backlighting can create silhouettes or a halo effect, lending a sense of mystery and beauty to your photographs. Experimenting with different lighting techniques allows you to capture the essence of a scene in a unique and captivating way.
In addition to the golden hour, don't be afraid to explore other lighting conditions, such as the soft diffused light on cloudy days or the dramatic and moody light during stormy weather. Each lighting situation offers its own unique qualities and opportunities for creative expression. By developing an eye for good light and understanding its impact on your subjects, you can create photographs that evoke emotions, tell stories, and leave a lasting impression on viewers.
Embracing the magic of light is an ongoing learning process in photography. Continually observe and experiment with different lighting conditions, and don't shy away from pushing the boundaries of what you can achieve. By harnessing the power of light, you can infuse your photographs with a sense of wonder, beauty, and atmosphere that transports viewers into the world you've captured through your lens.

Chasing light can be a difficult task, but when things align, you will be pleased like I was in Monument Valley. Photograph by Dalton Johnson
As you embark on your next road trip, armed with these seven photography tips, remember that the essence of a memorable photograph lies in your ability to capture the spirit of the moment. Break free from the confines of perfection and allow your creativity to soar. Whether you're using a state-of-the-art camera or your trusty smartphone, remember that it's not about the gear; it's about your perspective, your story, and your ability to seize the fleeting beauty that unfolds before you. So, get out there, embrace the adventure, and create photographs that will transport you back to those cherished memories time and time again. Happy road-tripping and happy photographing!
Discover more of Adventure Photography

How Do Adventure Photographers Make Money? Unveiling the Secrets of a Thrilling Career
Adventure photography is a challenging and rewarding career. It requires a combination of technical skills, creativity, and a love of the outdoors. But how do adventure photographers make money?
Adventure photography is a challenging and rewarding career. It requires a combination of technical skills, creativity, and a love of the outdoors. But how do adventure photographers make money?
There are a number of ways that adventure photographers can make money. One way is to sell their photos to magazines, newspapers, and websites. Another way is to sell their photos as stock photography. Adventure photographers can also make money by giving talks and workshops, writing books and articles, and teaching photography classes.
In this blog post, we will discuss the different ways that adventure photographers can make money. We will also provide tips on how to get started in this exciting career.
Walking a highline in Joshua Tree National Park. Photograph by Dalton Johnson
Pros of Adventure Photography:
Immersive Experiences: Adventure photography allows you to explore stunning landscapes, remote locations, and unique cultures firsthand. You get to embark on thrilling adventures, creating unforgettable memories while capturing breathtaking images.
Creative Freedom: As an adventure photographer, you have the freedom to express your creativity and vision. You can experiment with various techniques, compositions, and styles, resulting in unique and captivating photographs that reflect your artistic perspective.
Personal Growth: Adventure photography pushes you outside your comfort zone, challenging you both physically and mentally. It fosters personal growth, self-discovery, and a deeper connection with nature, helping you develop resilience, adaptability, and a greater appreciation for the world around you.
Sharing Inspiring Stories: Through your photographs, you have the power to inspire and evoke emotions in others. Adventure photography allows you to tell compelling stories of awe-inspiring landscapes, diverse cultures, and extraordinary human feats, encouraging others to explore, appreciate, and protect the natural world.
Exciting Opportunities: Adventure photographers have the opportunity to work with renowned brands, collaborate with like-minded individuals, and participate in prestigious events and assignments. It opens doors to exciting adventures, unique projects, and the potential for recognition within the photography industry.
Cons of Adventure Photography:
Physical Demands: Adventure photography often involves traversing challenging terrains, enduring harsh weather conditions, and carrying heavy camera gear. It requires physical fitness, endurance, and the ability to adapt to demanding environments, which can be physically taxing and potentially risky.
Uncertain Income: The income of adventure photographers can be unpredictable, especially when starting out. Securing consistent paid assignments and generating a steady stream of income can be challenging. It may require diversifying revenue streams and building a strong network within the industry.
Gear and Expenses: Adventure photography necessitates investing in high-quality camera equipment, lenses, accessories, and travel expenses. These costs can be substantial, particularly for specialized gear designed to withstand extreme conditions. Additionally, travel expenses and logistics can add up, especially when shooting in remote or distant locations.
Work-Life Balance: The life of an adventure photographer often involves being away from home for extended periods. Balancing personal relationships, family commitments, and the demands of an adventurous career can be a juggling act, requiring effective time management and communication skills.
Risk and Safety: Adventure photography can involve inherent risks, such as exposure to extreme weather, hazardous terrain, or wildlife encounters. Ensuring personal safety and taking precautions while capturing images is crucial. It's essential to have proper training, knowledge of the environment, and appropriate safety equipment.
Commercial Photography Assignments: Collaborating with Companies for Campaigns
While commercial work in the adventure photography space is the most lucrative, the amount of money that adventure photographers make on commercial assignments varies depending on a number of factors, including the client, the scope of the assignment, and the photographer's experience and skill level. In general, however, adventure photographers can expect to earn between $1,000 and $10,000 per assignment.
Here are some factors that can affect the price of a commercial assignment:
The client: More prestigious clients will typically pay more than less prestigious clients.
The scope of the assignment: More complex assignments will typically command a higher price than less complex assignments.
The photographer's experience and skill level: More experienced and skilled photographers will typically earn more money than less experienced and skilled photographers.
It is important to negotiate the price of your commercial assignments before you agree to them. Don't be afraid to ask for what you think your work is worth. And remember, you can always negotiate a higher price if the client is interested in your work.
Here are some tips for negotiating the price of your commercial assignments:
Do your research: Before you start negotiating, take some time to research the market and find out what other photographers are charging for similar assignments.
Be prepared to walk away: If you're not happy with the price, be prepared to walk away from the assignment. There are plenty of other clients out there who will be willing to pay you what you're worth.
Be confident: Don't be afraid to ask for what you think your work is worth. If you're confident in your abilities, the client will be more likely to agree to your price.
Here are some tips on how Pricing for a commercial shoot:
Day Rates/Creative Fees: In commercial photography, photographers often charge day rates for their services. The rates can range from a few hundred dollars to several thousand dollars per day, depending on the photographer's expertise and the scale of the project. High-profile or experienced adventure photographers with a strong reputation can command higher rates.
Usage and Licensing Fees: Commercial assignments may involve licensing the images for specific usage by the client. The fees for image usage can vary based on factors such as the duration, geographic scope, and media channels where the images will be used (e.g., print, online, social media, billboards). Licensing fees can provide additional income for adventure photographers beyond the initial day rates.
Production Costs: Production costs in adventure photography can vary depending on the scope and requirements of the project. These costs encompass various elements such as travel expenses (including transportation, accommodation, and meals), equipment rentals or purchases, hiring assistants or crew members, location permits and fees, prop acquisition, wardrobe and styling, post-production editing software, and marketing materials. Adventure photographers must carefully consider and budget for these costs to ensure a smooth and successful production. It's important to strike a balance between delivering high-quality work and managing expenses effectively to maintain profitability and provide clients with exceptional value.
Get a Project Budgets: The overall budget allocated by clients for commercial photography projects can greatly impact the photographer's earnings, so you need to get an idea of the budget a client has to work with. Larger budgets may allow for higher fees and more extensive shoots, while smaller budgets may require more negotiation and flexibility in terms of rates. But, suggesting a price point that is far to high, or to low, will knock you out of the running for the job.
License images to Magazines and Travel Publications: Capturing Stories That Inspire
This is one of the most common ways for adventure photographers to make money. Magazines, newspapers, and websites are always looking for high-quality photos to illustrate their stories. If you have a portfolio of great photos, you can submit them to publications and see if they're interested in buying them.
The amount of money that adventure photographers sell photos to publications for varies depending on a number of factors, including the publication, the size of the photo, and the rights that are being sold. In general, however, adventure photographers can expect to earn between $50 and $500 per photo.
Here are some factors that can affect the price of a photo:
The publication: More prestigious publications will typically pay more for photos than less prestigious publications.
The size of the photo: Larger photos will typically command a higher price than smaller photos.
The rights that are being sold: If the photographer is selling all rights to the photo, they will typically earn more money than if they are only selling one-time usage rights.
It is important to negotiate the price of your photos before you sell them. Don't be afraid to ask for what you think your photos are worth. And remember, you can always negotiate a higher price if the publication is interested in your work.
Print and sell your photos as prints
One of the benefits of adventure photography is that you travel to beautiful places to take photographs. If you capture a wonderful landscape image, you can sell it as a photographic print. The price of adventure photography prints varies depending on a number of factors, including the size of the print, the quality of the print, the photographer's reputation, and the demand for the print. In general, however, adventure photography prints can sell for anywhere from $50 to $5,000 or more.
Here are some factors that can affect the price of an adventure photography print:
The size of the print: Larger prints will typically command a higher price than smaller prints.
The quality of the print: High-quality prints will typically sell for more than low-quality prints.
The photographer's reputation: More well-known photographers will typically be able to charge more for their prints than less well-known photographers.
The demand for the print: If there is a high demand for a particular print, the photographer may be able to charge more for it.
It is important to price your prints competitively. Don't be afraid to do some research and see what other photographers are charging for similar prints. And remember, you can always lower the price of a print if it doesn't sell.
Here are some tips for pricing your adventure photography prints:
Do your research: Before you set a price for your prints, take some time to research the market and find out what other photographers are charging for similar prints.
Consider the size and quality of the print: Larger prints and high-quality prints will typically sell for more than smaller prints and low-quality prints.
Consider your reputation: If you're a well-known photographer, you may be able to charge more for your prints than if you're not as well-known.
Consider the demand for the print: If there is a high demand for a particular print, you may be able to charge more for it.
With a little research and effort, you can price your adventure photography prints competitively and make a profit.
Give talks and workshops
If you're an expert in adventure photography, you can give talks and workshops to share your knowledge with others. This is a great way to make money and to help others learn about your passion. The amount of money that adventure photographers make from giving talks and workshops varies depending on a number of factors, including the photographer's experience, their reputation, the size of the audience, and the location of the event. In general, however, adventure photographers can expect to earn between $500 and $5,000 per talk or workshop.
Here are some factors that can affect the amount of money an adventure photographer can make from giving talks and workshops:
The photographer's experience: More experienced photographers are typically able to command higher fees than less experienced photographers.
The photographer's reputation: More well-known photographers are typically able to command higher fees than less well-known photographers.
The size of the audience: The larger the audience, the more the photographer is likely to earn.
The location of the event: Events in major cities or tourist destinations typically pay more than events in smaller towns or rural areas.
If you are interested in becoming an adventure photographer who makes money from giving talks and workshops, it is important to build a strong reputation and network with other photographers and event organizers. You should also focus on developing your skills and experience as a photographer. With hard work and dedication, you can make a career out of adventure photography and public speaking.
Write books and articles
If you're a good writer, you can write books and articles about adventure photography. This is a great way to share your knowledge with others and to make money at the same time. The amount of money that adventure photographers can make writing books and articles varies depending on a number of factors, including the photographer's experience, their reputation, the type of publication, and the length of the piece. In general, however, adventure photographers can expect to earn between $500 and $5,000 per article or book chapter.
Here are some factors that can affect the amount of money an adventure photographer can make writing books and articles:
The photographer's experience: More experienced photographers are typically able to command higher fees than less experienced photographers.
The photographer's reputation: More well-known photographers are typically able to command higher fees than less well-known photographers.
The type of publication: More prestigious publications will typically pay more than less prestigious publications.
The length of the piece: Longer pieces will typically command a higher fee than shorter pieces.
If you are interested in becoming an adventure photographer who makes money writing books and articles, it is important to develop your writing skills and build a strong reputation. You should also focus on writing for high-quality publications. With hard work and dedication, you can make a career out of adventure photography and writing.
Here are some tips for becoming an adventure photographer who makes money writing books and articles:
Develop your writing skills: The better your writing skills, the more likely you are to be published. You can improve your writing skills by taking writing classes, reading books and magazines, and practicing writing as often as possible.
Write for high-quality publications: The more prestigious the publication, the more likely you are to be paid well. You can find out which publications are interested in adventure photography by reading their websites and contacting their editors.
Influencing on Social Media
We can not ignore the reality that most publications have gone digital and are now focused on social media growth. So, as an adventure photographer, why not tap into that as well. The amount of money that adventure photographers make on social media influencing varies depending on a number of factors, including the size of their following, the engagement rate of their posts, and the type of products or services they are promoting. In general, however, adventure photographers can expect to earn between $100 and $10,000 per post.
Here are some factors that can affect the amount of money an adventure photographer can make on social media influencing:
The size of their following: The larger an adventure photographer's following, the more they are likely to earn for each post.
The engagement rate of their posts: The more engagement an adventure photographer's posts receive, the more they are likely to earn for each post.
The type of products or services they are promoting: Adventure photographers who promote high-end products or services are typically able to earn more money than those who promote lower-end products or services.
If you are interested in becoming an adventure photographer who makes money on social media influencing, it is important to build a large following and engage with your audience regularly. You should also focus on promoting high-quality products or services that your audience will be interested in. With hard work and dedication, you can make a career out of adventure photography and social media influencing.
Going left at Mavericks at sunset in Half Moon Bay, CA. Photograph by Dalton Johnson
Becoming an adventure photographer is an extraordinary career choice, blending creativity, passion, and the thrill of exploration. While the journey may seem daunting at first, understanding the various ways adventure photographers make money opens up a world of possibilities. By leveraging multiple revenue streams, building a strong online presence, and honing your craft, you can embark on an exciting path that combines your love for photography with the adventure-filled life you've always dreamed of. So, grab your camera and get ready to capture the world through a lens of limitless potential.
Discover more of Adventure Photography

Discover Photography Spots in Alabama Hills, CA
Are you a photography enthusiast, or seasoned pro, seeking awe-inspiring landscapes to capture with your lens? Look no further than the enchanting Alabama Hills in California! Nestled in the shadow of the magnificent Sierra Nevada mountains, this unique destination offers an abundance of picturesque locations for photographers of all skill levels. Join us on a virtual journey as we explore the must-visit photography spots in Alabama Hills, CA.
Are you a photography enthusiast, or seasoned pro, seeking awe-inspiring landscapes to capture with your lens? Look no further than the enchanting Alabama Hills in California! Nestled in the shadow of the magnificent Sierra Nevada mountains, this unique destination offers an abundance of picturesque locations for photographers of all skill levels. Join us on a virtual journey as we explore the must-visit photography spots in Alabama Hills, CA.
From the iconic Mobius Arch against the Sierra Nevada backdrop to the scenic trails showcasing natural arches, there's no shortage of picture-perfect locations in the Alabama Hills, CA. Capture the magic of sunrise or sunset at Whitney Portal and explore hidden gems for unique compositions in this captivating landscape.
Continue reading to find the best places to photograph at the Alabama Hills.
Panoramic view of the the Alabama Hills along Highway 395 with Mount Whitney in the background. Photograph by Dalton Johnson
Pros of Photographing at the Alabama Hills:
Stunning Landscapes: The Alabama Hills offer a diverse and breathtaking landscape, featuring magnificent rock formations, rugged mountains, and vast open spaces. It provides a picturesque canvas for photographers to capture awe-inspiring shots.
Iconic Arch Features: The famous Mobius Arch and other natural arches within the area provide unique and visually captivating focal points for your photographs. They add an element of interest and create intriguing compositions.
Film History and Nostalgia: The Alabama Hills have a rich history as a filming location for countless Western movies. Photographers can embrace the nostalgic ambiance and capture images that pay homage to the film industry's past.
Varied Lighting Conditions: The Sierra Nevada mountains and open skies offer a range of lighting conditions, from soft morning and evening light to dramatic sunsets. This diversity allows photographers to experiment with different moods, colors, and effects in their images.
Accessibility and Hiking Trails: Many of the photography spots in the Alabama Hills are easily accessible, requiring only short walks or hikes. The well-maintained trails make it convenient to explore and discover new locations, even for photographers with varying levels of mobility.
Cons of Photographing at the Alabama Hills:
Crowds and Popular Spots: The Alabama Hills have gained popularity among photographers and tourists alike, particularly around iconic locations like Mobius Arch. During peak seasons or weekends, these spots can become crowded, making it challenging to find solitude or capture unobstructed shots.
Harsh Sunlight: While the varied lighting conditions can be a pro, the strong desert sun can pose challenges when it comes to managing exposure and harsh shadows. Photographers may need to plan their shoots carefully or utilize tools such as filters or reflectors to mitigate the harsh light.
Limited Facilities: The Alabama Hills are a relatively remote location, and amenities such as restrooms, food, and water may be scarce. Photographers should come prepared with enough supplies to ensure comfort and safety during their outings.
Variable Weather Conditions: Being situated in a desert region, the Alabama Hills experience extreme temperature fluctuations throughout the day and night. Photographers should be prepared for both hot and cold weather, and be cautious of sudden changes, especially during winter months.
Limited Subject Variety: While the Alabama Hills offer stunning landscapes and rock formations, photographers looking for a variety of subjects may find limited options beyond the natural arches and rock formations. It may require creativity and a keen eye for detail to find diverse elements to include in compositions.
the Eastern Sierra Backdrop:
When it comes to landscape photography, the Alabama Hills in California offer an incredible opportunity to showcase the beauty of nature against the majestic Eastern Sierra mountain range. The juxtaposition of the unique rock formations and the towering peaks creates a visual symphony that will captivate any photographer's lens. Here's why using the Eastern Sierra as a backdrop in the Alabama Hills elevates landscape photography to new heights.
Dramatic Scenery: The Eastern Sierra is home to some of the most dramatic and awe-inspiring landscapes in California. The towering peaks, jagged ridges, and snow-capped summits create a stunning backdrop that adds depth and grandeur to your compositions. The contrast between the rugged mountains and the smooth, weathered rock formations of the Alabama Hills creates a harmonious balance of textures and shapes.
Changing Light: The Eastern Sierra offers a dynamic range of lighting conditions throughout the day, allowing photographers to capture different moods and atmospheres. From the soft golden light during sunrise and sunset to the dramatic shadows cast by the mountains, each moment presents an opportunity to create breathtaking images. The interplay of light and shadow adds depth, dimension, and a sense of drama to your photographs.
Vast Perspectives: The Eastern Sierra's vastness and scale provide photographers with endless opportunities for creating stunning compositions. Whether you're capturing the expansive mountain range as a backdrop or zooming in on the intricate details of the rock formations in the foreground, the combination of the Eastern Sierra and the Alabama Hills offers a wide range of perspectives and framing options.
Seasonal Transformations: The Eastern Sierra experiences distinct seasonal changes, each offering its unique charm for landscape photography. In winter, snow-capped peaks and frost-covered rocks create a winter wonderland, while spring brings vibrant wildflowers to the foreground. Summer showcases lush greenery and clear blue skies, and autumn adds a warm palette of golden hues to the scene. No matter the season, the Eastern Sierra provides a canvas that is ever-changing and always captivating.
Weather and Atmosphere: The Eastern Sierra's high elevation and proximity to the desert create a dynamic weather system that adds an extra layer of interest to your landscape photography. From dramatic cloud formations to atmospheric conditions like morning mist or afternoon thunderstorms, the ever-changing weather patterns can transform the mood and atmosphere of your images, creating unique and compelling visuals.
Visual Contrast and Complementary Colors: The contrast between the warm earth tones of the Alabama Hills and the cool, icy blues of the Eastern Sierra creates a visually striking combination. This contrast enhances the impact of your photographs, drawing attention to the subjects in the foreground while highlighting the stunning mountain backdrop. The complementary colors add depth and vibrancy to your compositions, making them visually captivating.
When photographing the Alabama Hills with the Eastern Sierra as your backdrop, it's essential to scout locations and plan your shoots according to the lighting conditions and weather patterns. Experiment with different perspectives, compositions, and focal lengths to capture the full beauty and majesty of this stunning landscape.
Photographing Movie Road:
Movie Road in the Alabama Hills is not only a scenic route but also a treasure trove for photographers looking to capture the nostalgic charm and cinematic history of this iconic location. As you venture along Movie Road, you'll discover remnants of Western film sets, rustic buildings, and unique rock formations that transport you back in time. Here's why photographing Movie Road in the Alabama Hills is a captivating experience that combines history, creativity, and visual storytelling.
Nostalgic Film Sets: Movie Road is dotted with remnants of Western movie sets, providing a captivating backdrop for your photographs. As you explore the area, you'll encounter weathered structures, old facades, and abandoned buildings that evoke a sense of nostalgia and transport you to the heyday of Western cinema. These remnants offer opportunities to capture images that tell stories of the past and pay homage to the film industry's history.
Unique Rock Formations: Movie Road winds through the stunning rock formations of the Alabama Hills, adding a unique and visually appealing element to your compositions. The juxtaposition of the rugged natural formations with the remnants of film sets creates a captivating contrast and adds depth to your photographs. Experiment with different angles and perspectives to capture the interplay between the man-made and the natural elements.
Cinematic Atmosphere: The combination of the rugged landscapes, old structures, and the knowledge that countless Western films were shot in this very location creates a cinematic atmosphere that ignites your creativity. Embrace the ambiance and let it inspire you to capture images that evoke the spirit of the Wild West, creating your own cinematic moments through photography.
Creative Storytelling: Movie Road offers ample opportunities for creative storytelling through your lens. Use the remnants of film sets, buildings, and unique landscapes to construct narratives within your images. Frame your shots to evoke a sense of mystery, adventure, or nostalgia, drawing viewers into the stories you create within the frame.
Lighting and Shadows: The varying lighting conditions along Movie Road present opportunities for creative exploration. Capture the play of light and shadows as they dance across the structures and landscapes, adding depth, drama, and texture to your photographs. Consider visiting during golden hour or during the magic hours of sunrise or sunset to enhance the atmospheric qualities of your images.
Details and Textures: Movie Road is rich in details and textures, providing ample opportunities for close-up shots and capturing intricate elements. Zoom in on weathered wood, rusted metal, or peeling paint to capture the character and patina of the film sets and structures. These close-up shots add a layer of storytelling and bring out the charm of the location.
Remember to respect the remnants of film sets and structures while photographing Movie Road. Take care not to disturb or damage any artifacts and be mindful of private property boundaries.
Astrophotography in the Alabama Hills: Unveiling the Nighttime Wonders
The Alabama Hills, known for their remarkable landscapes during the day, also offer an exceptional experience for astrophotography enthusiasts. With minimal light pollution and a breathtaking backdrop of towering mountains and unique rock formations, this destination becomes a haven for capturing the wonders of the night sky. Here's why astrophotography in the Alabama Hills is an experience not to be missed.
Dark Sky Reserve: The Alabama Hills, situated in close proximity to the town of Lone Pine, benefit from its Dark Sky Reserve status. This means that the area is officially recognized for its minimal light pollution, allowing for exceptional stargazing and astrophotography opportunities. The absence of urban glow creates a pristine canvas for capturing the celestial beauty above.
Milky Way Galore: The clear and unpolluted skies of the Alabama Hills provide an ideal setting for capturing the splendor of the Milky Way. As night falls, the galactic core becomes visible, unveiling a tapestry of stars, dust lanes, and celestial wonders. Photographers can experiment with long exposures to reveal the intricate details and capture the ethereal glow of our galaxy.
Iconic Compositions: Incorporating the unique rock formations and arches of the Alabama Hills into astrophotography compositions adds an extra layer of visual interest and a sense of place. The juxtaposition of the ancient geological formations against the vastness of the cosmos creates captivating and otherworldly images.
Meteor Showers and Celestial Events: The Alabama Hills offer front-row seats to witness meteor showers, eclipses, and other celestial events. Photographers can plan their visits during peak meteor shower activity, such as the Perseids or Geminids, to capture stunning images of shooting stars streaking across the night sky.
Low-Light Photography Opportunities: Beyond capturing the grandeur of the Milky Way, astrophotography in the Alabama Hills allows for creative explorations of low-light photography techniques. Photographers can experiment with light painting techniques to illuminate the rock formations or use star trails to create mesmerizing compositions that showcase the passage of time.
Time-Lapse Possibilities: The Alabama Hills' tranquil setting and uninterrupted horizons make it an ideal location for capturing time-lapse sequences. With the breathtaking landscapes as a backdrop, photographers can create captivating videos that reveal the movement of stars, the changing colors of the sky, and the play of light and shadow over the rocky terrain.
Remember, to make the most of your astrophotography experience in the Alabama Hills, it is essential to come prepared. Here are a few tips to ensure successful astrophotography sessions:
Bring a sturdy tripod: A stable tripod is crucial for capturing long-exposure shots and avoiding camera shake.
Use a wide-angle lens: A wide-angle lens allows you to capture more of the night sky and the surrounding landscapes in your compositions.
Master manual settings: Understand the manual settings of your camera, including aperture, shutter speed, and ISO, to properly expose your night sky images.
Bring spare batteries and memory cards: Long exposure photography and time-lapse sequences can drain battery life and fill up memory cards quickly, so having backups is essential.
Embarking on an astrophotography adventure in the Alabama Hills opens up a world of celestial wonders and allows you to capture the beauty of the cosmos against the backdrop of captivating natural landscapes. So, grab your camera, tripod, and a sense of wonder, and prepare to witness the magic of the night sky in this truly enchanting destination.


Mobius Arch Loop Trail:
The Mobius Arch Loop Trail is a must-visit destination for photographers seeking to capture the iconic beauty of the Alabama Hills. This scenic trail offers a unique opportunity to photograph the breathtaking Mobius Arch, framing it against the majestic backdrop of the Sierra Nevada mountains. Here's what you need to know to make the most of your photography experience on the Mobius Arch Loop Trail.
Iconic Arch Composition: The star of the show on the Mobius Arch Loop Trail is undoubtedly the Mobius Arch itself. This natural rock arch forms a perfect frame for capturing stunning vistas of the Eastern Sierra. Position yourself to frame your subject within the arch, whether it's the majestic mountains, a colorful sunrise or sunset, or even the starry night sky. Experiment with different angles and perspectives to create unique compositions that showcase the arch's beauty.
Timing is Everything: To capture the best shots on the Mobius Arch Loop Trail, timing is crucial. Consider planning your visit during sunrise or sunset when the light is soft and golden, creating a warm and magical atmosphere. These times of day also offer the opportunity to capture breathtaking silhouettes and vibrant colors. Additionally, visiting during the blue hour or at night allows for astrophotography opportunities, with the arch framing the starry sky.
Exploring Beyond the Arch: While the Mobius Arch steals the spotlight, don't forget to explore the surroundings of the trail. The Alabama Hills offer a myriad of unique rock formations, captivating landscapes, and hidden gems waiting to be discovered. Venture off the beaten path and explore the area to find interesting compositions and viewpoints that go beyond the arch itself.
Managing Light and Shadows: As with any outdoor photography, understanding how to work with light and shadows is essential on the Mobius Arch Loop Trail. The arch's positioning can create challenges with contrast and dynamic range, especially during midday when the sun is high. Consider using graduated neutral density filters or bracketing exposures to balance the exposure between the bright skies and the darker areas around the arch. Shooting during the softer light of sunrise or sunset can also help to manage the contrast.
Leading Lines and Foreground Elements: Enhance the visual impact of your photographs by incorporating leading lines and foreground elements into your compositions. Utilize the natural lines and shapes of the surrounding rocks and trails to guide the viewer's eye towards the arch. Including interesting foreground elements, such as wildflowers, cacti, or textured rocks, adds depth and visual interest to your images.
Capturing Seasonal Changes: The Mobius Arch Loop Trail presents different opportunities throughout the year due to seasonal changes. Visit during spring to capture the vibrant wildflowers that bloom in the Alabama Hills. In winter, the snow-capped Sierra Nevada mountains create a stunning backdrop against the arch. Each season offers unique photographic possibilities, so consider planning your visit accordingly to capture the specific beauty of that time of year.
Respect and Preserve: While photographing on the Mobius Arch Loop Trail, it's crucial to respect the natural environment and preserve its pristine condition. Stay on designated trails, avoid stepping on delicate vegetation, and leave no trace of your visit. By practicing responsible photography, we can help protect this incredible destination for future generations of photographers.
Photographing on the Mobius Arch Loop Trail is a remarkable experience that allows you to capture the iconic beauty of the Alabama Hills. With careful planning, an eye for composition, and an appreciation for the stunning surroundings, you can create images that showcase the arch's natural frame and the breathtaking landscapes it encompasses. So grab your camera, explore the trail, and let the magic of the Mobius Arch inspire your photography.
Photographing Mount Whitney from the Alabama Hills
The Alabama Hills provide a unique vantage point for photographing the towering majesty of Mount Whitney, the highest peak in the contiguous United States. With its dramatic presence and breathtaking surroundings, Mount Whitney offers a captivating subject for photographers looking to capture the grandeur of nature. Here's what you need to know to make the most of your photography experience when capturing Mount Whitney from the Alabama Hills.
Composing with the Alabama Hills: The rock formations of the Alabama Hills offer a stunning foreground element to frame Mount Whitney in your compositions. Look for interesting leading lines, textured rocks, or arches to create depth and add visual interest to your images. Experiment with different angles and perspectives to find the perfect composition that highlights both the foreground and the distant peak.
Timing for Optimal Lighting: Consider the time of day when photographing Mount Whitney. Sunrise and sunset often provide the most favorable lighting conditions, casting warm, soft light on the peak and surrounding landscapes. The golden hour and blue hour are particularly magical for capturing Mount Whitney, as the changing colors of the sky complement the mountain's grandeur. Plan your shoots accordingly to maximize the beauty of the light.
Weather and Atmospheric Conditions: Keep an eye on the weather forecast and plan your photography session accordingly. Clear skies with minimal haze allow for crisp, well-defined shots of Mount Whitney. However, dramatic cloud formations, fog, or atmospheric conditions can also add a unique and moody atmosphere to your photographs. Be prepared to adapt and embrace the ever-changing weather patterns to create compelling images.
Wide-Angle Perspectives: Mount Whitney's massive presence calls for a wide-angle lens to capture its entirety. The vastness of the peak, combined with the surrounding landscapes, creates a sense of scale and emphasizes the mountain's grandeur. Experiment with different focal lengths to find the ideal balance between capturing the entire scene and highlighting the details of the mountain.
Creative Reflections: If you're lucky to encounter a calm body of water, such as a small pond or lake, take advantage of it to capture reflections of Mount Whitney. The mirror-like surface adds a captivating element to your compositions, creating symmetry and enhancing the overall visual impact. Look for water sources within the Alabama Hills or nearby to incorporate reflections into your photographs.
Including Human Elements: To add a sense of scale and storytelling to your images, consider incorporating human elements into your compositions. Hikers or climbers ascending Mount Whitney or traversing the trails can provide a visual reference and emphasize the mountain's magnitude. However, always respect the privacy and space of individuals and seek their permission if you intend to include them as subjects in your photographs.
Photographing Mount Whitney from the Alabama Hills is an awe-inspiring experience that allows you to capture the essence of this majestic peak. By utilizing the stunning foreground elements, considering optimal lighting conditions, and embracing the natural beauty of the landscape, you can create images that convey the grandeur and allure of Mount Whitney. So grab your camera, explore the Alabama Hills, and let the mountain's presence inspire your photography.
Exploration and Discovery:
Beyond the well-known spots, don't hesitate to venture off the beaten path and explore the lesser-known corners of Alabama Hills. The vast expanse of unique rock formations offers countless opportunities for creative photography. Allow yourself to wander, discover hidden gems, and let your imagination guide you to capture the essence of this remarkable landscape.
A Milky Way bow over the Alabama Hills in California. Photograph by Dalton Johnson
Alabama Hills, CA, is a paradise for photographers seeking natural beauty and captivating landscapes. Whether you're drawn to the famous Mobius Arch, curious about film history, or eager to explore the lesser-known corners, this destination has something for everyone. Immerse yourself in the enchanting scenery, let your creativity soar, and capture photographs that will tell the story of your journey through Alabama Hills for years to come. Start planning your photography adventure today and witness the magic of this remarkable destination firsthand.
Discover more of Eastern Sierra

Creating a Sun-kissed Photo: A Step-by-Step Guide to Solar Flare Photography
Have you ever seen a beautiful photograph with a stunning solar flare effect? Solar flare photography is a unique way to add some drama and magic to your photos. It's a technique that can be difficult to achieve but with some tips and tricks, it's possible to create this effect.
Have you ever seen a beautiful photograph with a stunning solar flare effect? Solar flare photography is a unique way to add some drama and magic to your photos. It's a technique that can be difficult to achieve but with some tips and tricks, it's possible to create this effect.
Creating the solar flare effect in a photograph is simple, turn your aperture between f/10 - f/22. While the settings are simple, the positioning and details to create a great solar flare photograph can be challenging.
In this blog, we'll share some helpful tips for creating the solar flare photography effect.
Pros:
Unique and visually striking: Solar flares can add a dramatic and eye-catching element to a photograph, making it stand out from others.
Adds emotion: Solar flares can evoke a sense of warmth, nostalgia, and hope, making the image more emotional.
Natural lighting: Photographing during golden hour when solar flares are more common can produce a beautiful, natural-looking effect without the need for artificial lighting.
Can hide imperfections: Solar flares can also hide or diminish unwanted elements in the frame, such as lens scratches or dust.
Cons:
Can be distracting: Solar flares can be overwhelming and distracting, taking away from the subject or message of the photograph.
Can be overused: The solar flare effect has become increasingly popular and overused in recent years, leading to an oversaturation of images with this effect.
Difficult to capture: Capturing a solar flare effect can be challenging, requiring the right equipment and skill to achieve the desired result.
Can look unnatural: If not done correctly, solar flares can look unnatural and gimmicky, taking away from the authenticity of the image.
Use the Right Equipment
The first step to creating a solar flare photography effect is to use the right equipment. A camera with a high-quality lens and manual mode (or aperture priority) is essential to capture the sun's rays and create the flare effect. My personal preference is to NOT use a filter as I feel these can mess up the solar flare.
Some Camera Gear Recommendations:
Camera body: The main component of your camera setup, choose a body that fits your needs and budget.
Lenses: Invest in high-quality lenses that will allow you to capture a variety of shots. Wide-angle, standard, and telephoto lenses are all useful to have.
Tripod: A sturdy tripod is essential for shooting in low light, long exposures, and for keeping your camera steady.
Memory cards: Ensure you have enough memory cards with sufficient capacity to store your images.
Camera bag: A bag to store and transport your camera and gear is a must-have.
Use Manual Settings
When capturing a solar flare effect, it's important to use manual settings, or aperture priority. Since this effect only occurs with an aperture between f10 to f/22, using the auto setting might not set your aperture correctly.
Additionally, shooting with manual, or back button autofocus, should be used. General autofocus can be inaccurate when capturing such a bright light source, so it's best to take control and focus manually. This way, you can ensure that your subject is in focus, and the flare effect is captured perfectly.
Positioning is Key
Positioning is crucial when trying to capture a solar flare effect. The best solar flares occur when half to a quarter of the sun is showing. So, this means you need o have some object cover most of the sun to create the best solar flare possible. It's important to find the perfect angle and position to capture the sun's rays at just the right moment. This can take some trial and error, so be patient and keep trying until you find the perfect position.
Pro Tip: The edge of shadows are the easiest place to create a solar flare.


Experiment with Exposure
Exposure is another critical element to consider when creating a solar flare effect. It's best to start with a low exposure and gradually increase it until you achieve the desired effect. However, be careful not to overexpose the image, as this can result in loss of detail, especially in the sky.
Pro Tip: Using your light meter, aim for -0.3
Shoot During Golden Hour
The golden hour is the perfect time to capture a solar flare effect because the sun is on the horizon, blocking the half the sun, giving a half star. Additionally, this is the hour after sunrise or before sunset when the light is soft and warm, which draws people to an image. Lastly, shooting during this time can create a beautiful, natural-looking solar flare effect.
Note: Even though the best time of day to shoot a solar flare is around golden hour, you can create this effect at anytime of the day.
Edit in Post-Production
Post-production editing is a crucial step in creating a solar flare effect. You can use editing software to enhance the flare effect and make it stand out more. Adjusting the contrast and saturation can make the effect more prominent, while adjusting the colors can create a unique look. If you are editing in Adobe Lightroom, the “dehaze” tool is very effective at making your solar flare POP!
Using a solar flare to draw your eye to the people siting on the cliff. Photograph by Dalton Johnson
Creating a solar flare photography effect can be challenging, but with the right tips and tricks, it's possible to achieve stunning results. Use the right equipment, experiment with positioning and exposure, shoot during golden hour, and edit in post-production to create a beautiful solar flare effect in your photographs. Remember to be patient, and keep trying until you find the perfect shot. Good luck!