
We Kayaked Lake Tahoe's Best Spots In A Single Day, It Was Awesome
Some adventures come from spontaneous ideas, and this was one of them. Kristin and I, both having grown up near Lake Tahoe, realized that despite our roots, we had never spent a full day kayaking its iconic waters. So, we woke up at 3:30 a.m. with a bold plan: hit three stunning kayaking spots in a single day—Emerald Bay, Bonsai Rock, and Zephyr Cove.
Some adventures come from spontaneous ideas, and this was one of them. Kristin and I, both having grown up near Lake Tahoe, realized that despite our roots, we had never spent a full day kayaking its iconic waters. So, we woke up at 3:30 a.m. with a bold plan: hit three stunning kayaking spots in a single day—Emerald Bay, Bonsai Rock, and Zephyr Cove.
Starting at Emerald Bay
Armed with coffee and determination, we made our way to Emerald Bay as the first rays of sunlight began to light the trail. The hike down, though scenic, was long and a bit cumbersome with our Oru kayaks in tow. These foldable kayaks were lifesavers for transporting from the van to the water.
Emerald Bay’s calm morning waters greeted us as we assembled our kayaks and paddled toward Fannette Island, the only island in Lake Tahoe. While Emerald Bay is one of the most popular destinations in the area, the early hour meant fewer boats and a peaceful atmosphere. Reaching the island didn’t take long, and we climbed up to explore the historic teahouse at its peak. Though small and weathered, the teahouse offered panoramic views that made the effort worthwhile.
As we scouted the island’s cliffs, Kristin playfully asked if we could jump off. A quick check of the water below revealed a safe landing spot, and we decided to go for it. Standing about 15 to 20 feet above the icy water, we counted down: “3… 2… 1…” and plunged in. The cold was shocking but invigorating, and we laughed as we climbed back into our kayaks.
By mid-morning, boat traffic was picking up, so we paddled back to shore, hiked out, and began the drive to our second destination.
Exploring Bonsai Rock
The hour-long drive to Bonsai Rock was filled with music, podcasts, and conversations. Along the way, we stopped at a local Mexican restaurant for burritos—a much-needed energy boost. Bonsai Rock, famous for its submerged granite boulders, was free to access but notoriously difficult for parking. We managed to snag a spot and began the steep, sandy hike down with our gear.
Once on the water, the magic of Bonsai Rock took over. The clarity of Lake Tahoe’s water is unmatched, and paddling over the massive boulders below felt like gliding above another world. We spent hours exploring the area, diving into the cool water, and marveling at the natural beauty surrounding us. Kayaking here was meditative, with each stroke accompanied by the rhythmic glide of the kayak and the warm sun overhead.
Carrying the kayaks back up to the van proved challenging after a long paddle, but the experience was worth every bit of effort. Bonsai Rock remains one of my favorite spots on the lake, and I’d happily return a hundred more times.
Ending at Zephyr Cove
Our final destination was Zephyr Cove, a local gem that offers one of the best sunset views in Tahoe. The cove is quieter compared to the busier tourist spots, with limited parking and minimal crowds. By the time we arrived, the evening light was softening, painting the landscape with warm hues.
We launched the kayaks one last time and paddled into the still waters. The sunset over the surrounding mountains was mesmerizing, and Kristin and I savored the peacefulness of the moment. The colors shifted from gold to pink and purple as we lingered on the water, paddling until the sun dipped completely behind the horizon.
Though the light faded, it wasn’t difficult to navigate back. The shallow waters at Zephyr Cove made getting in and out safe and easy, even as the day turned to dusk.
Reflections on the Day
To our surprise, our ambitious plan went off without a hitch. The only adjustment we made was skipping a sit-down dinner, as most places had closed by the time we finished. In hindsight, packing a picnic dinner would’ve been ideal. Still, the adventure was everything we had hoped for and more.
My favorite moments were jumping off the cliffs at Fannette Island and watching the sunset with Kristin at Zephyr Cove. Both experiences felt uniquely Tahoe—a mix of exhilaration and tranquility.
Tips for Your Own Kayaking Day
If you’re inspired to plan your own epic kayaking day on Lake Tahoe, here are a few tips:
Start Early: Beat the crowds, especially at Emerald Bay.
Gear Up: Foldable kayaks like the Oru are a game-changer for portability. Bring waterproof bags, snacks, lots of water, and electrolytes.
Dress Smart: Mornings can be chilly, but shorts and T-shirts are perfect for midday. Don’t forget sunscreen!
Plan Your Parking: Bonsai Rock and Zephyr Cove have limited parking. Arrive early or be patient while looking for a spot.
Know Your Limits: It’s a full day of activity and driving, so pace yourself and stay hydrated.
Kayaking Lake Tahoe was a spontaneous idea that turned into one of the most memorable days of the summer. Whether you’re a local or a visitor, exploring these spots by kayak offers a unique perspective of the lake’s stunning beauty.
Discover More Adventures


Testing Peak Design's Outdoor Bag Photographing Blue Whales in Loreto, BCS
For two months, the Peak Design Outdoor 45L Pack sat on my shelf. Its design intimidated me: no traditional clips, a roll-top, and an array of dangling cords. I’ve packed hundreds of bags, but I couldn’t figure out where to start with this one. I shelved it for "later," waiting for the right opportunity. That opportunity finally arrived. I was heading to Loreto, Baja California Sur, for a quick trip to photograph whales. Carry-on only, no room for error.
For two months, the Peak Design Outdoor 45L Pack sat on my shelf. Its design intimidated me: no traditional clips, a roll-top, and an array of dangling cords. I’ve packed hundreds of bags, but I couldn’t figure out where to start with this one. I shelved it for "later," waiting for the right opportunity. That opportunity finally arrived. I was heading to Loreto, Baja California Sur, for a quick trip to photograph whales. Carry-on only, no room for error.
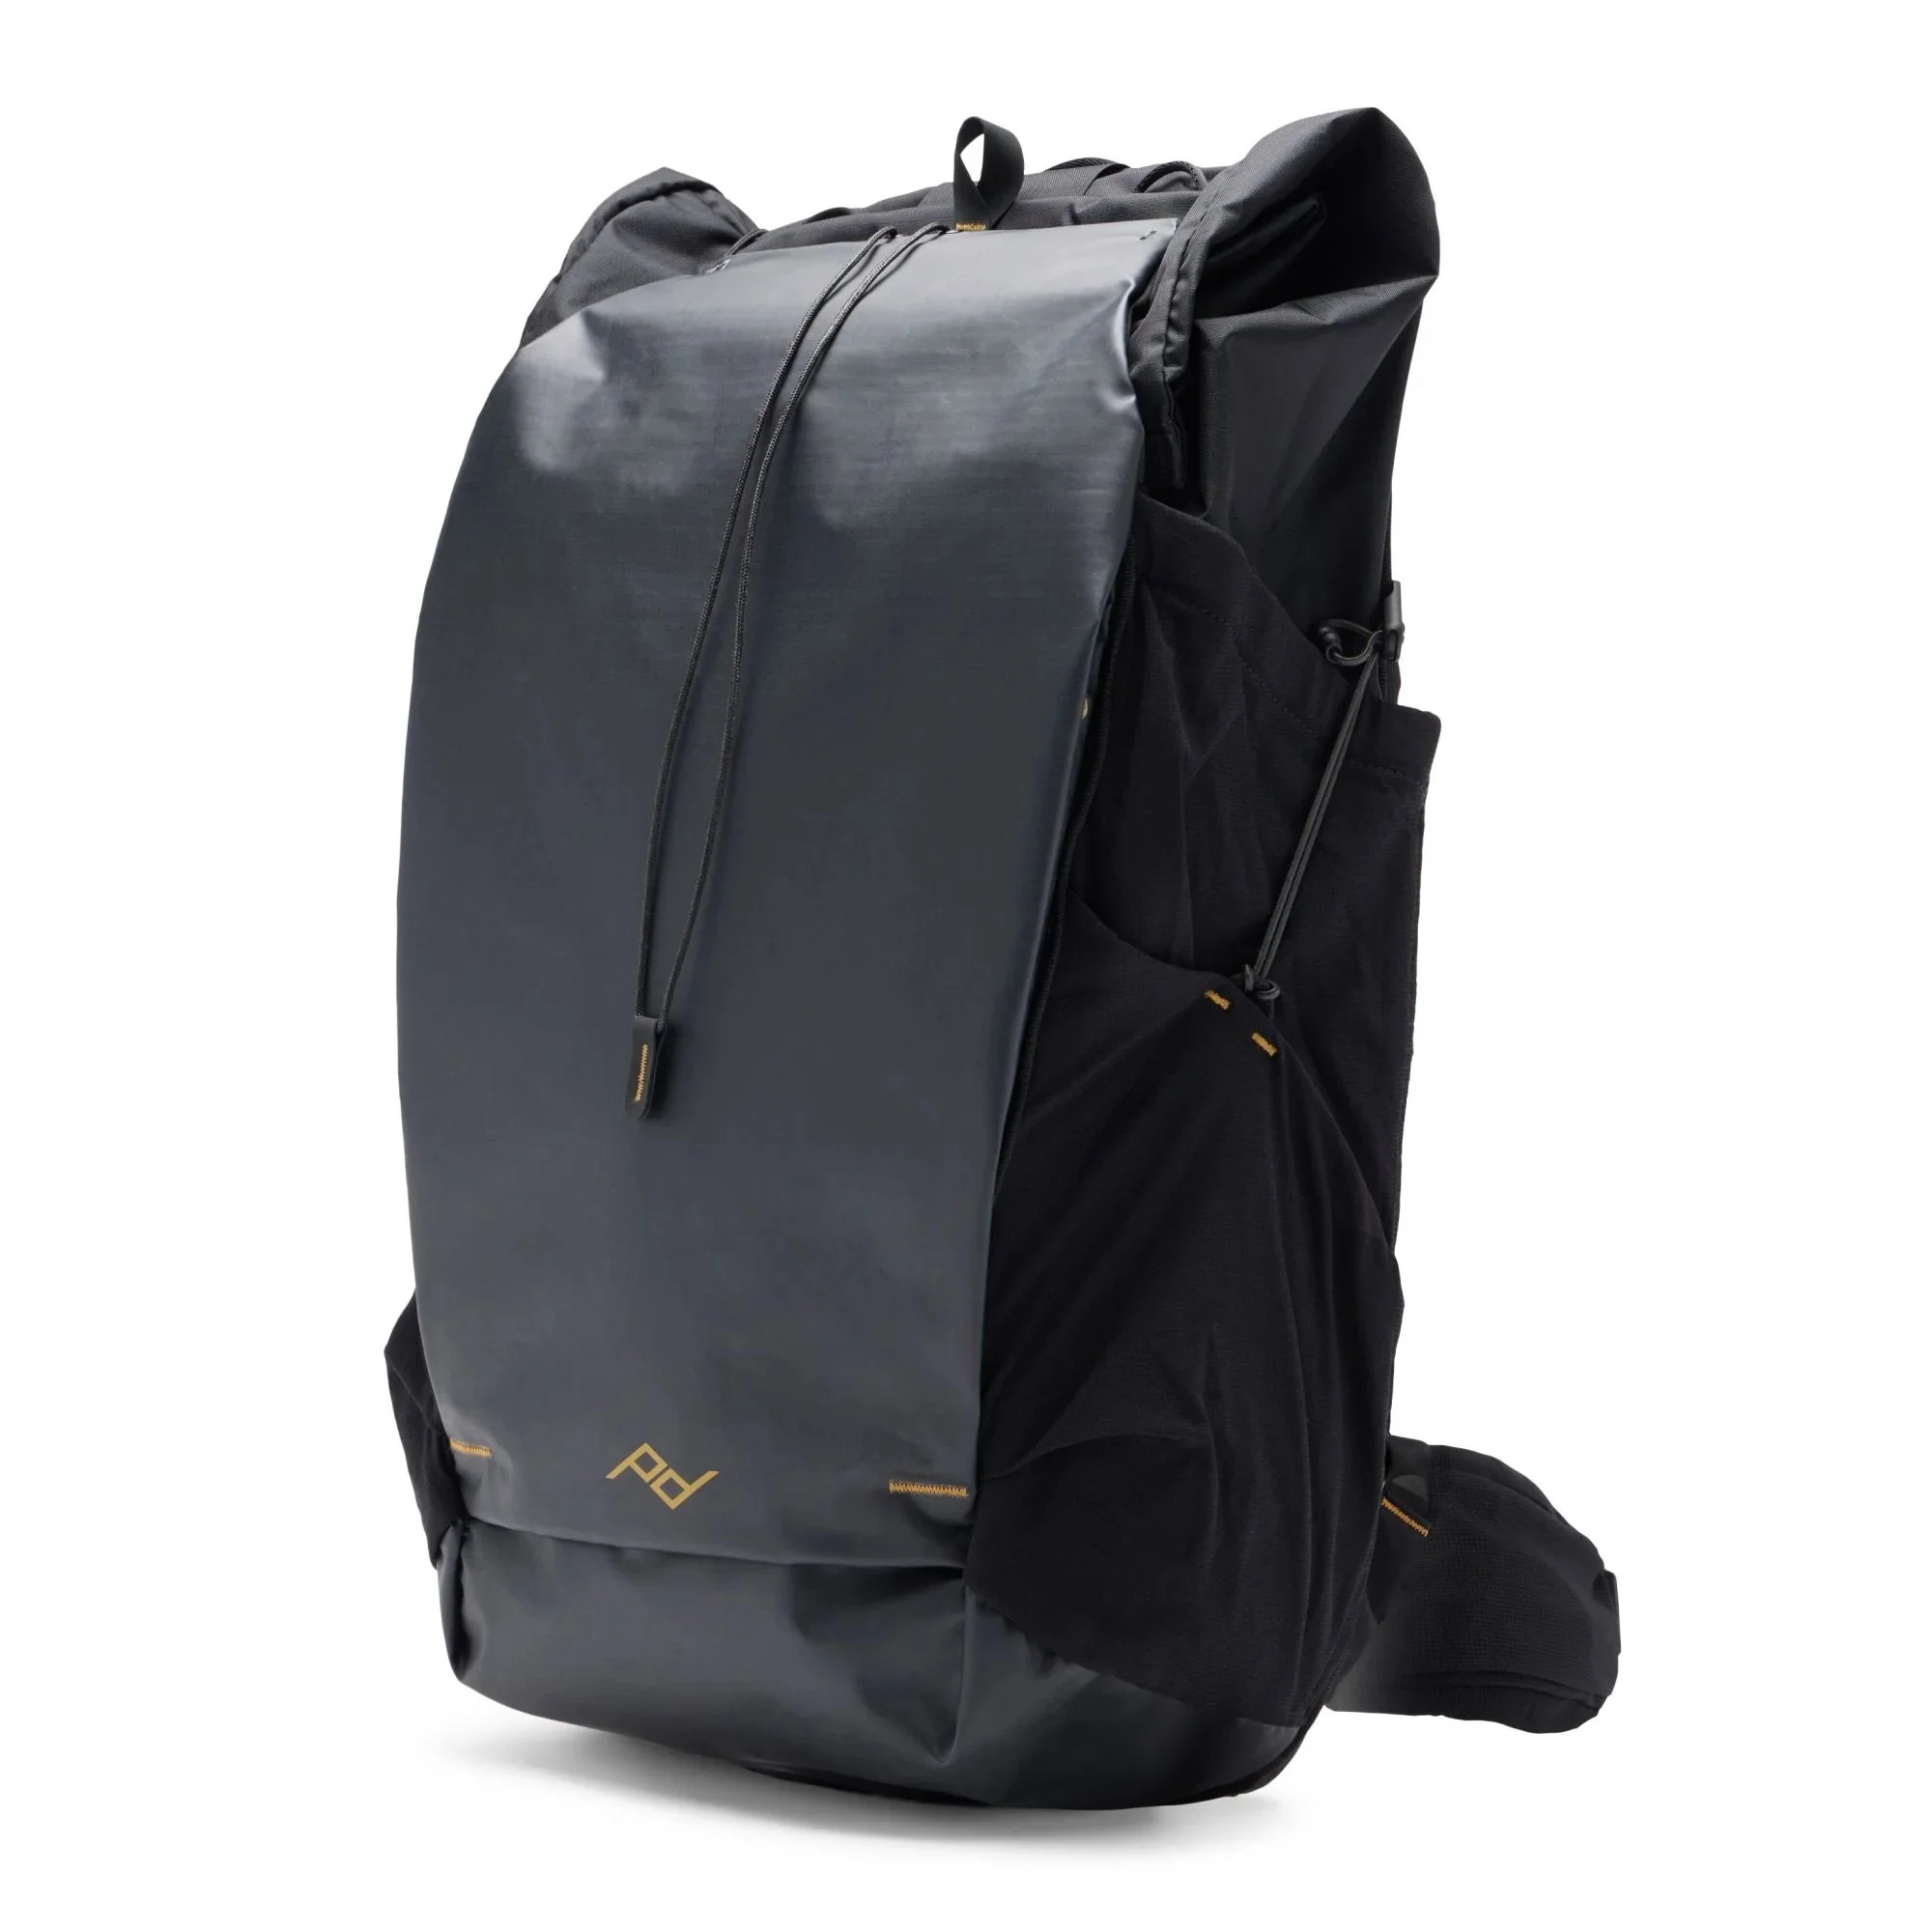
Peak Design
Packing the Bag
With my trip ahead, I took the bag off the shelf and started packing. Laptop, camera, small lens, big lens, medium lens, chargers, toiletries, camera cleaning supplies, headphones, batteries, journal, memory cards, jacket, extra pair of shorts (just in case I got hot on the plane)—all of it fit. At first glance, this seemed like an impressive feat for a carry-on bag. However, figuring out how to organize everything in the bag efficiently was another story. The clips and closures weren’t intuitive at first, and the design required a bit of trial and error to master. It’s not the kind of bag you just throw items into; it demands a bit of planning. However, once I got the hang of it, everything clicked, and the bag’s smart design started to make sense.
I appreciated the modularity of the compartments. Adding a camera cube kept my camera gear organized and snug, while the roll-top provided flexibility for last-minute additions. Despite my initial frustration, I began to see the potential for this bag to adapt to various scenarios.
Early Travel Morning
The day started early. I was up at 2:30 a.m., groggy but determined to catch my flight. By 5:30, I was boarding my first plane. The plane was small, but to my relief, the bag fit under the seat without any issues—a major win for carry-on travelers. This was one of those moments when the bag’s compact yet spacious design really shone.
Waiting for my connecting flight, hunger struck. I remembered tossing snacks into the bag’s numerous pockets earlier that morning but couldn’t find them immediately. Scrunching the outside pockets and looking through the pack's main compartment, the snacks disappears. Then it came back to me: the snacks were in one of the front zipper pockets. A small inconvenience, but it highlighted how many compartments the bag has—both a blessing and a curse if you’re not organized.
The two large chest pockets on the shoulder straps also stood out. My phone and passport fit perfectly, keeping them within easy reach. Although I worried about losing my passport in the shuffle, I eventually moved it to an internal zipper pocket for extra security until I needed it again at immigration.

The first mission in the California’s. Photo by Dalton Johnson
Exploring Loreto, BCS
Once in Loreto, I dropped off most of my gear at the hotel and ventured into town with just my camera equipment. This is where the bag really started to shine. Walking through Loreto’s charming streets, I frequently placed the bag on the ground, unzipped the back panel, and pulled out my camera to snap frames. The back panel’s access design made these quick transitions seamless. It was clear that this bag was designed with photographers in mind.
Loreto’s town square was bustling with activity. I admired the historic mission, the first in the Californias, and took in the sights along the malecón. The views of the Sea of Cortez and the nearby islands were stunning. The freedom to pack my camera away between shots allowed me to observe more without the weight of my camera constantly around my neck. This bag provided the perfect balance of accessibility and security for my gear.
Photographing Blue Whales
The next morning, the real adventure began. We headed out early for a panga boat ride to search for whales. After an hour’s drive to the dock, we set off on the water, and the wildlife did not disappoint. Along the way, we encountered:
Dolphins — Pods of them, darting alongside the boat in numbers I have never seen before.
A fin whale — Elusive and quick, it surfaced twice before disappearing into the depths.
A blue whale — The gentle giant of the sea. It was feeding and calm, allowing us to spend two incredible hours watching it surface repeatedly. Our guide summed it up perfectly: “Watching blue whales is like... blowhole, back, back, back, more back, more back, tiny fin, more back, tail.” While we never saw its iconic fluke, the experience of being so close to this water mammal was unforgettable.

Peak Design outdoor bag going for a boat ride. Photo by Dalton Johnson
Throughout the day, the bag continued to perform admirably. The rainfly provided peace of mind against ocean spray, while the internal camera cube kept my gear secure even on the choppy waters. The back-opening design made it easy to switch lenses quickly, a crucial feature for capturing wildlife on the move. While the bag isn’t waterproof, its water-resistant materials handled the conditions well.

While we didn’t see many whales in Mag Bay, we did see lots of birds including this Bald Eagle. Photo by Dalton Johnson
A Windy Day at Magdalena Bay
The following day, we ventured to Magdalena Bay in search of gray whales. Unfortunately, the wind had picked up, and the choppy seas made sightings difficult. We managed to spot a few gray whales, but the experience was brief. Despite the challenging conditions, the bag held up. My gear remained dry and secure, and the bag’s comfortable straps made carrying it all day a non-issue. This was another reminder of the bag’s durability and thoughtful design.

Sunrise at the marina in Loreto, BCS. Photo by Dalton Johnson
Sunrise and Final Impressions
On my last morning in Loreto, I woke up early to watch the sunrise before heading to the airport. As I sat on the malecón, reflecting on the trip, I realized how much I had underestimated this bag. While its design takes time to get used to, the Peak Design Outdoor 45L Pack proved to be a reliable and versatile companion. Its structured compartments, clever organization, and durable materials make it a solid choice for outdoor photographers.
Would I call the Peak Design Outdoor 45L Pack a perfect bag? Not quite. Personally, I prefer simpler designs that require less of a learning curve. However, for casual outdoor photography and travel, it’s an excellent choice. The bag’s adaptability, comfort, and functionality make it a valuable tool for those willing to take the time to learn its quirks. If you’re planning an adventure like photographing blue whales in Loreto, this bag won’t let you down.
Discover More Gear

We Road Tripped To Alaska, Standing One Foot In Canada, The Other in Alaska
After days of driving, endless highways, and countless moments of awe, we finally reached the Canada-Alaska border. For me, it wasn’t just another milestone on the map. It felt like the culmination of everything the journey had been leading up to. My dad and I pulled over, parked the van, and stepped out to take it all in. That moment—standing there with one foot in Canada and the other in Alaska—became one of my favorite memories of the entire trip.
After days of driving, endless highways, and countless moments of awe, we finally reached the Canada-Alaska border. For me, it wasn’t just another milestone on the map. It felt like the culmination of everything the journey had been leading up to. My dad and I pulled over, parked the van, and stepped out to take it all in. That moment—standing there with one foot in Canada and the other in Alaska—became one of my favorite memories of the entire trip.
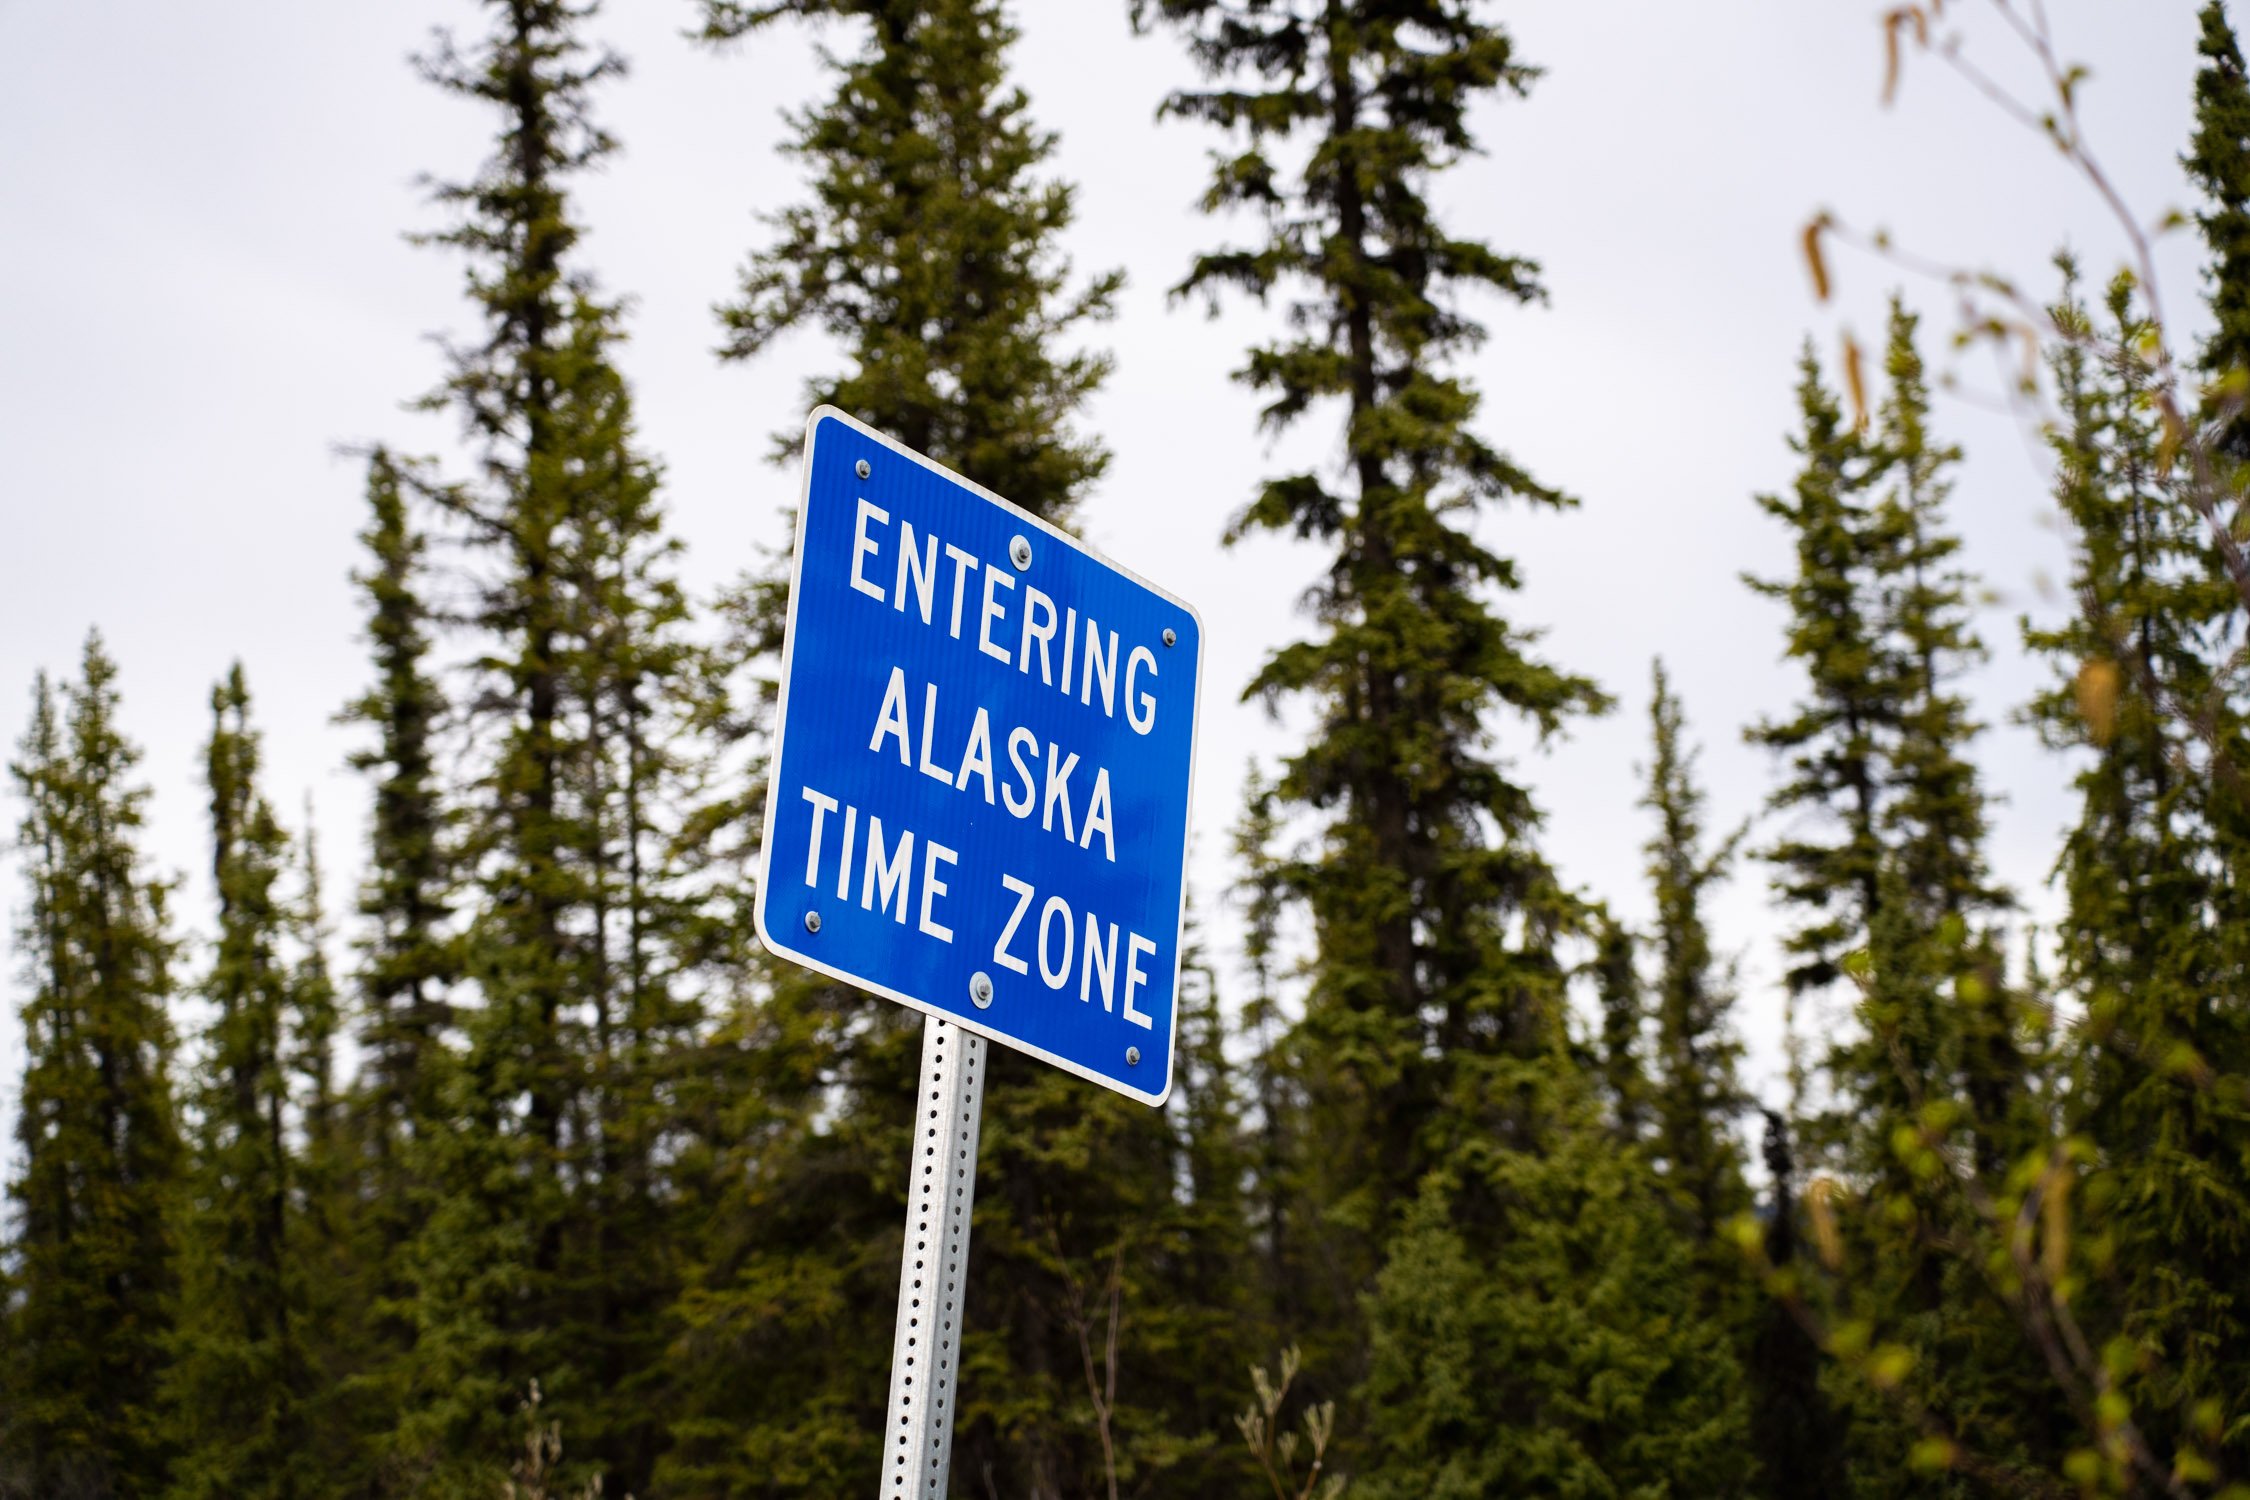
We knew we were getting close the to international border when we saw this sign. Photo by Dalton Johnson
The drive to get there wasn’t easy. The long stretches of road tested us both physically and mentally. We’d spent hours navigating highways framed by towering mountains, forests that seemed endless, and occasional wildlife crossings that brought the van to a halt. Often resulting in me jumping out of the van with my camera, trying to take photos of the bears, moose, or birds. The beauty was overwhelming, but so was the scale of it all. Each mile reminded me of just how far we had come—and how far we still had to go.
One of the things about driving to Alaska is how much time you spend reflecting. There’s something about the endless stretches of wilderness, the quiet hum of the road, and the absence of distractions that make you turn inward. For my dad and me, those hours of driving were about catching up on years of conversations we’d never had. Growing up, we didn’t have a lot of time to spend together. He worked long hours to provide for the family, and while I’ve always appreciated that, it meant we missed out on moments like this. This trip gave us the time and space to reconnect in ways that felt both overdue and deeply meaningful.
One foot in Canada, one foot in Alaska. Photo by Dalton Johnson
When we arrived at the border, it was quiet. No traffic, no other travelers, just us and the line separating two countries. There was something surreal about being there. The air was cool and crisp, carrying a sense of anticipation and accomplishment. My dad grinned as he stepped onto the imaginary line, positioning himself with one leg in Canada and the other in Alaska. “Look at me,” he joked. “I’m in two places at once!”
We laughed, but it was more than a joke. That moment captured the joy and simplicity of the trip. It wasn’t about grand gestures or extravagant destinations. It was about these quiet milestones, shared with someone you care about, that turn an ordinary day into something extraordinary. For my dad, it was pure fun. For me, it was a moment to soak in how far we’d come—not just in distance, but in everything this journey represented.


We stood there for what felt like ages, even though it was probably only ten minutes. The “Welcome to Alaska” sign felt like more than just a marker; it was a symbol of how far we’d come. For me, it was the first time Alaska felt real. Up until that point, it had been an idea, a destination I’d read about or seen in photos. But standing there, on the edge of it, made it tangible. This wasn’t just a place on a map. It was something we had earned by driving every mile to get there.
The border itself was striking in its simplicity. There were no grand monuments or bustling checkpoints. Just the quiet stillness of the wilderness around us. It made me think about how much of this trip had been about embracing the in-between. The moments on the road—seeing a moose by the side of the highway, stopping to fix our makeshift bug nets, or sharing snacks at a random pullout—had been just as impactful as the major stops we planned.
I’ll never forget the way my dad’s face lit up as he joked about being in two places at once. It was one of those moments where everything feels lighter, where the weight of the miles disappears, and you’re just there, fully present. It’s funny how the small moments stick with you the most. They aren’t flashy or dramatic, but they capture the essence of the journey.

We made it to Alaska. Photo by Dalton Johnson
As we stood there, I thought about all the miles ahead. Reaching the border wasn’t the end—it was just the beginning of exploring Alaska. But that moment gave me the energy to keep going. It was a reminder of why we’d chosen to drive instead of fly: to experience the journey, to connect with the places we passed through, and to share these quiet, powerful moments together.
That moment at the border wasn’t flashy or dramatic, but it was perfect. It captured everything the trip was about: the journey, the connection, and the joy of being present. It’s funny how something so small can stick with you, but that’s what makes it special. Standing there with my dad, sharing that quiet milestone, is a memory I’ll carry with me forever.
Discover more Adventures

Big Agnes’s Big Six Is My Go-To Car Camping Chair
In the back of my van, you will always find two Big Agnes Big Six camp chairs. They’re simply the best. After countless road trips and nights spent boondocking—including an unforgettable journey through Alaska—these chairs have earned their permanent spot in my gear collection. Every night on the road, as we set up camp and cooked dinner, these chairs were my go-to for comfort and relaxation.
In the back of my van, you will always find two Big Agnes Big Six camp chairs. Why? They’re simply the best. After countless road trips and nights spent boondocking—including an unforgettable journey through Alaska—these chairs have earned their permanent spot in my gear collection. Every night on the road, as we set up camp and cooked dinner, these chairs were my go-to for comfort and relaxation.

Making dinner and enjoying the view with the Big Agnes Big Six. Photo by Dalton Johnson
What sets the Big Six apart from other camping chairs is how comfortable they are. Unlike the bulky, fold-up chairs that pop open in seconds but often leave your back aching after an hour, the Big Six is designed with real support in mind. The high backrest, wide seat, and slightly reclined position make it perfect for lounging around a campfire, enjoying a meal, or just sitting back to watch the sunset. During our Alaska road trip, I’d set up the chair every evening and sink into it after a long day of driving. Whether I was enjoying a hot dinner, watching the sun dip below the horizon, or marveling at the endless daylight, the Big Six never let me down. It’s like having a slice of luxury in the middle of nowhere.
That’s not to say the chair doesn’t have its quirks. If you’re used to the typical camping chairs that fold open in one motion, the Big Six will feel like a bit of a puzzle at first. The frame comes in multiple pieces that snap together, and the seat fabric needs to be stretched onto the frame. The first few times, it can be a little frustrating—especially when all you want to do is sit down and relax. But once you’ve done it a few times, the setup becomes second nature. By the time we reached the halfway point of our Alaska trip, I could set up the chair without even thinking about it.

Vanlife would not be the same without these chairs, they make for a great community area just outside the door. Photo by Dalton Johnson
For someone living out of a van or traveling with limited space, the Big Six’s ability to pack down small is a game-changer. These chairs don’t take up much room, which is crucial when space is at a premium. They easily fit into the storage bins in my van, leaving plenty of room for other gear. And because they’re so lightweight, I can toss them into the car for shorter car camping trips without a second thought.
Durability is another area where the Big Six excels. These chairs have been through a lot—from dusty deserts to rainy forests—and they’ve held up beautifully. The materials feel sturdy, and the frame shows no signs of wear, even after years of use. I trust these chairs to last through countless adventures.
Most of my time in these chairs is spent next to a fire, with a beverage in the cup holder and good friends all around. There’s something about the combination of a cozy campfire, a sturdy chair, and great company that makes the world feel right.
During our Alaska trip, some of my favorite moments were spent sitting in the Big Six, talking with my dad or Kristin about the day’s adventures while the fire crackled in front of us. These chairs aren’t just functional—they add to the experience. From watching vibrant sunsets to witnessing the surreal beauty of endless daylight in Alaska, the Big Six became more than just a chair. It was a front-row seat to some of the most incredible moments of my life.

Bouldering with friends in the Buttermilks while on a climbing road trip. Photo by Dalton Johnson
The Big Agnes Big Six isn’t just my go-to car camping chair; it’s an essential part of my outdoor experience. It’s reliable, durable, and compact enough to fit seamlessly into van life. Whether I’m setting up camp in the middle of nowhere or enjoying a casual weekend trip, I know I can count on these chairs to provide comfort and support. If you’re someone who values comfort, durability, and packability in your camping gear, the Big Six is worth every penny. Just be prepared to spend a few minutes learning how to set it up. Trust me, once you’re sitting by the fire, watching the sun dip below the horizon, you’ll know it was worth it.
Discover More Gear
Road Trip to Alaska, The Drive That Changed Everything
When the opportunity to create a documentary about Mount Denali came my way, I had two choices: fly to Alaska or drive. I chose to drive. That decision transformed what could have been a straightforward work trip into an unforgettable adventure—one that tested my limits, deepened my bond with my dad, and left me with memories I’ll carry for the rest of my life.
When the opportunity to create a documentary about Mount Denali came my way, I had two choices: fly to Alaska or drive. I chose to drive. That decision transformed what could have been a straightforward work trip into an unforgettable adventure—one that tested my limits, deepened my bond with my dad, and left me with memories I’ll carry for the rest of my life.

Dad making dinner, we switched every night, while I walked around snapping images. Photo by Dalton Johnson
At the time, driving to Alaska wasn’t something I’d dreamed about. Sure, the Pan-American Highway was a fantasy of mine, but Alaska? It hadn’t crossed my mind until the documentary project made it a possibility. Flying would have been easier, faster, and probably more convenient, but I wanted to experience the journey. Once I decided to drive, everything began to fall into place—even though I had no idea what to expect.
A Mixture of Excitement and Uncertainty From the Start
The trip began with excitement tinged with doubt. Driving thousands of miles into unfamiliar territory felt overwhelming. Thankfully, my dad decided to join me. He didn’t need much convincing—a couple of weeks before we left, he jumped on board. Having him there meant everything. I wasn’t alone in figuring out the road ahead, and I had someone to share both the challenges and the magic of the journey.
We packed up the van—a converted Ram ProMaster 2500. It was more than just a vehicle; it was our home on wheels. Inside, we had a bed, cabinets, a small kitchen, and even a portable toilet. Solar panels powered the essentials, letting us live off-grid when needed. The van was more than functional—it gave us freedom. We didn’t have to rely on hotels or campgrounds; we could pull over almost anywhere and feel at home.
The first days were a mix of getting into a rhythm and making adjustments. One of the earliest lessons we learned was about the bugs. Alaska’s mosquitoes and biting flies are relentless. Within days, we rigged up makeshift bug nets to keep the van livable. It might seem like a small thing, but those nets made all the difference. They turned the van into a refuge rather than a trap.

A small Dad in a big landscape. Photo by Dalton Johnson
Moments That Took My Breath Away
Every road trip has its highlights, and this one was no exception. One moment I’ll never forget was standing at the border between Canada and Alaska. My dad, grinning ear to ear, straddled the line with one leg in each country. It was such a simple thing, but the joy on his face made it unforgettable. Watching him light up reminded me why this trip was so special—it wasn’t just about the destination; it was about the shared experience.
Then there were the roads themselves. In Alaska, highways stretch endlessly, flanked by towering mountains and endless forests. The sense of scale is hard to describe. Each mile felt like a journey deeper into the wild. Sometimes we’d drive for hours without seeing another car, just the landscape unfolding around us. It was humbling and exhilarating all at once.
And then there was the glacier. It was the first I’d ever seen, and it took my breath away. The icy blue shimmered in the sunlight, and for the first time, Alaska didn’t feel like an abstract idea. It was real, vast, and stunningly beautiful. That glacier made everything—the miles, the uncertainty, the effort—worth it.

That moment you realize you made it. Photo by Dalton Johnson
Lessons Learned on the Road
This trip wasn’t just about getting to Alaska. It was about the journey, the obstacles, and the moments in between. Driving thousands of miles gave me time to reflect and to connect with my dad in ways we hadn’t before. Growing up, we didn’t spend a lot of time together—he was always working, providing for our family. This trip gave us the time and space to talk, to share stories, and to just be.
One of the biggest lessons I learned was adaptability. Whether it was rigging up bug nets, finding places to sleep, or dealing with long stretches of road, we had to adjust constantly. Every challenge became a chance to figure things out together. It also taught me the value of preparation. The van’s setup—the bed, the kitchen, the solar power—made the journey smoother and gave us the freedom to focus on the adventure rather than logistics.
The other big lesson was about the value of companionship. Having my dad there turned what could have been a lonely drive into something transformative. We didn’t just share the road; we shared the experience. Watching the world go by from the van window, cooking meals together, and even sitting in silence—those moments meant as much as the big highlights.
The passenger was always responsible for looking wildlife along the roads while driving to Alaska. Photo by Dalton Johnson
Why This Trip Mattered
When I look back on this road trip, it’s not the glaciers, the mountains, or the endless highways that stand out most. It’s the feeling of connection—to the landscape, to my dad, and to myself. Choosing to drive to Alaska instead of flying turned what could have been a routine work trip into something life-changing.
This journey taught me that the best adventures aren’t always the ones you plan meticulously. Sometimes, they’re the ones that start with a single decision—to take the long way, to embrace the unknown, and to see what happens. The drive to Alaska wasn’t just a trip. It was a turning point, a reminder of the beauty of slowing down and the magic of the open road.
Discover more Adventures

These Walkie Talkies Saved Us While Road Tripping In Baja
When I first considered using walkie-talkies on a road trip, I wasn’t sure they’d make much of a difference. But after experiencing the challenges of driving through Baja’s unpredictable roads with a group of friends in separate vehicles, I’m convinced that Rocky Talkies were an absolute lifesaver. Here’s why these rugged two-way radios became our ultimate communication tool during the trip.
When I first considered using walkie-talkies on a road trip, I wasn’t sure they’d make much of a difference. But after experiencing the challenges of driving through Baja’s unpredictable roads with a group of friends in separate vehicles, I’m convinced that Rocky Talkies were an absolute lifesaver. Here’s why these rugged two-way radios became our ultimate communication tool during the trip.
Exploring the dirt roads of Baja, communication is very sparse and often no cell service. Photo by Dalton Johnson
The Baja Challenge
Road-tripping through the Baja Peninsula is an adventure in itself. The roads are often narrow, full of potholes, and require constant attention. On top of that, cell service is spotty or nonexistent in many remote areas. With several vehicles in our caravan, we needed a way to stay in contact without relying on phones or constantly pulling over.
I had previously used Rocky Talkies while rock climbing, where they excel at connecting belayers and climbers on long routes. They’re compact, tough, and easy to use even in challenging conditions. I’d also tried them on photo shoots to coordinate between teams. This trip, however, was the first time I considered using them for road travel.
How Rocky Talkies Kept Us Connected
Throughout the trip, the Rocky Talkies proved to be incredibly effective. We could quickly and clearly let each other know when to turn, where to stop, and what road hazards lay ahead. The radios were particularly helpful in areas like Conception Bay, where sharp turns and unpredictable road conditions made it tricky to maintain a coordinated caravan.
Their range, up to 25 miles in open areas, allowed us to spread out and still stay connected. Even in more rugged terrain, we were able to communicate without interruption. The radios’ durability also came into play: they easily handled the dust, heat, and occasional drops that are inevitable on a Baja adventure.

Our buddy pulled over in Baja. Photo by Dalton Johnson
Real-World Scenarios
One of the most memorable moments was when a friend got pulled over by local police. As we lost sight of his vehicle, we relied on the radios to figure out what happened. He couldn’t respond right away since he was talking to the officer, but knowing he could hear us and would update us as soon as possible gave us peace of mind. Once the situation was resolved, he quickly let us know, and we regrouped without confusion or further delays.
Another instance involved picking our camping spot. The narrow, winding roads near Conception Bay made it difficult to pull over and discuss options. With the Rocky Talkies, we could relay information about upcoming turns and decide on the fly without risking safety or causing traffic issues.

Camping on the beach in Conception Bay. Photo by Dalton Johnson
Final Thoughts
The Rocky Talkies exceeded my expectations for road-tripping. Their reliability, durability, and range kept our group connected when we needed it most. While they’re marketed primarily for outdoor sports like climbing, their utility extends well beyond the rock. For any group road trip—especially in remote areas like Baja—I can’t recommend these radios enough.
Discover More Gear

8 Tips for First-Time Alaska Road-Trippers
I have driven to Alaska and back. Each way taught me new lessons about timing, route choices, and personal limits. These tips will help you plan your own road trip with a clear mind and a realistic approach. Whether you’re an experienced road-tripper or embarking on your first major journey, Alaska’s vast wilderness offers lessons you’ll carry with you for a lifetime.
I have driven to Alaska and back to the lower 48. Each way taught me new lessons about timing, route choices, and personal limits. These tips will help you plan your own road trip with a clear mind and a realistic approach. Whether you’re an experienced road-tripper or setting off on your first major journey, Alaska’s vast wilderness offers lessons you’ll carry with you for a lifetime.

Driving a dirt road to an epic camping spot on the beach of Kenai Lake. Photo by Dalton Johnson
1. Give Yourself Enough Time
I recommend at least two and a half weeks to drive up and another two and a half weeks to drive back. Alaska is far away, and the journey can feel longer than you expect. The roads have plenty of interesting stops, and each one can eat up hours. If you try to pack it all into a shorter window, you may feel rushed and miss experiences you truly want.
Remember, Alaska’s beauty lies in its vastness. It’s not a place to rush through. Take time to soak in the incredible landscapes, from mountain ranges to shimmering lakes. Each stop can reveal something unforgettable, whether it’s a hidden hiking trail or an unexpected wildlife sighting. Time is your best friend on a journey like this.

My Dad really wanted to see Bear Glacier, so we made the stop despite the winter conditions. Photo by Dalton Johnson
2. Choose Meaningful Stops
Pick activities or sights that matter to you. Maybe you want to see specific wildlife or catch the northern lights. Research their active seasons. If you dream of spotting grizzly bears, aim for the months they are out. If you want a shot at the northern lights, plan for darker skies. The Milepost guidebook is a great resource, but be honest with yourself: you can’t do it all in one trip.
Some highlights that stand out to me include Bear Glacier near Stewart and Hyder, the Exit Glacier hike in Kenai Fjords National Park, and the bore tide near Turnagain Arm. Each of these spots offered unique experiences, from breathtaking views to the chance to try something new—like surfing a tidal wave! Think about what excites you most and prioritize those stops.

My Dad was a great road trip buddy! Photo by Dalton Johnson
3. Road Trip Buddy
Driving with a partner or friend can save you from exhaustion. You can take turns at the wheel, share camping duties, and stay safe if you’re in remote spots. Also, long drives become more fun with another person to chat with. I found that traveling with my dad deepened our bond, and traveling with my girlfriend made the experience more special.
A buddy also adds a layer of safety, especially in more isolated areas. If one of you is tired, the other can take over driving. Plus, sharing experiences like spotting wildlife or witnessing a stunning sunset makes the journey even more memorable. Don’t underestimate the value of good company on the road.
4. Lodging vs. Camping
I love my van because I have a built-in bed. It removes the pressure of finding campsites or hotels every night. If you rely on a car or tent, plan ahead for safe places to sleep. Tired driving is dangerous. Sometimes you can find random pullouts or rest areas, but be sure it’s allowed. Book campgrounds in busy areas if you want guaranteed space.
Camping can also provide some of the most rewarding moments on the trip. Waking up to a quiet forest or lakeside view is hard to beat. However, safety and comfort are key. Make sure you have reliable gear if you’re tent camping, and always check for wildlife activity in the area before settling in for the night. Bears are common in Alaska, and proper food storage is essential.

Storm clouds blocking our view of Bear Glacier, but we didn’t mind. Photo by Dalton Johnson
5. Seasonal Considerations
Alaska changes a lot by season. In early spring, I saw icy roads and had to watch for potholes. In summer, the views were greener and the wildlife more active. Decide what is most important to you. Do you want to see snowy landscapes? Are you aiming for warmer days? Each season has unique rewards and drawbacks. If you choose winter or early spring, check if you need tire chains or special vehicle prep.
Summer offers nearly endless daylight, which is both a blessing and a challenge. It’s perfect for packing in activities but can make it hard to maintain a regular sleep schedule. On the flip side, fall and winter bring shorter days but offer better chances for northern lights viewing. No matter when you go, pack clothing and gear for unpredictable weather.
6. Budgeting and Vehicle Prep
Gas adds up fast. You’ll cover hundreds or even thousands of miles, and fuel can cost more in remote areas. Bring extra funds. Also, do a thorough check on your vehicle before you leave. Fresh oil, good tires, and a spare tire are essential. I like having some basic tools and a small roadside repair kit for peace of mind. My van handled the trip well, but I was ready for the worst-case scenario.
It’s also wise to carry extra water, snacks, and a first aid kit. Breakdowns in remote areas can mean long waits for help. Even if you don’t encounter any issues, being prepared will make you feel more confident throughout the journey. Your vehicle is your lifeline on a trip like this—treat it accordingly.

Kayaking to a glacier was very high on Kristin and I bucketlist, so we rented kayaks and made it happen. Photo by Dalton Johnson
7. Staying Realistic
I encourage you to be honest about your pace and energy levels. Alaska is huge, and the drive can be draining. Don’t force yourself to push too hard each day. Plan for rest days, especially when you reach a spot you want to explore. Trying to cram too much can leave you exhausted and unfocused on the road.
It’s okay to let go of the idea of seeing everything. Focus on quality over quantity. A few well-chosen activities or destinations will be far more meaningful than a rushed checklist of stops. Give yourself the space to truly enjoy each moment.
8. My Personal Take
Each time I head north, I realize how much I still haven’t seen. The size of Alaska and western Canada is overwhelming. I learned that focusing on a few major activities or destinations helped me enjoy them more. I also found that bringing someone along—whether a partner, friend, or family member—turns the long drive into a bonding experience.
One of my favorite moments was standing with my dad at the border between Canada and Alaska. It was a simple thing, but seeing his face light up made it unforgettable. Another highlight was exploring Homer with my girlfriend, kayaking to remote glaciers, and sharing meals with incredible views. These are the memories that stick with you long after the trip ends.
Soaking in the iconic Alaska gray skies with Kristin. Photo by Dalton Johnson
A road trip to Alaska can be life-changing. It’s a long haul, but if you balance your schedule, pick meaningful stops, and prepare your vehicle, you’ll create memories that last forever. Keep these tips in mind and remember: the best trips happen when you allow yourself the space to enjoy the journey. Plan well, stay flexible, and embrace the adventure.
Discover more Adventures

The Tamron 150-500mm Was Always On My Camera While I Drove to Alaska, Here’s Why
When I drove to Alaska with my dad and later returned with my girlfriend Kristin, one thing remained constant: the Tamron 150-500mm lens was always attached to my camera. If there’s one thing you learn quickly on a road trip to Alaska, it’s that wildlife can appear at any moment. Whether it’s a bear lumbering along the roadside, an eagle soaring overhead, or a moose grazing in a meadow, you’re constantly surrounded by incredible opportunities for wildlife photography. Having the Tamron 150-500mm on my camera ensured I was always ready to capture those fleeting moments, no matter when or where they happened.
When I drove to Alaska with my dad and later returned with my girlfriend Kristin, one thing remained constant: the Tamron 150-500mm lens was always attached to my camera. If there’s one thing you learn quickly on a road trip to Alaska, it’s that wildlife can appear at any moment. Whether it’s a bear lumbering along the roadside, an eagle soaring overhead, or a moose grazing in a meadow, you’re constantly surrounded by incredible opportunities for wildlife photography. Having the Tamron 150-500mm on my camera ensured I was always ready to capture those fleeting moments, no matter when or where they happened.

A roadside black bear scurrying across the highway. Photo by Dalton Johnson
The Importance of Being Ready
Driving through places like Alaska or along the Cassiar Highway is like stepping into a nature documentary. Wildlife is everywhere, and you never know when you’ll get a chance to photograph something extraordinary. One moment, you’re cruising down an empty stretch of highway, and the next, you spot a bear munching on grass by the roadside. That’s when the Tamron 150-500mm lens truly shines. With its versatile focal range, it’s the perfect lens for quickly zooming in on wildlife without having to get too close (safety first!).
For me, the Tamron stayed on my camera almost the entire trip. The reason? Simplicity. I didn’t want to waste precious seconds swapping lenses while the perfect shot disappeared. Wildlife doesn’t wait for you to get your gear together. The 150-500mm gave me the reach and flexibility I needed to capture everything from a bald eagle perched high in a tree to a bear crossing the road right in front of us. I’d often find myself pulling over with no warning, grabbing the camera, and stepping out onto the shoulder, heart racing, ready to snap the scene in front of me.
Even when I wasn’t actively looking for wildlife, the Tamron’s versatility meant I could take incredible shots of the landscapes around me. The long highways surrounded by towering peaks, the sweeping valleys, and even the quiet moments of mist rising off a lake in the morning—all were within the range of this lens.

A roadside moose enjoying it’s lunch. Photo by Dalton Johnson
Key Features That Made It Indispensable
Versatile Focal Range: The 150-500mm range is ideal for wildlife photography. It offers the perfect balance between zooming in on distant subjects and maintaining flexibility for closer encounters. Whether the wildlife was 50 feet away or 500 feet away, I felt like I had the reach I needed. It allowed me to photograph everything from tight details to more environmental shots that showed the subject within its natural setting.
Portability: For a lens with such an impressive zoom range, the Tamron 150-500mm is surprisingly compact and lightweight. On long road trips, when every ounce of gear adds up, this was a huge bonus. It was easy to carry, mount, and shoot with for extended periods, even when we were on foot. Carrying it all day while hiking didn’t feel like a chore, which is saying something for a telephoto lens.
Sharpness and Detail: The image quality was outstanding. Even when shooting at the longer end of the focal range, the lens produced sharp, detailed images. This was crucial when capturing textures like the feathers of an eagle or the fur of a bear. The clarity in those shots was something I kept coming back to as I reviewed the photos after the trip.
Fast Autofocus: Wildlife doesn’t stay still for long, and the Tamron’s autofocus kept up beautifully. Whether I was shooting from inside the van or stepping out to frame a shot, the lens locked onto my subjects quickly and accurately. This speed made all the difference when I had only a few seconds to capture a fleeting moment.
Stabilization: Shooting handheld, especially with a telephoto lens, can be tricky, but the Tamron’s built-in stabilization was a lifesaver. It allowed me to get sharp shots even when shooting at longer focal lengths without a tripod, which isn’t always feasible when you’re working quickly.
A bald eagle perched in a tree, this shot would not have been possible without the Tamron 150-500mm. Photo by Dalton Johnson
Real-World Moments
One memory that stands out was when we were driving along a remote stretch of the Cassiar Highway. Out of nowhere, my dad shouted, “Bear!” We pulled over, and there it was—a black bear casually grazing by the roadside. I grabbed my camera, stepped out quietly, and started shooting. The Tamron’s zoom allowed me to get tight, detailed shots without ever feeling like I was invading the bear’s space. The bear looked up at one point, sniffed the air, and then continued eating. That’s the kind of moment you can’t plan for, and having the right lens made all the difference.
Another unforgettable moment was spotting a bald eagle perched high in a tree near Homer. The light was perfect, and the eagle’s silhouette stood out against the blue sky. The Tamron 150-500mm allowed me to fill the frame with the eagle, capturing the sharpness of its talons and the intense focus in its eyes. It’s one of my favorite shots from the trip. Without the lens’s reach, there’s no way I could’ve gotten that level of detail.
Then there were the moments that didn’t involve wildlife but were just as breathtaking. One morning, as we parked at a pullout overlooking a misty lake, I used the Tamron to zoom in on the gentle ripples in the water and the silhouettes of distant trees. The lens brought a level of intimacy to the scene that made it feel even more magical.

A black bear taking a casual stroll across the Cassiar Highway. Photo by Dalton Johnson
Why This Lens Should Be in Your Kit
If you’re planning a trip to Alaska, or anywhere with abundant wildlife, the Tamron 150-500mm is a lens you won’t want to leave behind. Its versatility, portability, and exceptional image quality make it the perfect companion for capturing the unpredictable beauty of the wild. You never know what you’ll encounter, and having a lens like this ensures you’re always ready.
For me, it wasn’t just a piece of gear—it was an essential part of the journey. From black bears to bald eagles and the quiet beauty of Alaska’s landscapes, the Tamron 150-500mm helped me document memories I’ll treasure forever. If you’re heading into the wild, do yourself a favor and bring this lens along. You’ll be glad you did.
Discover More Gear
Don't Forget Your Rainfly When Camping In Baja
Camping in Baja is a truly unique experience. The stunning desert landscapes, the wide-open skies, and the incredible solitude make it a paradise for adventurers. But as we learned the hard way, Baja's beauty comes with its own set of challenges—challenges that can be made much easier with the right gear. Chief among these: don’t forget your rainfly.
Camping in Baja is a truly unique experience. The stunning desert landscapes, the wide-open skies, and the incredible solitude make it a paradise for adventurers. But as we learned the hard way, Baja's beauty comes with its own set of challenges—challenges that can be made much easier with the right gear. Chief among these: don’t forget your rainfly.

Set up and ready for sunset in Cataviña. Photo by Dalton Johnson
Our Rainfly Mistake
When we set out for Baja in our Ford Bronco equipped with a Yakima rooftop tent, we thought we were ready for anything. We carefully packed everything we thought we’d need. But in an effort to save space, we decided to leave the rainfly behind. After all, it’s Baja, right? A place where sunburns are more common than rainstorms. We figured we’d never need it.
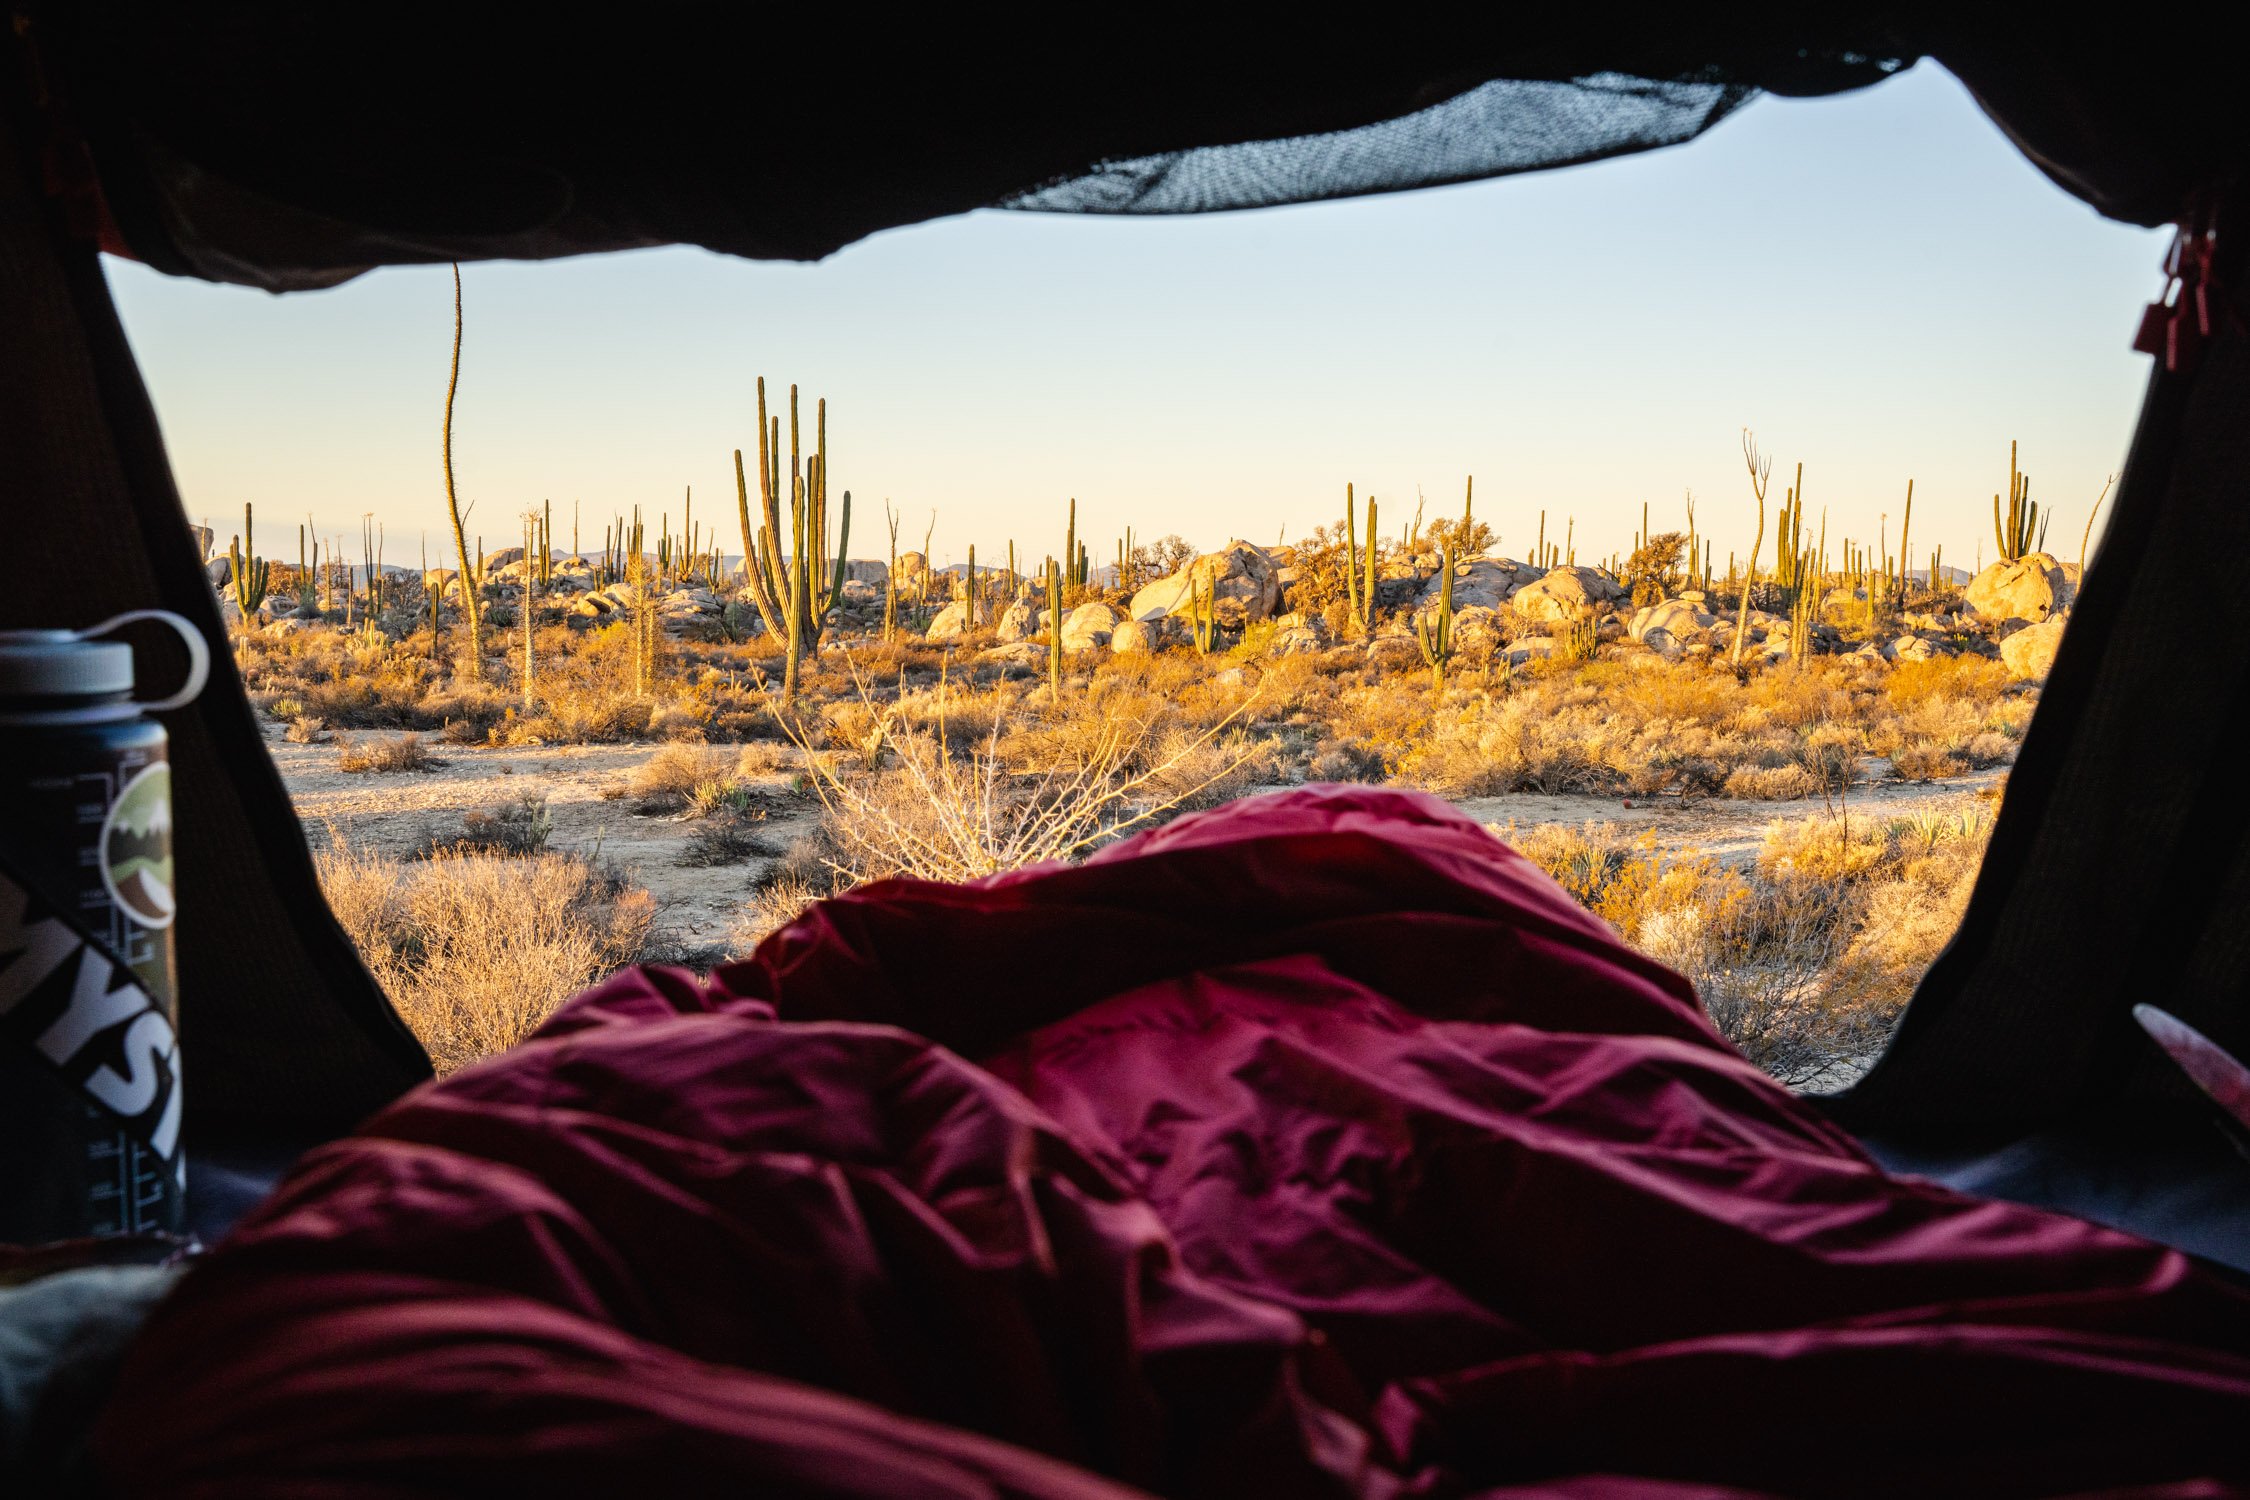
That turned out to be a major miscalculation. Our first night in Cataviña was beautiful. This remote stretch of Baja is known for its otherworldly landscape—huge boulders, towering cardón cacti, and surreal boojum trees that look like something out of a Dr. Seuss book. It’s a popular stop on the Baja 1000 route and a favorite for overland campers.
The desert setting was peaceful, and we drifted off under a canopy of stars. But the next morning, we woke up to a cold, damp surprise. The tent’s fabric and our sleeping bags were soaked with dew. It was enough to leave us shivering and a bit miserable. In that moment, we realized how much easier life would have been if we’d packed the rainfly. While it might not have rained, the rainfly would have provided a layer of protection against the overnight moisture and made for a more comfortable night.
Waking up cold and wet while camping in Cataviña. Photo by Dalton Johnson
Lessons Learned and Tips for Baja Camping
Camping in Baja offers some of the most breathtaking scenery you’ll ever find. But you need to come prepared. Here are a few tips we learned from our experience:
Bring Your Rainfly: Even if you think it never rains in Baja, the morning dew can drench your tent and sleeping gear. The rainfly provides extra insulation and keeps your tent drier and warmer.
Pack for the Unexpected: Baja’s environment can be unpredictable. Nights are often cooler than you expect, and even the driest deserts can have damp mornings.
Drying Out Is Easy: One great thing about Baja is the warm, sunny weather during the day. If your gear does get wet, you can often dry it out quickly by laying it in the sun or hanging it on a line.
Prepare for Remote Locations: Many of the best camping spots, like Cataviña, are miles from the nearest town. Plan ahead and carry enough water, fuel, and food. You’ll also want to pack a good map or GPS, as cell service can be spotty.
A coyote high on the rocks in Catviña looking for some food. Photo by Dalton Johnson
Why Cataviña Is Worth Stoping
Despite the dew-soaked gear, camping in Cataviña remains one of our favorite Baja experiences. The area is a camper’s dream. You can pull off the road and set up camp almost anywhere. The wildlife—coyotes howling in the distance, birds fluttering among the rocks—and the stark, beautiful terrain make it feel like you’ve stepped onto another planet. The boulder fields and unique vegetation invite endless exploration. And because it’s so remote, you’ll often have the place all to yourself.
If you plan to camp in Cataviña or anywhere else in Baja, make sure you’re fully prepared. Learn from our mistake: pack the rainfly, prepare for cooler nights, and ensure you have enough supplies to enjoy the wild, untouched beauty of this incredible region.
Discover more Adventures

The Most Breathtaking Moments from My Drive to Alaska
When you drive to Alaska, the road has a way of leaving its mark on you. It’s not just the miles you cover but the moments that make you stop, look around, and truly feel the scale of the world. On my drive, there were three experiences that stood out and defined the journey: standing at the Canada-Alaska border, driving those endless highways that stretch into the wilderness, and seeing my first glacier. Each of these moments wasn’t just beautiful—they were unforgettable.
When you drive to Alaska, the road has a way of leaving its mark on you. It’s not just the miles you cover but the moments that make you stop, look around, and truly feel the scale of the world. On my drive, there were three experiences that stood out and defined the journey: standing at the Canada-Alaska border, driving those endless highways that stretch into the wilderness, and seeing my first glacier. Each of these moments wasn’t just beautiful—they were unforgettable.
A selfie with my Dad capturing the moment we made it to Alaska. Photo by Dalton Johnson
Standing at the Canada-Alaska Border
The border crossing between Canada and Alaska might seem like just another stop on a map, but for me, it was so much more. After days on the road, seeing that “Welcome to Alaska” sign felt like a major milestone. My Dad and I pulled over, stretched our legs, and took it all in. I’ll never forget the grin on his face as he stood with one foot in Canada and the other in Alaska, claiming his moment of international glory. It was simple, maybe even a little cheesy, but it summed up what the trip was about—celebrating the journey as much as the destination.
That moment at the border also made the vastness of the trip hit home. We’d driven so far to get there, passing through countless landscapes and long stretches of wilderness. Standing there, I couldn’t help but feel like we’d truly earned the experience. It wasn’t just about getting to Alaska; it was about everything it took to arrive.
The road to the mountains, kind of intimidating but stunning. Photo by Dalton Johnson
The Endless Highways of Alaska’s Wilderness
Once we crossed the border, the landscape seemed to stretch even farther. Alaska’s highways are a world of their own. They go on forever, winding through mountains, forests, and valleys. Driving them feels like stepping into a postcard—except it’s real, and you’re part of it.
I remember one stretch where the road seemed to disappear into the horizon. On either side, the land rolled out in waves of green, dotted with lakes and framed by towering peaks. We drove for hours, and it felt like we were the only people in the world. That kind of solitude is rare and humbling. It makes you realize how small you are and how vast the planet truly is.
Every so often, we’d pull over just to take it all in. Those stops weren’t planned, but they became some of the most memorable parts of the drive. It wasn’t just about getting somewhere—it was about being present, letting the landscape sink in, and appreciating the sheer scale of Alaska.
Bear Glacier hiding in plain sight while driving to Alaska. Photo by Dalton Johnson
Seeing My First Glacier
Of all the moments on the trip, seeing my first glacier stands out the most. We were driving along a remote stretch of road when we came to Bear Glacier. It was massive, towering above the surrounding landscape. The top of the glacier disappeared into the clouds, and the icy blue face seemed to shimmer in the light. It was cold, the wind whipping across the thermal lake in front of it, but I didn’t care. I was in awe.
That was the first time Alaska felt real to me. Up until then, it had been an abstract idea, something I’d read about or seen in photos. But standing there, staring at the glacier, it hit me: this is Alaska. This is what makes it so incredible. It’s raw, untamed, and unlike anything else.
For my Dad, it was just as special. We stood there for a while, not saying much, just taking it in. Moments like that don’t need words. They’re about feeling connected—to the place, to each other, and to the journey itself.
A final selfie together in front of Exit Glacier before Dad flew home. Photo by Dalton Johnson
Looking back, these moments—the border, the highways, the glacier—defined my drive to Alaska. They weren’t just stops along the way; they were reminders of why the journey mattered. Driving to Alaska isn’t just about reaching a destination. It’s about everything you see and feel along the way, the memories you make, and the awe that stays with you long after the trip is over.
Discover more Adventures

If You Have The Time, Drive To Alaska Instead Of Flying
If you’re thinking about traveling to Alaska, there’s a choice you’ll have to make: fly or drive. For me, the decision to drive wasn’t just about getting there—it was about everything that happens along the way. Choosing to drive instead of fly let me feel the sheer vastness of Alaska, experience the wild beauty as it unfolded, and share an unforgettable journey with my dad. What could have been a quick flight turned into a trip I’ll never forget.
If you’re thinking about traveling to Alaska, there’s a choice you’ll have to make: fly or drive. For me, the decision to drive wasn’t just about getting there—it was about everything that happens along the way. Choosing to drive instead of fly let me feel the sheer vastness of Alaska, experience the wild beauty as it unfolded, and share an unforgettable journey with my Dad. What could have been a quick flight turned into a trip I’ll never forget.

Understanding the sense of scale in Alaska is hard, but using a drone gives you that edge . Photo by Dalton Johnson
When I was hired to make a documentary about Mount Denali, I had two options. Flying would’ve been faster and way less complicated. But as I thought about it, I realized driving would give me something a flight never could: the chance to see what lies between here and there. I wanted to feel the distance, watch the scenery change mile by mile, and earn the arrival. So I decided to take the long way.
To be honest, I wasn’t sure I’d made the right call at first. Thousands of miles stretched ahead of me, and I’d never driven anything like this before. Thankfully, my Dad decided to come along for the ride. He didn’t need much convincing—he was in almost as soon as I brought it up. Having him with me turned what could have been a solo mission into something much more meaningful.
Dad making us dinner while I went for a photo walk. Photo by Dalton Johnson
Our home for the journey was my converted Ram ProMaster 2500 van. It wasn’t just a vehicle; it was our mobile base camp. Inside, we had a bed, a small kitchen, cabinets for storage, and even a portable toilet. Solar panels powered everything we needed, so we could camp off-grid whenever we wanted. My Dad slept on the floor, while I took the bed. Maybe I should’ve been a better son and swapped with him, but he didn’t seem to mind—he was just happy to be there.
Of course, the road had its challenges. One of the first things we had to figure out was dealing with the bugs. Alaska’s mosquitoes and biting flies are relentless. Within days, we rigged up makeshift bug nets to keep the van livable. Then there was the sun. The never-ending daylight threw off everything, from our sleep schedules to our sense of time. My Dad also got sick at one point, which made the journey tougher. But even with all of that, we kept moving forward.
Most of the drive was spent listening to podcasts, not music. It wasn’t really planned—it just worked out that way. Music came when we felt like talking or sharing stories. Those quiet conversations, set against the backdrop of endless highways, were some of the best moments of the trip.
The drive itself was full of unforgettable experiences. One of my favorite moments happened at the border between Canada and Alaska. My Dad stood there, one leg in each country, grinning like a kid. It was such a simple thing, but it captured what made this trip special: we weren’t rushing to get somewhere. We were taking the time to enjoy the journey, step by step.
A selfie at the Alaska road, we made it! Photo by Dalton Johnson
And then there was Bear Glacier. It was the first glacier either of us had seen in America, and it was massive. The wind whipped around us as we stood across the thermal lake, staring at the ice towering into the clouds. It was cold, and I’ll admit, a little intimidating. But it was also incredible. That moment made the journey real in a way flying never could have. Alaska wasn’t just a destination anymore; it was something we’d earned by driving there.
Driving also gave me time to reconnect—with the landscape, with myself, and with my Dad. Growing up, we didn’t spend much time together. He was always working to support our family, and I get that now. This trip gave us the chance to talk about everything we hadn’t before, to share stories, and to just be. Those memories mean more to me than anything else from the trip.
One of the many endless road we drove. Photo by Dalton Johnson
If you have the time, whether it’s a month, six weeks, or longer, I can’t recommend driving to Alaska enough. The road offers something flying never will: a chance to experience the journey. You’ll see how the world changes as you head north, feel the solitude of remote highways, and discover places you never knew existed. Of course, not everyone has the luxury of time. If your main goal is to maximize your days in Alaska, flying might make more sense. But if you’re looking for an adventure, the drive is absolutely worth it.
Choosing to drive to Alaska wasn’t just a way to get there; it was the heart of the trip. From dealing with bugs and long days to seeing glaciers and sharing quiet conversations with my Dad, the road gave me more than I ever expected. Alaska is incredible, but the journey to get there—that’s what I’ll always remember.
Discover more Adventures

Top Safety Tips for Road Tripping in Remote Areas
Road tripping in remote areas can be an incredible adventure, offering unparalleled scenery, solitude, and a chance to connect with nature. However, traveling far from urban centers also comes with unique challenges and risks. From vehicle preparedness to personal safety, here are the top tips to ensure your remote road trip is as safe as it is memorable.
Road tripping in remote areas can be an incredible adventure, offering unparalleled scenery, solitude, and a chance to connect with nature. However, traveling far from urban centers also comes with unique challenges and risks. From vehicle preparedness to personal safety, here are the top tips to ensure your remote road trip is as safe as it is memorable.
Headed deep into Alaska on dirt roads. Photo by Dalton Johnson
1. Prepare Your Vehicle
Before heading into remote areas, make sure your vehicle is in top condition. Schedule a comprehensive maintenance check, including brakes, tires, fluid levels, and battery. Equip your vehicle with a spare tire, jack, and tire repair kit, as flat tires are common on unpaved or rough roads. Consider carrying an extra fuel canister if gas stations are scarce along your route. If your trip involves rugged terrains or off-road trails, investing in high-clearance tires and a winch can provide extra peace of mind. Always keep a basic toolkit for unexpected repairs and know how to use it.
Additionally, familiarize yourself with your vehicle’s manual. Knowing how to change a tire, jumpstart the battery, or reset certain systems can save time and prevent unnecessary stress. Keep a record of emergency roadside assistance numbers and ensure your insurance coverage includes towing services for remote areas.
2. Carry Essential Supplies
Pack enough water, food, and snacks to last longer than your planned trip, in case of unexpected delays. Non-perishable items like energy bars, nuts, and canned goods are excellent options. For longer trips, consider bringing a portable water filtration system or purification tablets in case your supply runs low.
Clothing layers are essential to adapt to varying weather conditions. Pack moisture-wicking base layers, insulated mid-layers, and waterproof outerwear. Don’t forget sturdy footwear, hats, and gloves. Include a well-stocked first aid kit with items such as bandages, antiseptic wipes, pain relievers, and a thermal blanket. Personal hygiene supplies, including biodegradable soap, hand sanitizer, and toilet paper, can also enhance your comfort.
Searching for the largest glacier in the United States. Photo by Dalton Johnson
3. Have Reliable Navigation Tools
Don’t rely solely on your phone or GPS, as remote areas often lack reliable cell service. Invest in a detailed physical map of the region and learn how to use it. Apps like Gaia GPS or offline maps can be helpful, but ensure they’re downloaded before you leave. A compass is another valuable tool to keep on hand, especially if you plan on hiking or exploring areas away from the road.
Consider a GPS device specifically designed for off-road navigation, which often includes trail maps and waypoints for remote destinations. Learning basic orienteering skills can also be invaluable if technology fails. Always plan your route ahead and identify key landmarks to avoid getting lost.
4. Communicate Your Plans
Always let someone know your itinerary, including your planned route, expected arrival times, and camping locations. Share updates when you reach key stops if possible. A satellite communication device, like a Garmin InReach or SPOT tracker, can be a lifesaver for sending messages or requesting help in areas without cell service. Many of these devices allow you to share your real-time location with friends or family, adding an extra layer of security.
Keep a whistle and signal mirror in your emergency kit to attract attention if needed. In case of an emergency, knowing basic survival communication signals can help you alert rescuers effectively.
When driving to Alaska, be ready for the cold. Photo by Dalton Johnson
5. Stay Aware of Weather Conditions
Check the weather forecast frequently and be prepared for sudden changes, especially in mountainous or desert regions. Rain can make dirt roads impassable, while extreme heat or cold can pose risks to both you and your vehicle. Monitor conditions through apps or local radio channels and plan alternative routes if severe weather is expected.
Carry weather-specific gear, such as snow chains for winter travel or sunshades to protect against intense heat. Learn to recognize signs of natural hazards like flash floods or snowdrifts, which can develop rapidly in remote areas. Avoid crossing flooded roads, as water depth can be deceptive and dangerous.
6. Fuel Up Frequently
When traveling in remote areas, gas stations can be few and far between. Make it a rule to fill up your tank whenever you have the chance, even if it’s not empty. Running out of gas in an isolated area can quickly turn into a serious problem. In addition to carrying a spare fuel canister, know the average mileage your vehicle gets and plan accordingly to avoid running low.
If your route includes long stretches without services, research locations of fuel stations ahead of time and consider calling them to confirm availability. Diesel and other fuel types may be limited in certain regions, so plan accordingly.

The long road of Baja are often empty, so make sure you can fix anything that breaks yourself. Photo by Dalton Johnson
7. Bring Emergency Gear
Equip your vehicle with emergency essentials such as a multi-tool, flashlight with extra batteries, jumper cables, duct tape, and a fire extinguisher. Consider carrying a portable power bank to charge devices, as well as a solar charger for extended trips. In winter, add blankets, a shovel, and sand or cat litter for traction.
For off-road adventures, include recovery boards, a tow strap, and a high-lift jack to get your vehicle out of tough spots. A portable air compressor can be useful for adjusting tire pressure when transitioning between paved and unpaved roads.
8. Practice Responsible Camping
If you’re camping during your road trip, follow Leave No Trace principles to protect the environment. Pack out all trash, avoid disturbing wildlife, and camp only in designated or low-impact areas. Carry a portable toilet or learn how to properly dispose of human waste to maintain cleanliness and health.
In addition, minimize your impact by using biodegradable soap, sticking to established trails, and refraining from collecting natural objects like rocks or plants. Respect local rules and guidelines to ensure these remote areas remain pristine for future visitors.

Wild coyote saying hello in the early morning. Photo by Dalton Johnson
9. Watch for Wildlife
Remote areas are home to various wildlife, so stay alert, especially when driving at dawn or dusk when animals are most active. Use your high beams when appropriate, and reduce your speed on winding roads to avoid collisions. Keep your campsite food stored securely to prevent attracting animals.
Carry bear spray in regions where large predators are present, and make noise while hiking to avoid surprising wildlife. If you encounter animals, observe them from a safe distance and never feed them, as this can alter their natural behavior and create hazards for both humans and animals.
10. Know Your Limits
Adventure is exciting, but safety comes first. Avoid pushing yourself or your vehicle beyond their limits. Don’t drive on roads that seem unsafe or beyond your skill level. Listen to your instincts—if something feels off, it’s okay to turn back or choose an alternative route.
Recognize signs of fatigue and take breaks when needed to avoid accidents. Traveling in remote areas often requires patience and adaptability, so give yourself extra time to navigate challenges without rushing.
Camping in the middle of no where when road tripping through Baja. Photo by Dalton Johnson
Remote road trips offer unique rewards but require thorough preparation to ensure safety. By equipping yourself with the right tools, supplies, and knowledge, you can confidently explore even the most isolated destinations. Remember, planning ahead and staying adaptable are the keys to enjoying a safe and unforgettable adventure. With the right mindset and preparation, your journey through remote areas can become a cherished experience filled with awe-inspiring moments and personal growth.
Discover more Adventures

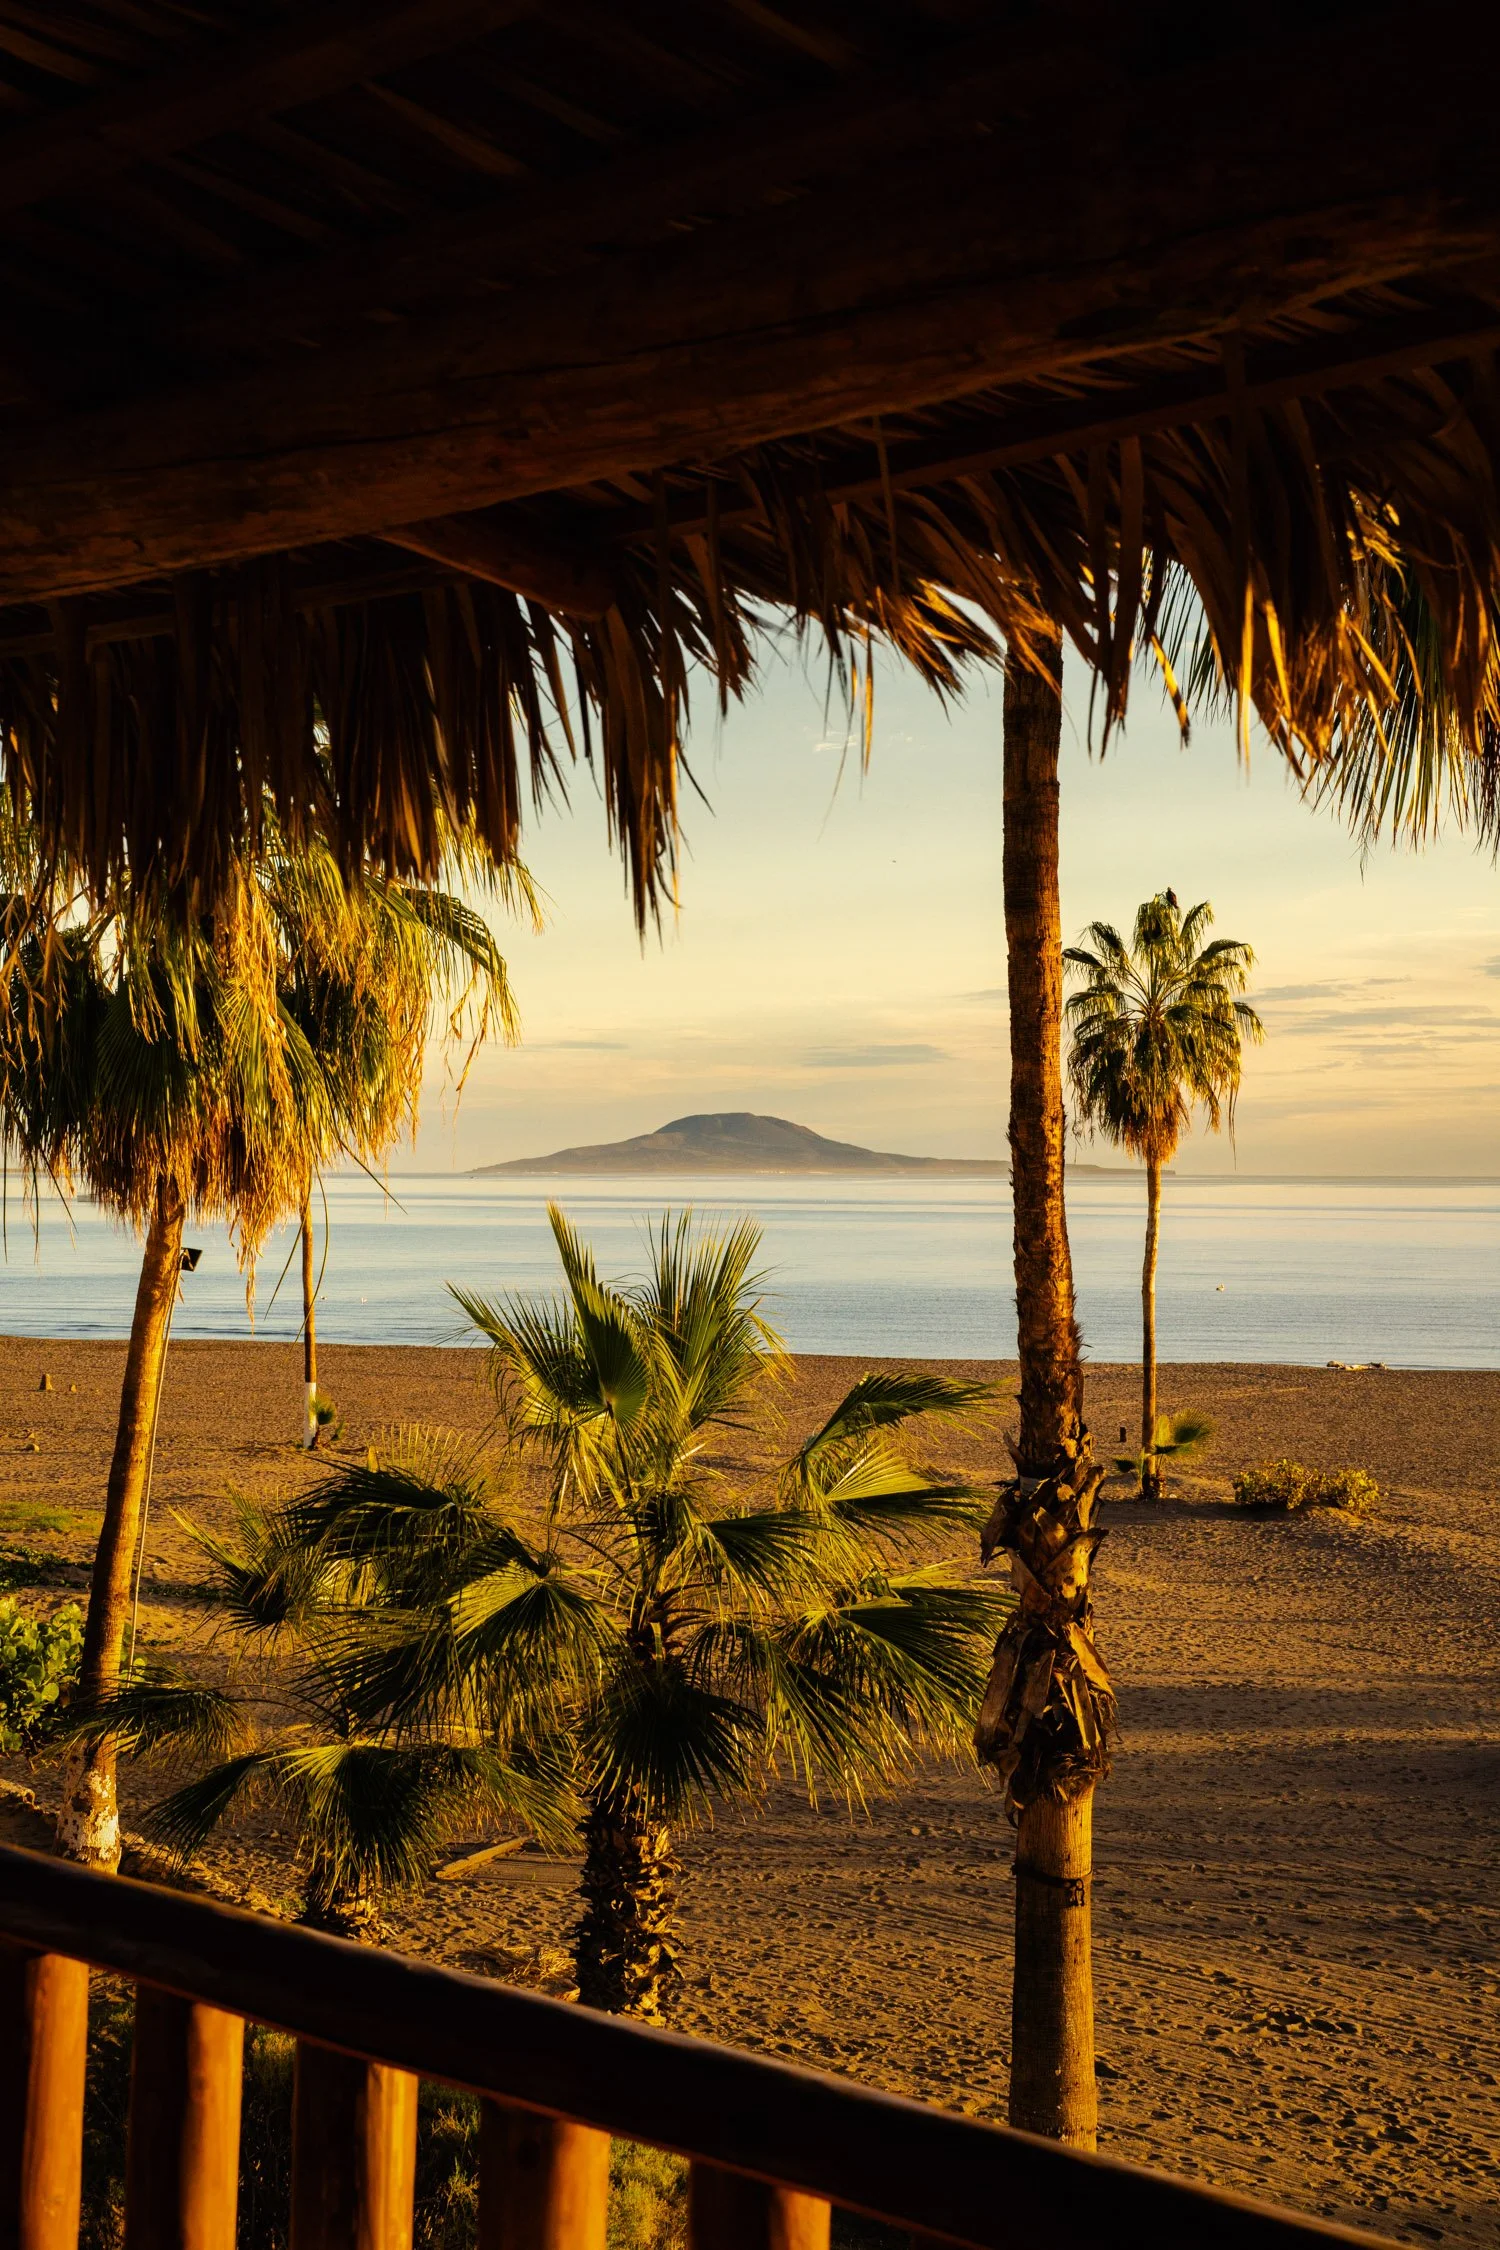
The Sunrises At Conception Bay Are Unforgettable
Without knowing what to expect, we left Mulegé in the afternoon, eager to find a place to camp along the beach. Not driving very far, we dropped into the Conception Bay area and were immediately stunned by the beauty. A massive bay stretched before us, dotted with islands and ripe with camping spots nestled along its shores. The water shimmered under the late afternoon sun, and we instantly knew this was where we wanted to spend the night.
Without knowing what to expect, we left Mulegé in the afternoon, eager to find a place to camp along the beach. Not driving very far, we dropped into the Conception Bay area and were immediately stunned by the beauty. A massive bay stretched before us, dotted with islands and ripe with camping spots nestled along its shores. The water shimmered under the late afternoon sun, and we instantly knew this was where we wanted to spend the night.
The long and empty roads of Baja. Photo by Dalton Johnson
We took our time driving along the road that skirted the bay, scanning for potential campsites. But as the sun dipped lower, we realized we needed to act fast. Using radios to communicate between vehicles, my buddy Andrew, who was driving ahead, called back, "This one looks good, let's see how much they charge."
We pulled into a gated beach that offered camping spots, and the attendant informed us it was $5 per vehicle for the night. The price seemed like a bargain, especially considering the beachfront location and the palapas available for shade. We quickly paid the fee and parked, each of us claiming a spot just steps from the water. By the time we had set up, the sun had already set. The bay was now cloaked in twilight, with only the soft lapping of waves breaking the silence.

The start of sunrise while camping on the beach at Conception Bay. Photo by Dalton Johnson
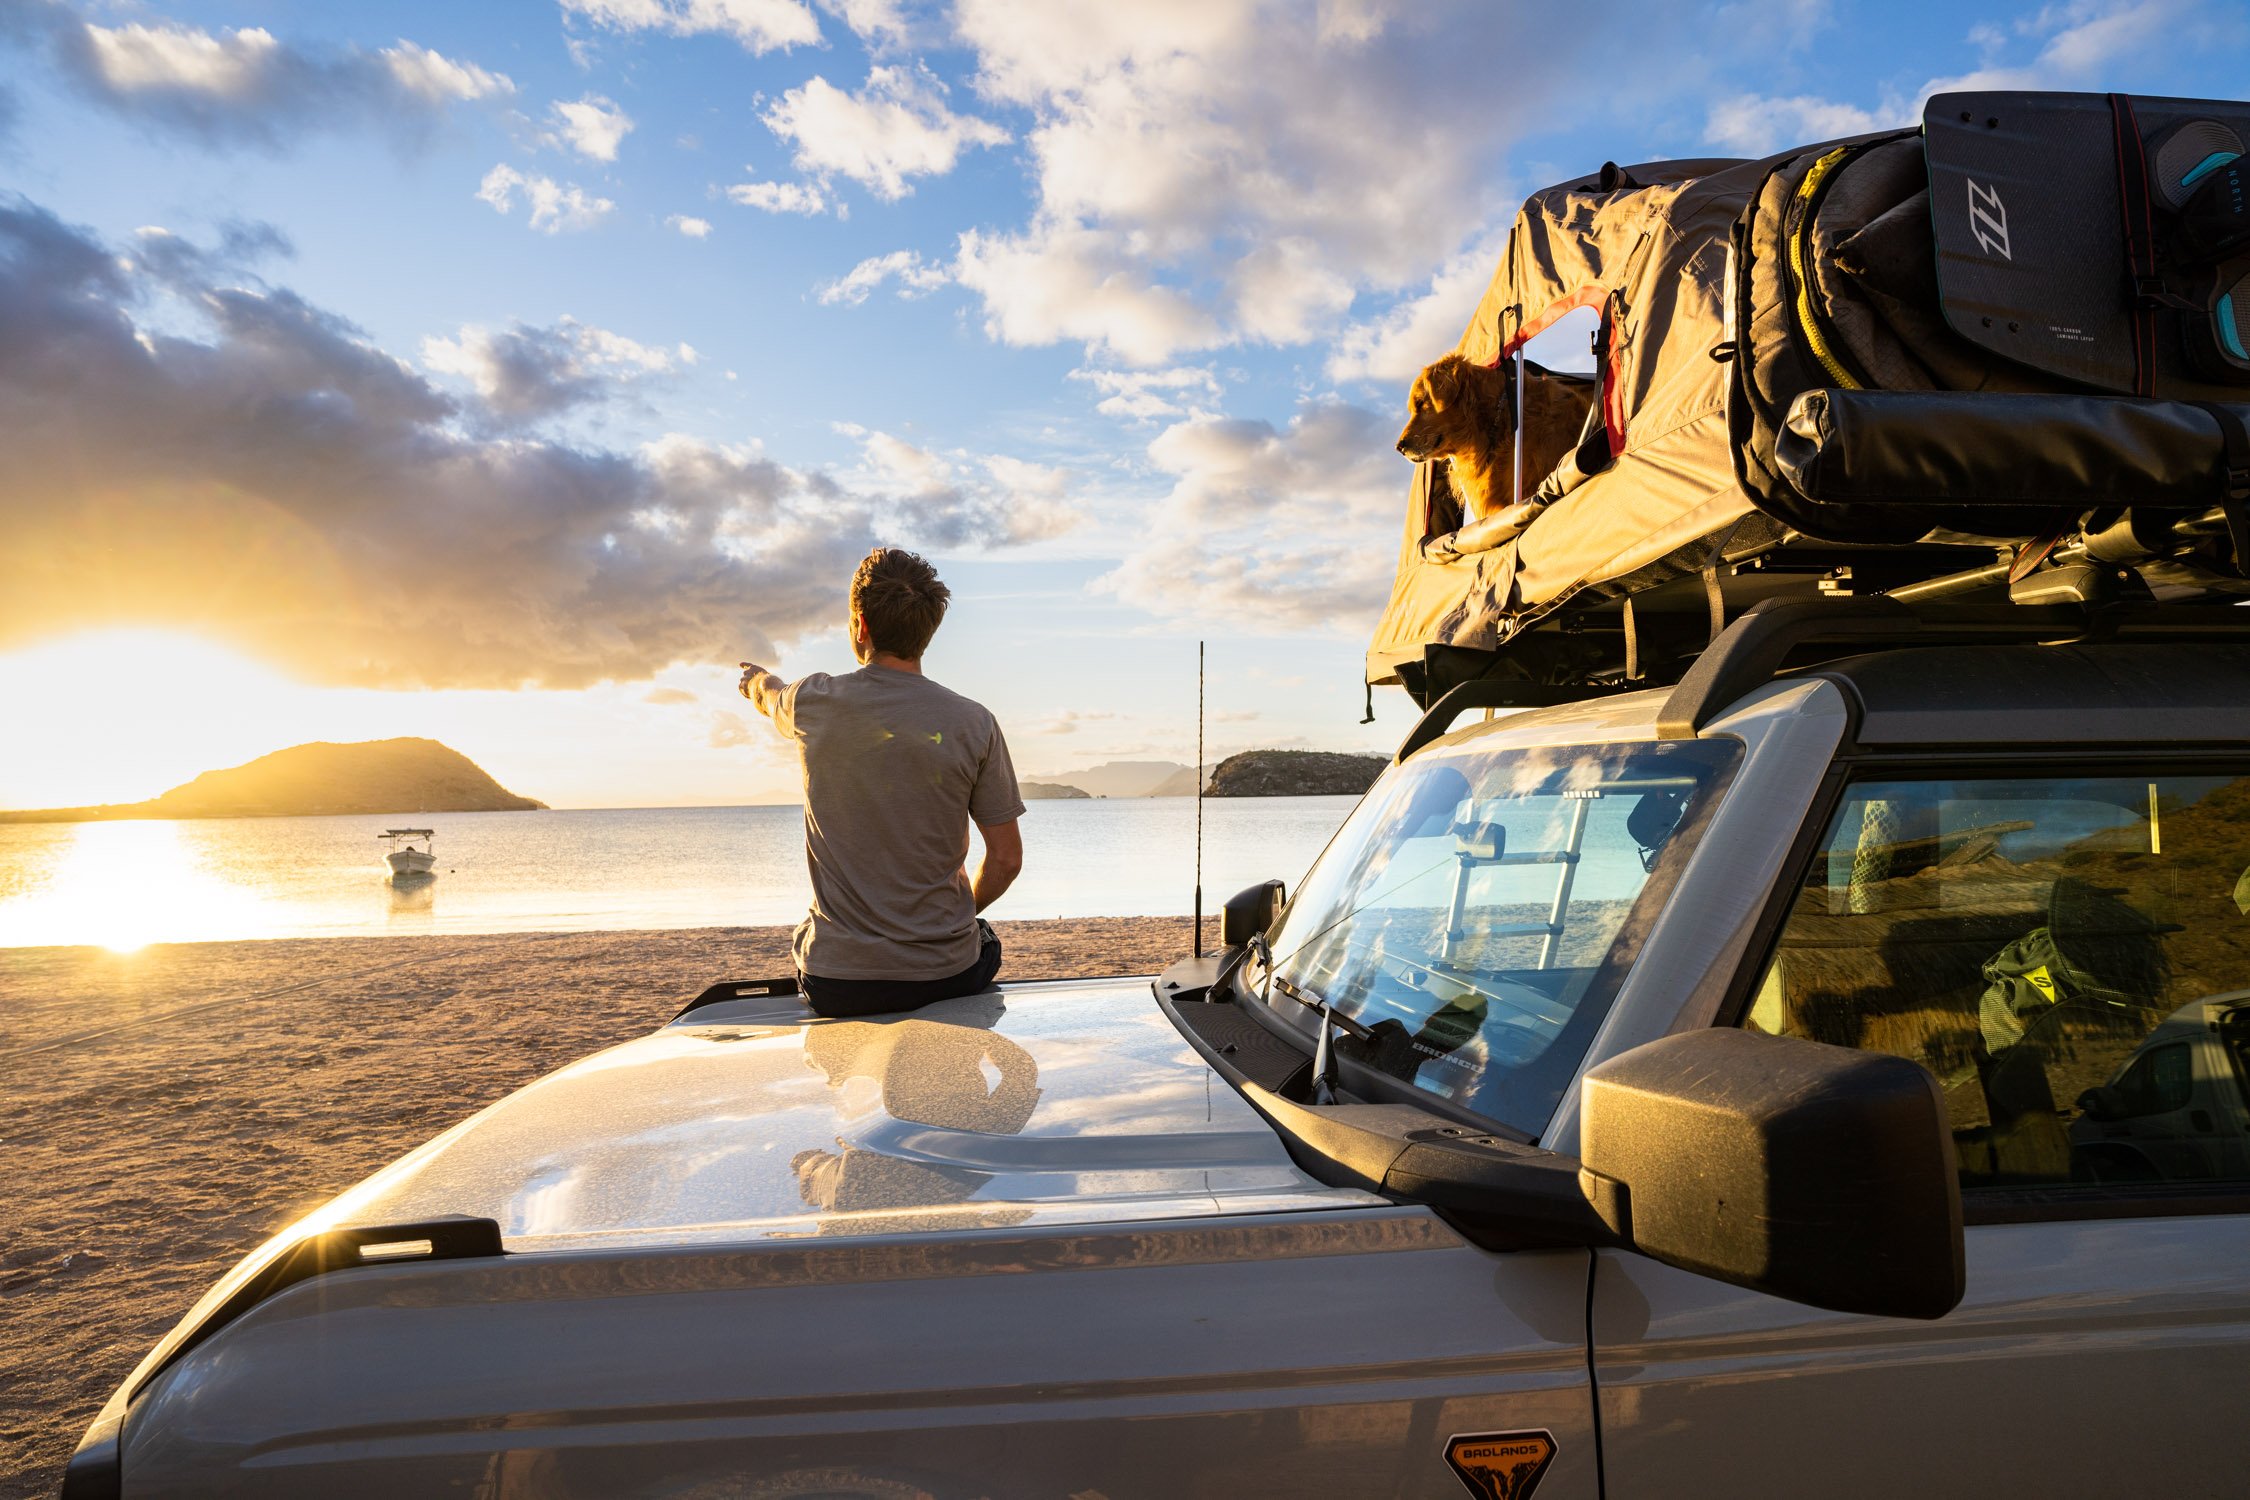
Dinner that evening was quick and simple, prepared in the fading light. My girlfriend Kristin and I were traveling in a converted van, and since the air was warm and humid, we decided to sleep with the back doors wide open, letting us gaze out onto the bay. Andrew, traveling with his dog, set up his rooftop tent on his Ford Bronco. The gentle sound of waves just 20 feet away made it easy for all of us to fall asleep, lulled by the tranquility of the place.
Kristin watching the Conception Bay sunrise from the back of the van. Photo by Dalton Johnson
I woke up early the next morning to find the start of a sunrise unfolding before me. The first light of dawn cast a soft glow over the bay, turning the sky shades of orange, pink, and purple. The water was perfectly still, reflecting the colors like a mirror. It was a moment that felt almost too perfect to be real. As I lay there in bed, taking in the view from the back of the van, I could feel the cool morning breeze and hear the faint rustle of leaves from the nearby palapas.
Realizing that this was a moment worth capturing, I climbed out of the van to check on Andrew. He was already awake, standing near his Bronco with his dog by his side. "We shooting this morning?" he asked, his voice cutting through the quiet.
"Yup, I’m getting ready now," I replied, heading back to grab my camera. Andrew nodded, already grabbing his gear. This was why we were here—to capture moments like these for the marketing projects we were working on.
The next hour was spent transitioning between the van, the beach, and the Bronco. We snapped photos of the sunrise, capturing the way the light danced on the water and highlighted the rugged beauty of the bay. Kristin joined us, taking in the view while we worked. Even as we focused on getting the perfect shots, we made sure to pause and simply enjoy the moment—the warmth of the sun on our faces, the soft sand beneath our feet, and the peacefulness of the bay waking up to a new day.
Andrew and Kicker stoked to see the sun in Conception Bay. Photo by Dalton Johnson
One of my favorite shots from that morning was taken from the back of the van, framing the sunrise through the open doors. It perfectly encapsulated the freedom and beauty of van life, a reminder of why we chose this way of traveling. Andrew, meanwhile, got some incredible angles from the beach, using the rippled sand and gentle waves to add texture and depth to his photos. His dog, always curious, wandered into a few shots, adding an unplanned but welcome touch of personality.
As the morning progressed, the colors of the sunrise gave way to the bright light of day. We packed up our gear, satisfied with the shots we’d captured, and took a moment to sit together by the water. Kristin brewed coffee on our portable stove, and we sipped it slowly, savoring the quiet before the world around us became busier.
That morning in Conception Bay was unforgettable. The combination of warm sunlight, gentle waves, and the sheer tranquility of the place created a memory that I’ll carry with me forever. For a mere $5, we experienced something priceless—a connection to nature, to each other, and to the simple joys of van life. It was one of those rare moments where everything felt just right, and I’m already dreaming of the next time I can wake up to a sunrise like that.
Discover more Adventures
Conception Bay's Camping Fee Is Worth Every Penny
Conception Bay is one of Baja’s crown jewels when it comes to beach camping. With stunning views, serene waters, and an array of activities, it’s a must-visit destination for any road tripper. While many of the camping spots here require a fee, ranging from $5 to $35 depending on the location and amenities, the experience makes it well worth the cost. Here’s what you can expect when camping in Conception Bay and why it’s an unforgettable destination.
Conception Bay is one of Baja’s crown jewels when it comes to beach camping. With stunning views, serene waters, and an array of activities, it’s a must-visit destination for any road tripper. While many of the camping spots here require a fee, ranging from $5 to $35 depending on the location and amenities, the experience makes it well worth the cost. Here’s what you can expect when camping in Conception Bay and why it’s an unforgettable destination.

Sunset at Conception Bay. Photo by Dalton Johnson
The camping fees in Conception Bay vary widely depending on the specific spot you choose, the amenities provided, and even the size of your vehicle. For instance, RVs often incur higher fees than smaller vehicles like vans or cars. Prices typically range from $5 to $20, with some locations charging up to $35. While the fee may fluctuate, most paid sites include access to a basic pit toilet—a welcome convenience for those camping long-term. Despite the costs, the value is undeniable. You’re paying for access to pristine beaches, stunning scenery, and a peaceful atmosphere that’s hard to match.

Andrew and Kicker stoked on the sunrise at Conception Bay. Photo by Dalton Johnson
Conception Bay offers plenty of activities that make camping here a dream for outdoor enthusiasts. The calm, turquoise waters are perfect for kayaking, allowing you to paddle along the coastline and explore the bay’s hidden coves and rocky outcroppings. SUPers will love gliding over the crystal-clear water, with the chance to spot marine life below. For snorkeling, the underwater world in Conception Bay is teeming with fish and vibrant coral. Bring your gear and spend hours exploring the shallows. The bay’s calm conditions make it an ideal playground for water-based activities, whether you’re a beginner or an experienced adventurer. If you’re lucky, you might even spot a pod of dolphins or rays leaping out of the water.
Related Read: Baja's Conception Bay Might Be The Best Place To SUP
While camping in Conception Bay, I experienced one of nature’s most magical phenomena: bioluminescence. During a road trip home, we noticed that the splashing waves glowed red with plankton—a sign of the red tide. We stayed and played in the glowing water all night, amazed at how the waves lit up with every movement. Capturing this phenomenon on camera proved impossible, but the memory is etched in my mind forever. Though bioluminescence isn’t guaranteed, the chance to experience it is another reason to make Conception Bay a priority on your Baja adventure.
Watching sunrise from bed while beach camping at Conception Bay. Photo by Dalton Johnson
One of the highlights of camping in Conception Bay is the sheer beauty of the area. Driving in from Mulegé, you’ll be greeted by breathtaking vistas as the bay comes into view. The turquoise waters and rugged hills create a dramatic contrast that will make you want to pull over just to soak it all in. Once you’ve settled into your campsite, the beauty doesn’t stop. The views from the beach are stunning, and the nearby hikes provide even more opportunities to take in the landscape. It’s incredible to think that such a picturesque location hasn’t been overdeveloped; you can still camp right on the beach and wake up to the sound of gentle waves.
Arriving early during high season is key to securing a palapa (a shaded beach structure), as there is no reservation system. However, if one spot is full, there are several alternative sites to explore. Outside of high season, the beaches are wonderfully quiet, allowing you to fully immerse yourself in the natural surroundings. While paid sites may offer pit toilets, other amenities are limited, so it’s important to come prepared with enough water, food, and gear to make your stay comfortable.
Kristin takes in the last bits of light while camping on the beach in Conception Bay with a van. Photo by Dalton Johnson
Without a doubt, camping in Conception Bay is worth the nominal fee. For as little as $5 to $35 per night, you gain access to pristine beaches, a safe and clean environment, and endless opportunities for adventure. The combination of stunning views, unique experiences like bioluminescence, and water activities makes it a standout destination on any Baja road trip. So, pack your gear and hit the road. Conception Bay is waiting to show you why it’s one of Baja’s best-kept secrets. Trust me, you won’t regret it.
Discover more Adventures

Common Mistakes to Avoid When Climbing Mount Massive
Mount Massive, Colorado’s second-highest peak, is the often overlooked step-sibling to the highest peak in Colorado, Mount Elbert, just across the valley. However, climbing this iconic mountain comes with its challenges, and mistakes can quickly turn an enjoyable trek into a tough lesson. Based on personal experiences, here are the top mistakes to avoid when tackling Mount Massive, so you can have a safer and more rewarding adventure.
Mount Massive, Colorado’s second-highest peak, is the often overlooked step-sibling to the highest peak in Colorado, Mount Elbert, just across the valley. However, climbing this iconic mountain comes with its challenges, and mistakes can quickly turn an enjoyable trek into a tough lesson. Based on personal experiences, here are the top mistakes to avoid when tackling Mount Massive, so you can have a safer and more rewarding adventure.
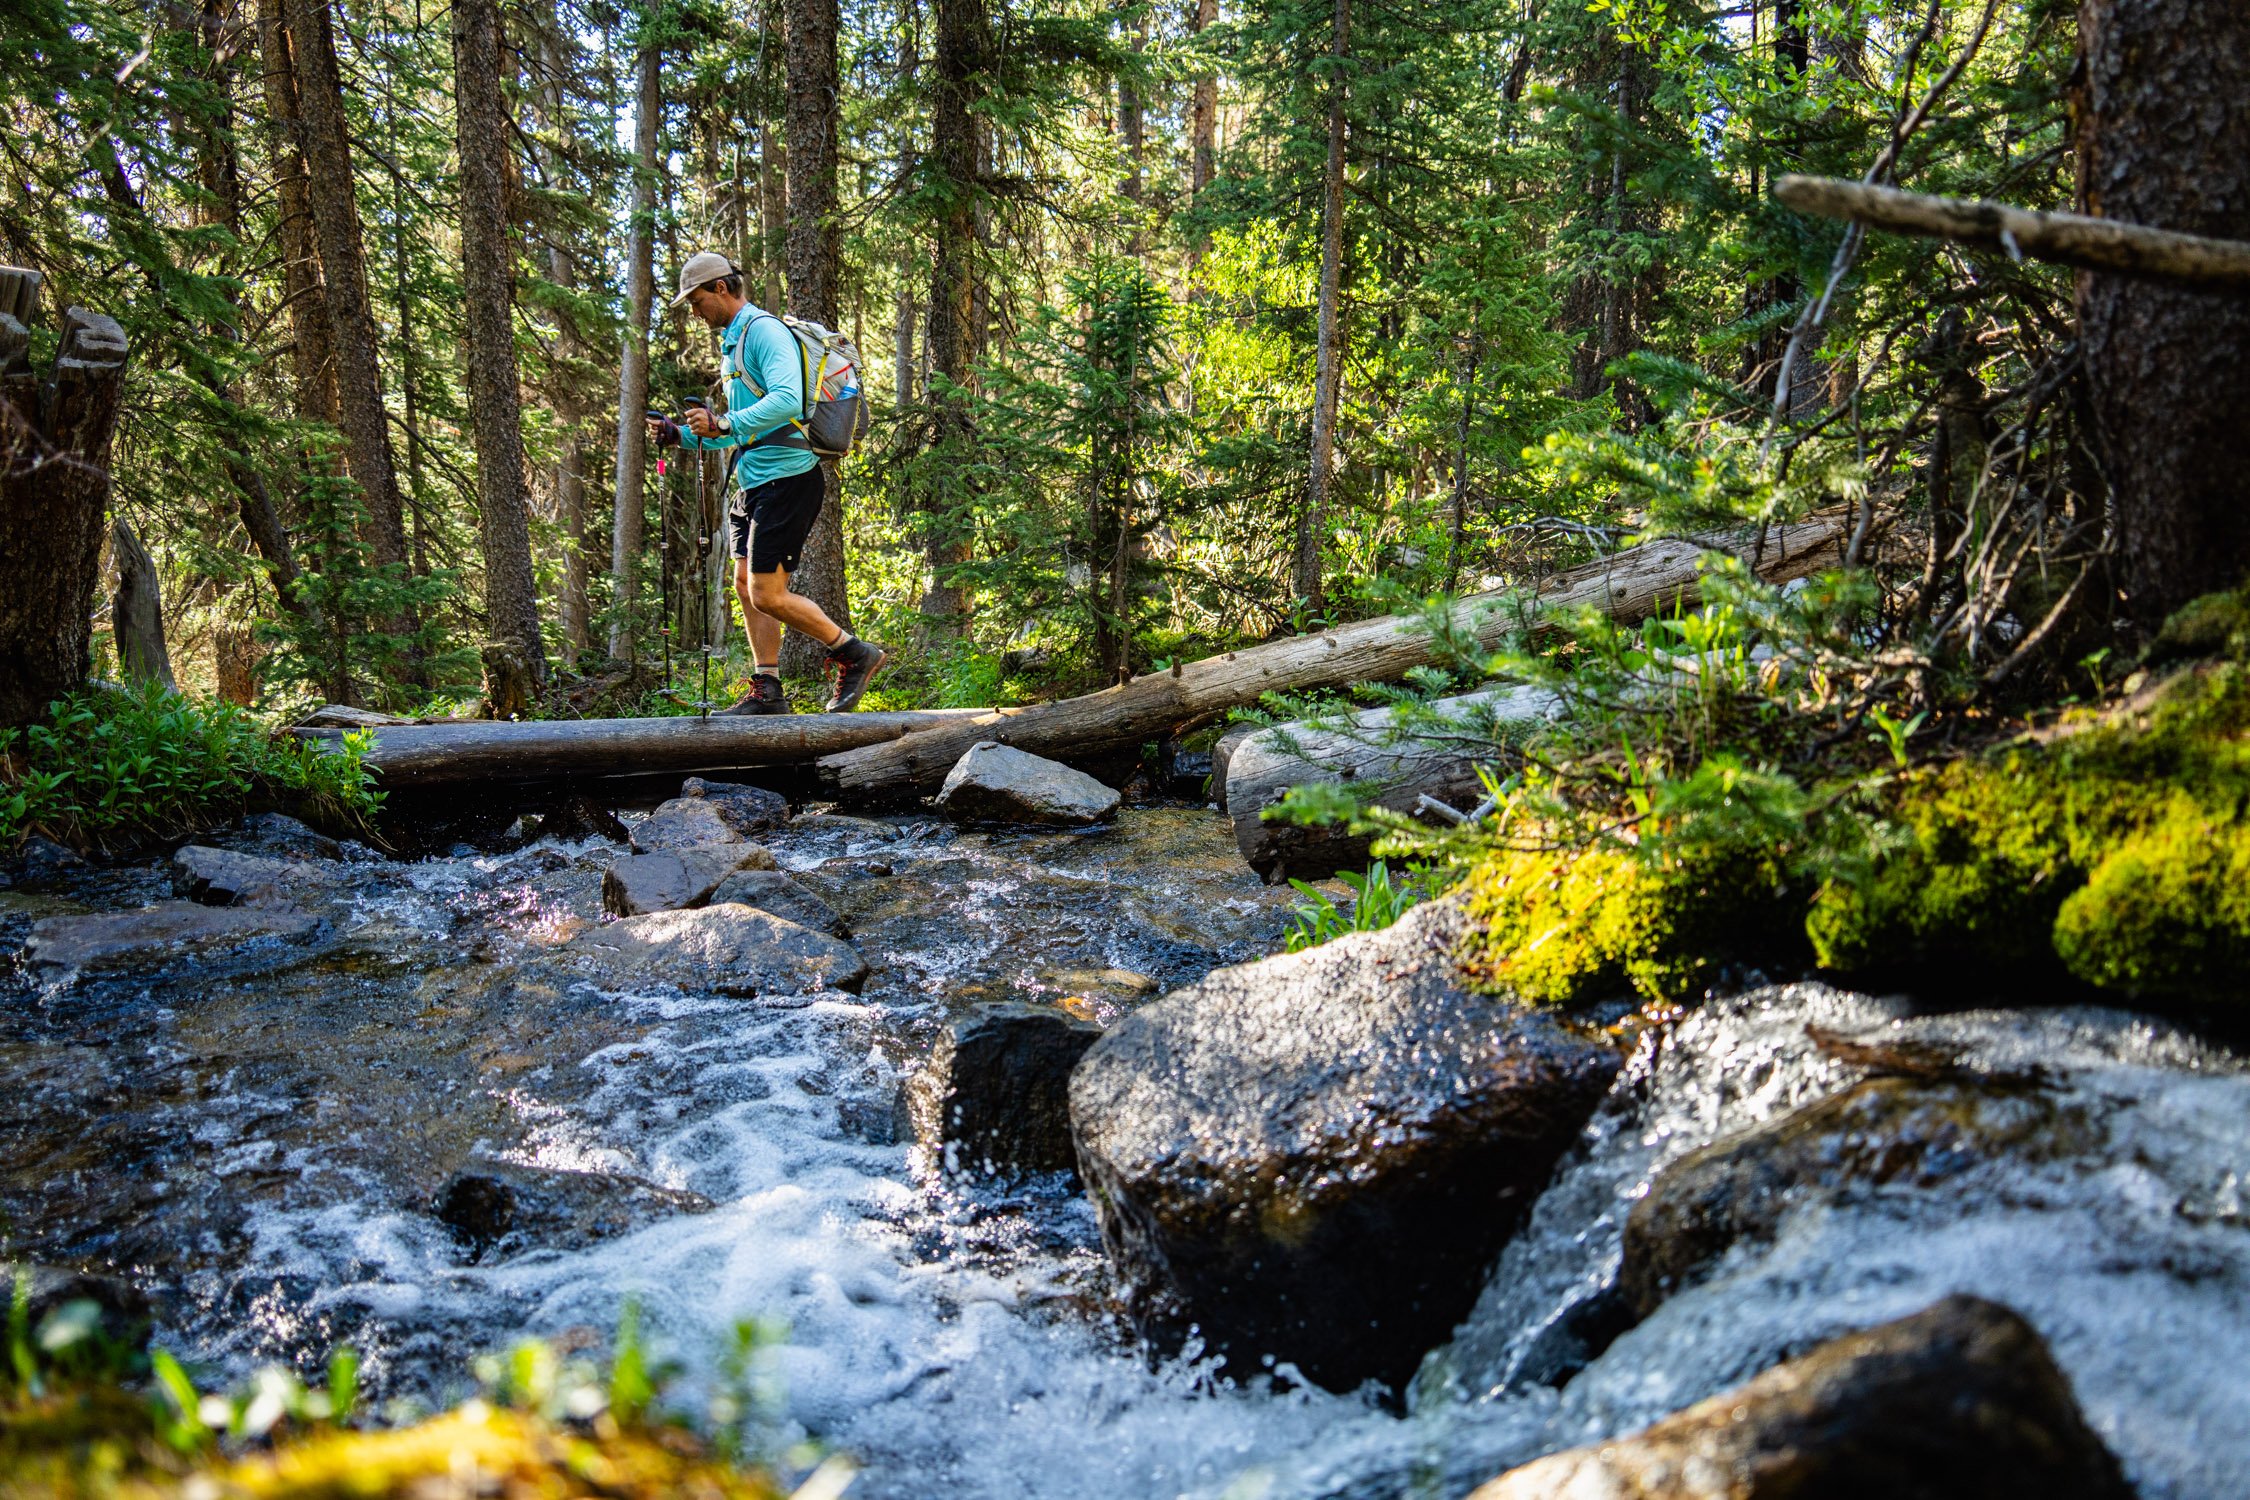
Crossing the first creek of Mount Massive. Photo by Dalton Johnson
1. Starting Too Late
One of the biggest mistakes you can make when climbing Mount Massive is starting too late. Afternoon thunderstorms are a well-known hazard in Colorado’s high country, and lightning strikes above the treeline can be deadly. An early start—ideally around 4:00 or 5:00 a.m.—gives you plenty of time to summit and descend before the storms roll in. On one of my hikes, I started later than planned and spent the entire ascent worrying about the clouds forming in the distance. Don’t let poor timing overshadow your experience.
Late starts also mean dealing with higher temperatures as the day progresses. Even at altitude, the sun’s intensity can be draining, especially on exposed sections of the trail. Early morning climbs offer cooler conditions, making the hike less physically demanding and more enjoyable. Additionally, starting early ensures that you’re not rushing your descent as daylight fades, reducing the risk of hiking in the dark.
For those aiming to beat the crowds, an early start has the added benefit of quieter trails. Mount Massive is popular among hikers, and trailheads can get busy by mid-morning. An early departure gives you a head start on parking and a more peaceful experience on the trail.

Shorts and a sun hoodie might not be the go to on Mount Massive, but that was what I did. Photo by Dalton Johnson
2. Overlooking Proper Layering
Weather on Mount Massive can change rapidly, and improper layering can make or break your hike. On one trip, I packed a thick Gore-Tex jacket and a fleece layer but skipped a lightweight windbreaker. As a result, I was either sweating in my heavy jacket or shivering in the wind when wearing just the fleece.
The key to staying comfortable is using a layering system that includes a moisture-wicking base layer, an insulating mid-layer, and a lightweight windproof or waterproof outer layer. This setup allows you to adjust to varying conditions without carrying unnecessary weight. Remember, it’s better to shed a layer than to not have the right one when you need it.
Another common mistake is neglecting to pack gloves and a warm hat. Even in the summer, temperatures at the summit can be freezing, and exposed skin loses heat quickly in strong winds. Keeping your extremities protected is just as important as layering your core. Take the time to research the weather forecast and pack accordingly to prepare for any sudden changes.

Getting a glimpse of the summit from below while climbing Mount Massive. Photo by Dalton Johnson
3. Forgetting Sunscreen
At high elevations, the sun’s rays are more intense, and forgetting sunscreen can lead to painful burns. The trail to Mount Massive is largely exposed after you leave the treeline, making it essential to protect your skin. On one hike, I forgot to reapply sunscreen and ended up with a sunburn that made the descent miserable.
To avoid this, apply a high-SPF sunscreen before you start your hike and reapply throughout the day, especially on sunny, cloudless mornings. Don’t forget areas like your ears, the back of your neck, and the tops of your hands—these spots are often overlooked. Additionally, wearing a wide-brimmed hat and UV-protective clothing can provide extra protection against the sun’s harmful rays. Sunglasses are also a must, as they reduce glare and protect your eyes from UV exposure at high altitudes.
4. Underestimating the False Summit
Mount Massive is known for its deceptive false summit, which can be a mental challenge for even experienced hikers. After hours of climbing, you’ll crest what appears to be the peak, only to see the true summit looming further ahead. This can be disheartening if you’re not prepared for it.
When I first climbed Mount Massive, the sight of the false summit nearly broke my resolve. But knowing this feature is part of the journey helps you mentally prepare. Keep a steady pace and remember that the extra effort will be worth it once you’re standing on the true summit, taking in the breathtaking views.
One way to avoid disappointment is by studying the route beforehand and setting realistic expectations. Many trail descriptions and maps highlight the false summit, so familiarize yourself with what to expect. Break the hike into manageable segments and celebrate milestones along the way to keep your morale high.

Hiking up the trail on Mount Massive. Photo by Dalton Johnson
5. Failing to Pack the Essentials
While it’s easy to focus on the big items like boots and jackets, neglecting smaller essentials can lead to unnecessary challenges. Always carry plenty of water to stay hydrated—dehydration at high altitudes can creep up quickly. A mix of snacks with carbohydrates and electrolytes will help you maintain your energy levels throughout the hike.
Additionally, a map, compass, or GPS device is critical for navigation. Trails can sometimes be poorly marked, and it’s easy to veer off course, especially in rocky sections. A first-aid kit, emergency blanket, and multi-tool are also valuable additions to your pack in case of unexpected situations. Don’t forget a headlamp, even if you plan to finish in daylight—delays can happen, and having a reliable light source is crucial for safety.
Getting silly just before the summit. Photo by Dalton Johnson
Tips for a Successful Climb
Avoiding these common mistakes will go a long way toward ensuring a safe and enjoyable hike up Mount Massive. Here are a few additional tips to keep in mind:
Acclimate to Altitude: Spend a night at a higher elevation before your hike to minimize the effects of altitude sickness.
Use Trekking Poles: These can provide extra stability on loose rock and reduce strain on your knees during the descent.
Stay Hydrated: Drink water consistently throughout the hike to avoid dehydration.
Monitor Weather Changes: Pay close attention to cloud formations and be prepared to turn back if conditions worsen.
Climbing Mount Massive is an unforgettable experience, but avoiding these common mistakes will make your adventure far more enjoyable. By starting early, dressing in proper layers, protecting yourself from the sun, and preparing for the false summit, you’ll be ready to tackle this incredible 14er with confidence.
Take the time to prepare, embrace the challenge, and savor every step of the journey to one of Colorado’s most iconic peaks. With careful planning and the right mindset, your trek up Mount Massive will be a memory you cherish for years to come.
Discover more Adventures
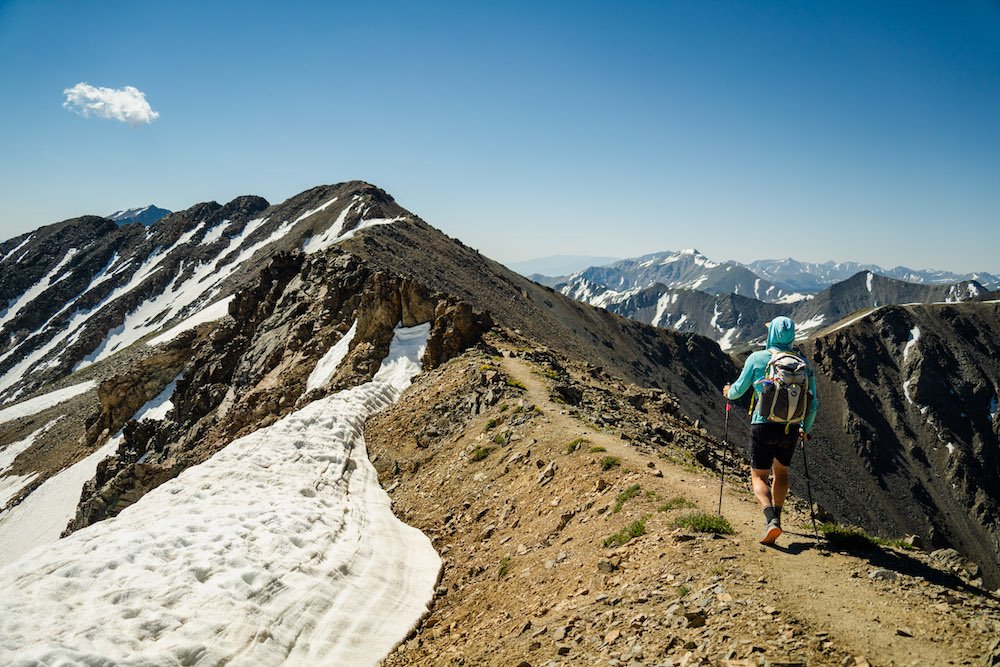
What You Need to Know About Timing Your 14er Ascent
Climbing a 14er—a peak with an elevation of at least 14,000 feet—is a bucket-list adventure for many hikers. However, timing your ascent is crucial for a safe and successful climb. Starting too late can put you at risk of thunderstorms, heat, and other hazards that can turn an enjoyable hike into a dangerous situation. Here’s what you need to know about timing your 14er adventure.
Climbing a 14er—a peak with an elevation of at least 14,000 feet—is a bucket-list adventure for many hikers. However, timing your ascent is crucial for a safe and successful climb. Starting too late can put you at risk of thunderstorms, heat, and other hazards that can turn an enjoyable hike into a dangerous situation. Here’s what you need to know about timing your 14er adventure.

California 14ers a little bit harder than Colorado’s, here’s some visual proof. Photo by Dalton Johnson
An early start is one of the most essential aspects of a 14er climb. In Colorado and other mountainous regions, weather patterns often bring thunderstorms that develop in the afternoon. Lightning strikes above treeline can be deadly, so most experienced hikers aim to summit and begin descending by late morning. Starting your hike at 4:00 or 5:00 a.m. gives you a significant buffer to reach the summit before storms roll in.
Beyond avoiding storms, an early start helps you beat the heat. Even at high elevations, the sun can be intense, especially in summer. Climbing during the cooler morning hours reduces the physical strain and minimizes the risk of dehydration and heat exhaustion. On a personal hike up Mount Massive, I started later than planned and found myself sweating through exposed sections of the trail as the sun climbed higher in the sky. Trust me, those early hours are worth the effort.

Scouting the route on Mount of the Holy Cross. Photo by Dalton Johnson
Popular 14ers often see a rush of hikers, especially on weekends. Arriving early ensures you secure a parking spot at the trailhead, which can fill up quickly by mid-morning. Late arrivals may have to park further away, adding extra distance to an already demanding hike. Additionally, starting early means you’ll encounter fewer hikers on the trail, creating a more peaceful and enjoyable experience.
When summiting Mount of the Holy Cross, I found myself “in a line” of hikers navigating the final section towards the summit, so I either had to wait or go around off trail. I chose to go around. The congestion slowed my progress and detracted from the solitude I value in the mountains.
Starting late doesn’t just increase the likelihood of encountering thunderstorms—it also limits your time buffer for unexpected delays. Whether it’s a slower pace, route-finding challenges, or dealing with altitude sickness, these delays can extend your hike beyond the safe window for summiting and descending. A late start also increases the risk of hiking back to the trailhead in the dark. While carrying a headlamp is essential, descending in darkness can be disorienting and dangerous, especially on rocky or poorly marked trails. The mental and physical fatigue from a long day adds to the challenge.

Sunrise above the clouds on Mount Princeton. Photo by Dalton Johnson
To ensure a safe and enjoyable hike, plan your start time by working backward from your target summit time. For most 14ers, a goal of reaching the summit by 10:00 or 11:00 a.m. is ideal. Estimate your pace and the time required for the ascent, including breaks, to determine when you need to begin.
For slower hikers or longer routes, this could mean starting as early as 3:00 a.m. Consider the season as well. During peak summer months, daylight hours are longer, providing more flexibility. In late spring or early fall, shorter days and cooler temperatures may require even earlier starts to avoid being caught out after dark.

Running between 14er summits to be down before a storm. Photo by Dalton Johnson
Here are some tips to help you plan an early start:
Prepare the Night Before: Lay out your gear, pack your bag, and set your alarm to avoid a rushed morning. Prepping your breakfast and filling water bottles the night before can save valuable time.
Check the Weather: Review the forecast for your hiking area, paying close attention to the timing of potential thunderstorms.
Acclimate to Altitude: Spend a night or two at a higher elevation before your hike to reduce the risk of altitude sickness, which can slow your progress.
Start in the Dark: Don’t be afraid to begin your hike before sunrise. A headlamp or flashlight will light your way, and you’ll get to experience the magical transition from night to day on the trail.
Pace Yourself: Even with an early start, it’s essential to maintain a steady pace to conserve energy for the descent.
Timing your ascent properly not only ensures safety but also enhances the overall experience. There’s something magical about starting in the quiet predawn hours, watching the first light touch the peaks, and reaching the summit with plenty of time to soak in the views before heading back down. A well-timed 14er climb is about more than just reaching the top—it’s about savoring the journey while prioritizing safety.
Whether you’re tackling your first 14er or your fifteenth, early starts are the key to making the most of your adventure. With the right preparation and timing, you’ll set yourself up for success and create unforgettable memories in the high country.
Discover more Adventures

Which 14er Should You Tackle First; Mount Massive vs. Mount of the Holy Cross
Colorado is home to some of the most iconic 14ers in the United States, and Mount Massive and Mount of the Holy Cross are two standout peaks in the Sawatch Range. If you’re deciding which to climb first, this guide will help you compare the two peaks based on difficulty, scenery, logistics, and the best times to climb.
Colorado is home to some of the most iconic 14ers in the United States, and Mount Massive and Mount of the Holy Cross are two standout peaks in the Sawatch Range. If you’re deciding which to climb first, this guide will help you compare the two peaks based on difficulty, scenery, logistics, and the best times to climb.
When I climbed Mount Massive, I was recovering from sore legs after summiting Mount of the Holy Cross just days earlier. The physical challenge and contrasting experiences of these two peaks gave me a unique perspective on their differences. Mount Massive, the second-tallest peak in Colorado, offers a long but manageable ascent. The standard route from the Mount Massive Trailhead stretches over 13 miles round-trip with about 4,500 feet of elevation gain. The terrain is primarily Class 2, involving rocky trails and loose scree, but little technical difficulty. While the hike is straightforward, the false summit can be a mental challenge as it adds an extra push to reach the true peak. I distinctly remember the heartbreak of cresting what I thought was the summit, only to see the true peak in the distance. It’s a moment that can humble even experienced hikers.
In contrast, Mount of the Holy Cross, though shorter at around 11 miles round-trip via the North Ridge, presents over 5,600 feet of elevation gain. The steep descent into East Cross Creek early in the hike means you’ll face a challenging climb back up on your return. The terrain is also Class 2, but with steeper sections and some route-finding near the summit, it’s slightly more technical than Mount Massive. On my climb, navigating the rocky ridgeline and staying on course required careful attention, especially as the trail faded closer to the summit. The extra effort, however, is worth it for the dramatic views and sense of accomplishment. For beginners, Mount Massive is the easier option due to its gradual incline and fewer technical elements.

Kristin hidden in the gigantic landscape surrounding Mount of the Holy Cross. Photo by Dalton Johnson
When it comes to scenery, Mount Massive and Mount of the Holy Cross offer different but equally stunning experiences. The trail to Mount Massive features expansive views of the Sawatch Range and surrounding valleys. Above the treeline, the ridge provides breathtaking panoramas of nearby peaks, including Mount Elbert. The landscape is vast and open, characterized by alpine tundra and darting marmots. I vividly recall pausing at the saddle to watch these curious creatures scurry about while taking in the sweeping vistas. It’s a serene and almost meditative experience that allows you to appreciate the vastness of Colorado’s high country.
On the other hand, Mount of the Holy Cross is famous for its dramatic cross-shaped snowfield visible on its east face during certain times of the year. The approach includes beautiful forested areas, a crossing at East Cross Creek, and lush meadows. Once above the treeline, the jagged ridgeline and views of the Gore Range create a more dramatic alpine setting. The sight of the cross-shaped snowfield, paired with the rugged beauty of the terrain, made every step worth it. I remember stopping frequently to take in the incredible contrast of the green valleys below and the stark, rocky ridgeline above. For those who prioritize striking and varied scenery, Mount of the Holy Cross is the winner.
The hot and never ending section of hiking Mount Massive. Photo by Dalton Johnson
Logistically, Mount Massive is more accessible. The trailhead, located off Halfmoon Road near Leadville, is easy to reach, with well-maintained roads and plenty of nearby camping options. The trail itself is straightforward, making navigation simpler. This accessibility makes it easier to plan a day hike without significant complications. In contrast, accessing Mount of the Holy Cross requires a longer drive to the Halfmoon Pass Trailhead. The road is more rugged, and overnight logistics at East Cross Creek require additional planning. I camped near the creek to break up the climb, but packing for an overnight added another layer of preparation. Route-finding, especially near the summit, can be tricky and demands familiarity with maps or GPS tools. For first-time 14er climbers, Mount Massive’s simpler logistics make it the better choice.
Dalton making his way over the false summit to the true summit. Photo by Dalton Johnson
The best times to climb both peaks are late June through early September, when trails are mostly snow-free. Thunderstorms are a common afternoon threat in Colorado’s high country, so starting early is crucial. On my Mount Massive hike, I had to push through a late start, meeting descending hikers warning me about potential storms. It’s an important reminder of how unpredictable mountain weather can be. While both mountains share similar climbing windows, Mount Massive’s easier accessibility makes it slightly more convenient to plan around weather and snow conditions. Mount of the Holy Cross, with its creek crossing, is less ideal early in the season when snowmelt can make the water levels treacherous.
Kristin taking her final steps to the summit of Mount of the Holy Cross. Photo by Dalton Johnson
Ultimately, the choice between Mount Massive and Mount of the Holy Cross depends on your experience and what you’re looking for in a climb. If you’re new to climbing 14ers or prefer a longer, less technical hike with straightforward logistics, Mount Massive is the way to go. Its gradual ascent and wide-open views make it a great introduction to Colorado’s high peaks. On the other hand, if you’re seeking a challenge with more dramatic scenery and don’t mind steeper terrain, Mount of the Holy Cross is an unforgettable adventure. Its iconic snowfield and rugged ridgeline make it a bucket-list climb for more experienced hikers.
Whichever peak you choose, both Mount Massive and Mount of the Holy Cross offer incredible adventures and the chance to experience the beauty of Colorado’s Sawatch Range. Whether it’s the vast tundra and marmots of Massive or the jagged ridgeline and iconic snowfield of Holy Cross, these climbs embody the spirit of adventure that draws so many to Colorado’s 14ers. As someone who has stood on the summit of both, I can confidently say that each peak holds its own special reward. Plan well, embrace the challenges, and savor every step of your journey.
Discover more Adventures

Mount Massive’s False Summit Is Heartbreaking
Waking up later than planned, I crawled out of my van with a packed bag, fueled by coffee and laced-up boots. Clicking my Coros watch to start recording my trek, I set off down the trail for a car-to-car push of Mount Massive. As Colorado's second-highest peak, I felt nervous but confident I could summit in good time. My legs were still sore from climbing Mount of the Holy Cross just a few days before, another challenging 14er in Colorado’s Sawatch Range.
Waking up later than planned, I crawled out of my van with a packed bag, fueled by coffee and laced-up boots. Clicking my Coros watch to start recording my trek, I set off down the trail for a car-to-car push of Mount Massive. As Colorado's second-highest peak, I felt nervous but confident I could summit in good time. My legs were still sore from climbing Mount of the Holy Cross just a few days before, another challenging 14er in Colorado’s Sawatch Range.
The initial stretch of trail was forgiving—flat and easy to navigate. However, something about this morning felt different. The usual hum of 14er activity was missing. It was silent.
I paused mid-trail, letting the quiet seep in. I listened to the birds flitting between branches, felt the sun warm my face, and watched the aspen leaves tremble in the breeze. Poetic? Maybe a little. It’s rare to find such a peaceful start on a popular 14er, and I let myself fully enjoy the moment.
Navigating the Trail
The tranquility carried me over the first creek and then the second. At the second river crossing, I almost made a rookie mistake. There's a campsite near the crossing, but don’t turn there. Continue another quarter mile before turning left. That’s where the real climb begins.
The steep ascent out of the trees was brutal, and I made another rookie error—I forgot sunscreen. Finding a wind-sheltered spot, I regrouped with sunscreen, trail mix, and water. With the tree line behind me, I faced the long, exposed climb toward Mount Massive’s summit.
Crossing the first creek on my way to the summit of Mount Massive. Photo by Dalton Johnson
The path transitioned from a packed trail to loose dirt and rock. It’s a stretch where every step demands attention. The exposure to the sun intensified as the morning wore on, and I regretted not starting earlier. I’d made a mental note of the thunderstorm warnings but kept scanning the sky for any signs of trouble. Thankfully, the skies remained a vibrant blue.
No music, just the crunch of my boots and the wind. There’s something therapeutic about that solitude. But as I climbed higher, solitude gave way to the chatter of descending hikers.
They warned me about thunderstorms, but the skies were clear, so I pressed on. Still, their remarks about my late start gnawed at me. My layering system was off, too. Without a proper wind layer, I alternated between overheating in a Gore-Tex jacket and freezing in a fleece. At least my trekking poles were a solid choice—they saved me on more than one slippery patch.
Beginning the long and exposed traverse to the summit of Mount Massive. Photo by Dalton Johnson
The Crux: Mount Massive’s Saddle and Ridgeline
Emerging onto the saddle, the summit finally came into view—or so I thought. First, there was the ridgeline to navigate.
I paused at the saddle, enjoying the antics of marmots darting around in search of snacks. These critters are entertaining but will chew through your pack if given the chance. Watch your gear here! Sitting there, I also took in the sweeping views. The saddle offered a dramatic perspective, with rugged peaks jutting up in every direction and a rolling valley far below. It’s the kind of scenery that makes every step worthwhile.

Marmots ready to eat your gear. Photo by Dalton Johnson
Refreshed, I tackled the ridge. Weaving through loose rock and patches of snow, I met climbers debating whether to continue due to the exposure. For those uneasy with heights, this ridgeline is daunting. But if you’re comfortable on loose terrain and confident in your footing, it’s manageable.
The ridgeline was both exhilarating and nerve-wracking. The exposure on either side made every step deliberate. A misstep here would be costly, but I found the challenge rewarding. With each step, the sense of accomplishment grew.
At last, I crested what I believed was the summit. Relief washed over me—until I looked north. There it was, the true summit, taunting me from across a dip.
Heartbreak and Triumph
The false summit was heartbreaking. Crawling down loose rock, I crossed the dip and scrambled up to the true summit. Relief and accomplishment hit me all at once.
Standing atop Mount Massive, I gazed out toward Leadville. Nearby, a fellow hiker in cowboy boots, a cowboy hat, and leather gloves shared his thoughts on the beauty of doing hard things. His perspective added depth to an already memorable summit experience. I couldn’t help but laugh at the juxtaposition of his gear against the rugged terrain. It’s moments like these—unexpected conversations and shared experiences—that make 14ers so special.
The summit views were breathtaking. The endless ridges of the Sawatch Range stretched in every direction, their jagged peaks dusted with snow. I took a moment to sit and reflect, letting the satisfaction of the climb wash over me. It’s not just the physical effort but the mental persistence that makes summiting so rewarding.
Making the final push to the true summit of Mount Massive. Photo by Dalton Johnson
The Journey Back
Descending was slow, but the views and the sense of achievement made every step worth it. I returned to my van, exhausted but satisfied. Tomorrow, Mount Elbert awaited.
The return trek had its own charm. As the sun began to dip lower in the sky, the golden light bathed the landscape, casting long shadows across the trail. Marmots scampered about, and I passed a few remaining hikers heading down, all exchanging knowing nods of shared effort.