
Common Mistakes to Avoid When Climbing Mount Massive
Mount Massive, Colorado’s second-highest peak, is the often overlooked step-sibling to the highest peak in Colorado, Mount Elbert, just across the valley. However, climbing this iconic mountain comes with its challenges, and mistakes can quickly turn an enjoyable trek into a tough lesson. Based on personal experiences, here are the top mistakes to avoid when tackling Mount Massive, so you can have a safer and more rewarding adventure.
Mount Massive, Colorado’s second-highest peak, is the often overlooked step-sibling to the highest peak in Colorado, Mount Elbert, just across the valley. However, climbing this iconic mountain comes with its challenges, and mistakes can quickly turn an enjoyable trek into a tough lesson. Based on personal experiences, here are the top mistakes to avoid when tackling Mount Massive, so you can have a safer and more rewarding adventure.
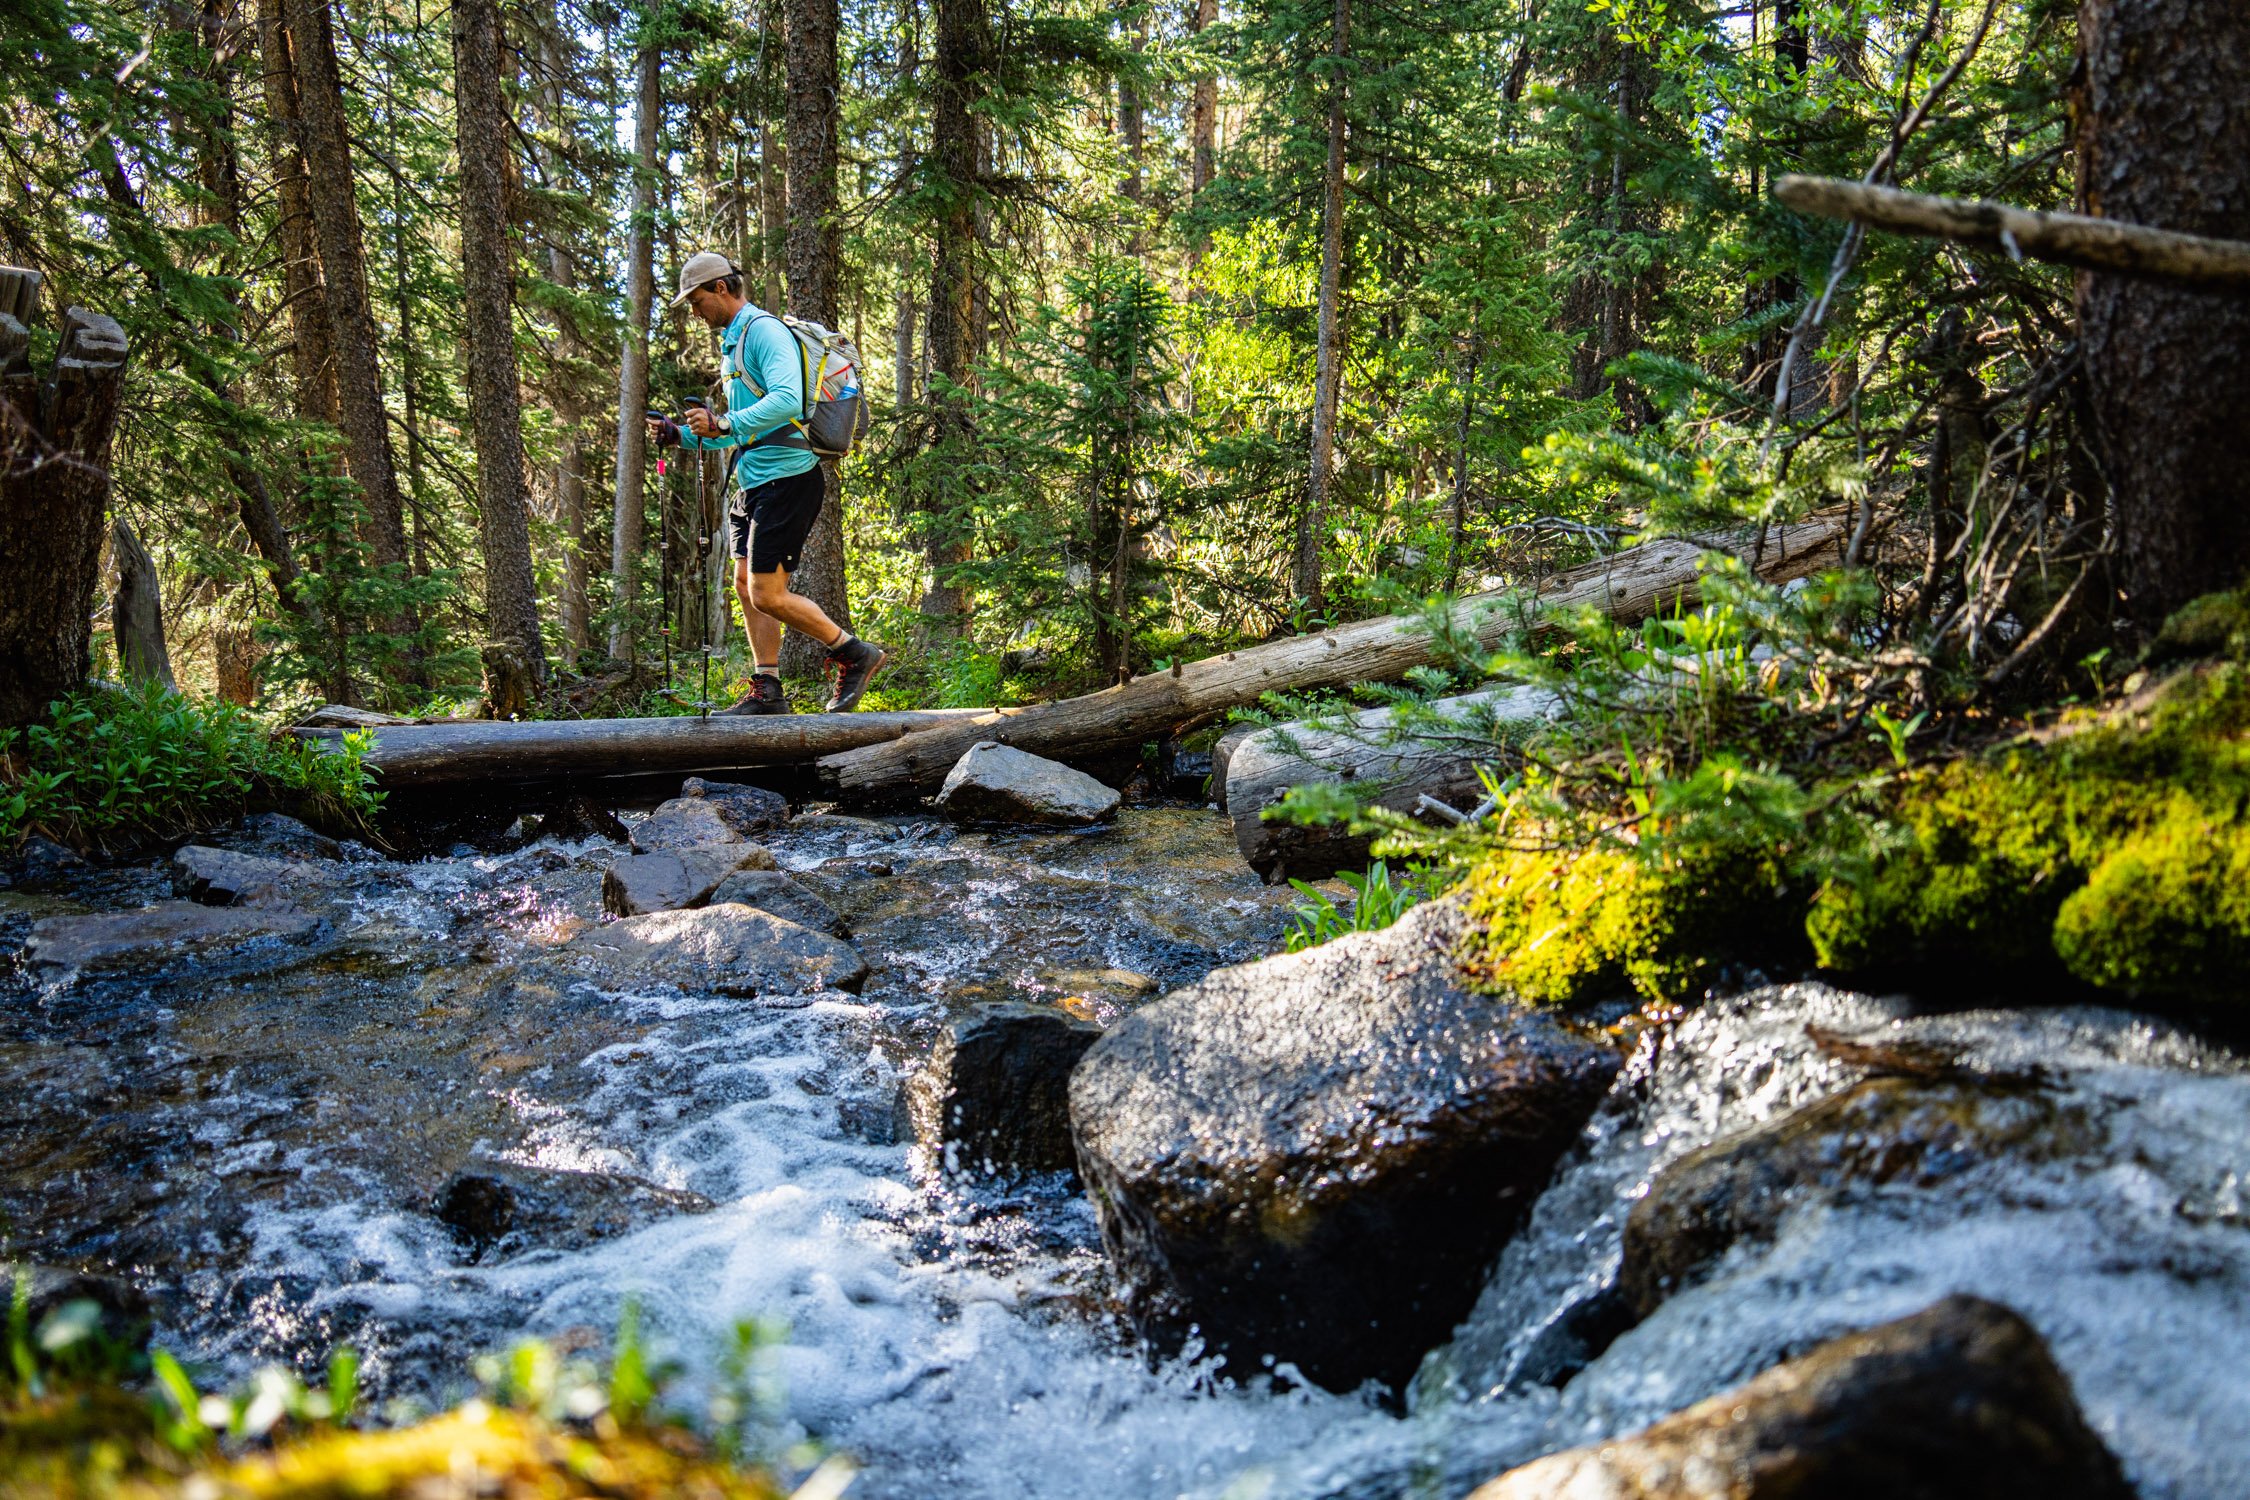
Crossing the first creek of Mount Massive. Photo by Dalton Johnson
1. Starting Too Late
One of the biggest mistakes you can make when climbing Mount Massive is starting too late. Afternoon thunderstorms are a well-known hazard in Colorado’s high country, and lightning strikes above the treeline can be deadly. An early start—ideally around 4:00 or 5:00 a.m.—gives you plenty of time to summit and descend before the storms roll in. On one of my hikes, I started later than planned and spent the entire ascent worrying about the clouds forming in the distance. Don’t let poor timing overshadow your experience.
Late starts also mean dealing with higher temperatures as the day progresses. Even at altitude, the sun’s intensity can be draining, especially on exposed sections of the trail. Early morning climbs offer cooler conditions, making the hike less physically demanding and more enjoyable. Additionally, starting early ensures that you’re not rushing your descent as daylight fades, reducing the risk of hiking in the dark.
For those aiming to beat the crowds, an early start has the added benefit of quieter trails. Mount Massive is popular among hikers, and trailheads can get busy by mid-morning. An early departure gives you a head start on parking and a more peaceful experience on the trail.

Shorts and a sun hoodie might not be the go to on Mount Massive, but that was what I did. Photo by Dalton Johnson
2. Overlooking Proper Layering
Weather on Mount Massive can change rapidly, and improper layering can make or break your hike. On one trip, I packed a thick Gore-Tex jacket and a fleece layer but skipped a lightweight windbreaker. As a result, I was either sweating in my heavy jacket or shivering in the wind when wearing just the fleece.
The key to staying comfortable is using a layering system that includes a moisture-wicking base layer, an insulating mid-layer, and a lightweight windproof or waterproof outer layer. This setup allows you to adjust to varying conditions without carrying unnecessary weight. Remember, it’s better to shed a layer than to not have the right one when you need it.
Another common mistake is neglecting to pack gloves and a warm hat. Even in the summer, temperatures at the summit can be freezing, and exposed skin loses heat quickly in strong winds. Keeping your extremities protected is just as important as layering your core. Take the time to research the weather forecast and pack accordingly to prepare for any sudden changes.

Getting a glimpse of the summit from below while climbing Mount Massive. Photo by Dalton Johnson
3. Forgetting Sunscreen
At high elevations, the sun’s rays are more intense, and forgetting sunscreen can lead to painful burns. The trail to Mount Massive is largely exposed after you leave the treeline, making it essential to protect your skin. On one hike, I forgot to reapply sunscreen and ended up with a sunburn that made the descent miserable.
To avoid this, apply a high-SPF sunscreen before you start your hike and reapply throughout the day, especially on sunny, cloudless mornings. Don’t forget areas like your ears, the back of your neck, and the tops of your hands—these spots are often overlooked. Additionally, wearing a wide-brimmed hat and UV-protective clothing can provide extra protection against the sun’s harmful rays. Sunglasses are also a must, as they reduce glare and protect your eyes from UV exposure at high altitudes.


4. Underestimating the False Summit
Mount Massive is known for its deceptive false summit, which can be a mental challenge for even experienced hikers. After hours of climbing, you’ll crest what appears to be the peak, only to see the true summit looming further ahead. This can be disheartening if you’re not prepared for it.
When I first climbed Mount Massive, the sight of the false summit nearly broke my resolve. But knowing this feature is part of the journey helps you mentally prepare. Keep a steady pace and remember that the extra effort will be worth it once you’re standing on the true summit, taking in the breathtaking views.
One way to avoid disappointment is by studying the route beforehand and setting realistic expectations. Many trail descriptions and maps highlight the false summit, so familiarize yourself with what to expect. Break the hike into manageable segments and celebrate milestones along the way to keep your morale high.

Hiking up the trail on Mount Massive. Photo by Dalton Johnson
5. Failing to Pack the Essentials
While it’s easy to focus on the big items like boots and jackets, neglecting smaller essentials can lead to unnecessary challenges. Always carry plenty of water to stay hydrated—dehydration at high altitudes can creep up quickly. A mix of snacks with carbohydrates and electrolytes will help you maintain your energy levels throughout the hike.
Additionally, a map, compass, or GPS device is critical for navigation. Trails can sometimes be poorly marked, and it’s easy to veer off course, especially in rocky sections. A first-aid kit, emergency blanket, and multi-tool are also valuable additions to your pack in case of unexpected situations. Don’t forget a headlamp, even if you plan to finish in daylight—delays can happen, and having a reliable light source is crucial for safety.
Getting silly just before the summit. Photo by Dalton Johnson
Tips for a Successful Climb
Avoiding these common mistakes will go a long way toward ensuring a safe and enjoyable hike up Mount Massive. Here are a few additional tips to keep in mind:
Acclimate to Altitude: Spend a night at a higher elevation before your hike to minimize the effects of altitude sickness.
Use Trekking Poles: These can provide extra stability on loose rock and reduce strain on your knees during the descent.
Stay Hydrated: Drink water consistently throughout the hike to avoid dehydration.
Monitor Weather Changes: Pay close attention to cloud formations and be prepared to turn back if conditions worsen.
Climbing Mount Massive is an unforgettable experience, but avoiding these common mistakes will make your adventure far more enjoyable. By starting early, dressing in proper layers, protecting yourself from the sun, and preparing for the false summit, you’ll be ready to tackle this incredible 14er with confidence.
Take the time to prepare, embrace the challenge, and savor every step of the journey to one of Colorado’s most iconic peaks. With careful planning and the right mindset, your trek up Mount Massive will be a memory you cherish for years to come.
Discover more Adventures


12 Pro Tips for Beginner Peak Baggers
Peak bagging is an exhilarating challenge that combines the thrill of reaching mountain summits with the satisfaction of conquering new heights. For beginners, the world of peak bagging can seem daunting, with its rugged terrains and high-altitude conditions. However, with the right preparation and knowledge, you can embark on your peak bagging journey with confidence. These 12 pro tips will guide you through the essentials of peak bagging, helping you safely and successfully reach new summits.
Peak bagging is an exhilarating challenge that combines the thrill of reaching mountain summits with the satisfaction of conquering new heights. For beginners, the world of peak bagging can seem daunting, with its rugged terrains and high-altitude conditions. However, with the right preparation and knowledge, you can embark on your peak bagging journey with confidence. These 12 pro tips will guide you through the essentials of peak bagging, helping you safely and successfully reach new summits.
Crossing the last few steps towards the summit block of Starlight peak in the High Sierra. Photo by Dalton Johnson
Background:
Peak bagging is a popular pursuit among outdoor enthusiasts, involving the quest to summit various peaks or mountains. This activity can range from conquering local hills to tackling some of the highest and most challenging peaks worldwide. Historically, peak bagging has been a part of mountaineering and exploration, offering a sense of accomplishment and adventure. Today, it continues to attract those seeking to push their limits and experience the beauty of high-altitude landscapes.
12 Pro Tips for Beginner Peak Baggers:
1. Start with Smaller Peaks
As a beginner peak bagger, it’s wise to start with smaller, less challenging peaks to build your experience and confidence. Opt for summits with moderate elevation gains and well-established trails. This allows you to gradually acclimate to the physical demands and technical aspects of peak bagging. Once you’re comfortable with smaller peaks, you can progressively tackle more difficult summits.
2. Research Your Peaks
Before setting out, thoroughly research the peaks you plan to climb. Understand the route, difficulty level, and weather conditions. Familiarize yourself with the peak’s elevation, terrain, and any technical requirements. Knowledge of the peak and its challenges will help you prepare effectively and set realistic expectations for your climb.
3. Train for Physical Fitness
Peak bagging demands a high level of physical fitness, especially for longer and steeper climbs. Incorporate a training regimen that includes cardiovascular exercises, strength training, and endurance workouts. Focus on building leg strength, core stability, and overall stamina. Proper training will improve your performance and reduce the risk of fatigue and injury during climbs.
4. Acclimate to Altitude
Altitude can significantly impact your performance and well-being during peak bagging. To minimize the risk of altitude sickness, acclimate gradually by spending time at higher elevations before your climb. Ascend slowly, taking breaks to adjust to the altitude. Understanding the symptoms of altitude sickness and knowing how to respond is crucial for a safe climbing experience.
5. Check Weather Conditions
Weather conditions play a crucial role in peak bagging, affecting both safety and enjoyment. Always check the weather forecast before your climb and be prepared for changing conditions. Mountain weather can be unpredictable, so bring appropriate clothing and gear for various scenarios. Avoid climbing in severe weather conditions such as storms or high winds.
6. Plan Your Route
Effective route planning is essential for a successful peak bagging adventure. Choose a route that matches your skill level and experience, and make sure to study maps and guidebooks. Consider factors such as trailhead access, navigation, and potential hazards. Having a clear route plan helps you stay on track and navigate the mountain safely.
7. Bring Essential Gear
While gear selection can vary depending on the peak and conditions, certain essentials are crucial for peak bagging. Carry a map, compass, first aid kit, headlamp, and emergency supplies. Also, pack sufficient food and water for the climb. Essential gear ensures you’re prepared for emergencies and unexpected situations on the mountain.
8. Practice Navigation Skills
Strong navigation skills are vital for peak bagging, especially when climbing in unfamiliar terrain. Practice using a map and compass, and consider carrying a GPS device if necessary. Learning how to read topographic maps and recognize trail markers will help you stay oriented and avoid getting lost during your climb.
9. Understand Mountain Hazards
Mountain environments present various hazards, such as rockfall, avalanches, and crevasses. Educate yourself about the specific hazards associated with the peak you’re climbing. Understand how to assess and mitigate risks, and know when to turn back if conditions become unsafe. Awareness of potential hazards helps you make informed decisions and stay safe.
10. Start Early
Starting your climb early in the day offers several advantages, including cooler temperatures and more daylight. Early starts help you avoid afternoon thunderstorms and provide ample time to complete your climb before darkness sets in. Planning an early start also allows for a more relaxed pace and reduces the risk of rushing or getting caught in adverse conditions.
11. Stay Hydrated and Nourished
Proper hydration and nutrition are crucial for peak bagging, especially at higher elevations. Drink plenty of water before and during your climb, and consume energy-rich snacks to maintain your energy levels. Avoid heavy meals right before the climb to prevent discomfort. Staying hydrated and well-nourished helps you perform at your best and stay focused on the climb.
12. Know When to Turn Back
Knowing when to turn back is an important aspect of safe peak bagging. If you encounter unexpected challenges such as severe weather, worsening conditions, or signs of altitude sickness, don’t hesitate to abandon the climb and return to safety. It’s better to miss a summit than to risk your safety or health. Trust your judgment and prioritize your well-being.
Celebrating the summit of a Colorado 14er. Photo by Dalton Johnson
Peak bagging is a rewarding and adventurous pursuit that offers a unique sense of accomplishment. By following these 12 pro tips, you’ll be well-prepared to tackle your first peaks with confidence and safety. Remember, peak bagging is about the journey as much as the destination. Embrace the challenge, enjoy the stunning views, and savor the experience of reaching new heights.
Discover more Adventures

Everything You Need To Know To Summit Mount of the Holy Cross
Mount of the Holy Cross is a striking 14er located in Colorado's Sawatch Range, known for its unique snow-filled cross on the northeast face, which gives the peak its name. At 14,005 feet, the climb offers breathtaking views and a sense of accomplishment for those who summit it. Here’s everything you need to know to prepare for your climb:
Mount of the Holy Cross is a striking 14er located in Colorado's Sawatch Range, known for its unique snow-filled cross on the northeast face, which gives the peak its name. At 14,005 feet, the climb offers breathtaking views and a sense of accomplishment for those who summit it. Here’s everything you need to know to prepare for your climb:
Pros:
Stunning Scenery: The unique snow-filled cross on the northeast face is breathtaking. Summit views offer sweeping panoramas of the Sawatch Range.
Sense of Achievement: Conquering a 14,005-foot peak provides a strong sense of accomplishment. The journey and the views make the effort worthwhile.
Non-Technical Climb: Challenging but manageable for experienced hikers without technical climbing skills. The North Ridge via Half Moon Pass is well-established and commonly used.
Camping Option: Opportunity to camp at East Cross Creek with a permit, allowing for a more relaxed pace.
Proximity to Denver: Easily reachable from Denver and nearby areas, making it a popular destination for a day trip or weekend adventure.
Cons:
Challenging Hike: Significant elevation gain of 5,600 feet can be strenuous. Initial ascent to Half Moon Pass and final scramble to the summit can be tough.
Permit Requirement for Camping: Difficulty in obtaining camping permits at East Cross Creek. Basic camping area with no facilities, requiring self-sufficiency.
Weather Risks: Common in summer, posing a risk to hikers. Weather can change rapidly, requiring preparedness for various scenarios.
Crowds: High traffic during peak season can lead to a crowded trail and summit. The popularity might detract from the wilderness experience.
Rough Access Road: The 8-mile road to the trailhead is rough and may require a high-clearance vehicle. The condition of the road can pose risks to vehicles not suited for off-road driving.
Understanding the Climb
Mount of the Holy Cross is a challenging yet non-technical climb, making it accessible to experienced hikers who are prepared for a demanding adventure. The mountain stands as one of Colorado's 14ers, peaks that rise over 14,000 feet, and is renowned for its distinctive cross-shaped snowfield on the northeast face.
The Route: North Ridge via Half Moon Pass
The standard route to the summit is the North Ridge via Half Moon Pass. This trek spans approximately 12 miles round trip with a substantial elevation gain of around 5,600 feet. The journey begins at the Half Moon Trailhead, where hikers embark on a steep ascent to Half Moon Pass, reaching an elevation of about 11,600 feet. From here, the trail descends into the East Cross Creek valley, losing about 1,000 feet of elevation, which hikers must regain on the return trip.
After crossing the creek, the real challenge begins. The trail climbs relentlessly through a mix of dense forest and rocky terrain, leading to the exposed North Ridge. This final stretch to the summit involves navigating large boulders and scree, demanding both physical stamina and mental fortitude. The total elevation gain, including the descent and re-ascent at Half Moon Pass, makes this hike particularly strenuous.
Getting There
To reach the trailhead, take I-70 to Exit 171 for Minturn and follow Highway 24 south for about 20 miles. Turn right onto Tigiwon Road (Forest Road 707) and follow it for 8 miles to the Half Moon Pass Trailhead. A high-clearance vehicle is recommended due to the rough road.
Trail Description
Half Moon Pass to East Cross Creek: The trail starts with a steep ascent to Half Moon Pass at 11,640 feet, followed by a 1,000-foot descent to East Cross Creek. This is a common camping spot for those with permits.
East Cross Creek to Summit: After crossing the creek, the trail climbs steadily through the forest to the treeline. The final stretch involves scrambling over talus and boulders up the North Ridge. The summit offers panoramic views and the iconic cross on the northeast face.
Timing and Strategy
Most hikers aim to complete the climb in a single day, starting early to ensure they summit and descend before afternoon thunderstorms, common in the Rockies during summer months. However, the total elevation gain and distance make this a long and grueling day.
For those looking to break up the journey, camping is an option at East Cross Creek, approximately halfway through the hike. This approach allows for a more manageable ascent, spreading the effort over two days. It's essential to secure a permit for camping, as the area is regulated to preserve its natural beauty and minimize environmental impact. These permits are limited and can be challenging to obtain, so planning well in advance is crucial.
Preparing for the Climb
Given the climb's demands, proper preparation is essential. Hikers should be in good physical condition and acclimated to high altitudes. Essential gear includes sturdy hiking boots, trekking poles, layers of clothing for varying weather conditions, and sufficient water and food. Navigation tools such as maps, a compass, or a GPS device are also vital, as the trail can be difficult to follow, especially above the treeline where cairns mark the route.
Overall, climbing Mount of the Holy Cross is a rewarding experience, offering breathtaking views and a sense of accomplishment. However, it's a test of endurance and preparation, requiring hikers to be well-equipped and ready for the challenges of this iconic Colorado 14er.
Permits and Camping
Camping at East Cross Creek, located approximately halfway along the North Ridge route to Mount of the Holy Cross, requires a permit due to the area's popularity and the need to preserve its natural environment. These permits are limited and can be challenging to obtain, so it is crucial to plan ahead and secure one well in advance of your trip.
Securing a Permit
Permits for camping at East Cross Creek are issued to manage the number of visitors and minimize the environmental impact on this delicate alpine ecosystem. To obtain a permit, you typically need to apply through the relevant forest service or park management agency. This process may involve submitting an application online or in person, and in some cases, there may be a lottery system due to high demand.
When planning your trip, consider the following steps to secure a permit:
Research Permit Requirements: Check the official website of the governing body managing the Mount of the Holy Cross area. This site will provide detailed information on permit availability, application procedures, and any associated fees.
Apply Early: Permits are often released several months in advance, and they can be claimed quickly. Mark your calendar with the permit release date and submit your application as soon as possible.
Be Flexible: If your preferred dates are unavailable, having alternative dates in mind can increase your chances of securing a permit.
Confirm Permit Details: Once you obtain a permit, review all conditions and restrictions, including group size limits, designated camping areas, and any specific regulations you need to follow.
The Camping Experience
East Cross Creek offers a primitive camping experience, which means there are no developed facilities such as restrooms, potable water sources, or established campsites. As a result, campers must be fully self-sufficient and adhere to the principles of Leave No Trace to protect the environment and ensure the area remains pristine for future visitors.
Key Points for Primitive Camping:
Pack Out All Waste: Bring enough bags to carry out all your trash, food scraps, and other waste. Do not leave any litter behind.
Sanitation: Use a portable toilet system or follow guidelines for digging a cat hole at least 200 feet away from water sources, trails, and campsites to dispose of human waste. Pack out toilet paper and hygiene products.
Water Purification: There are natural water sources in the area, but you should always purify water before drinking by using a portable water filter, purification tablets, or boiling.
Food Storage: Store food securely to prevent attracting wildlife. Use bear-resistant containers or hang your food in a tree at least 10 feet off the ground and 4 feet away from the trunk.
Campfire Restrictions: Check current fire regulations before your trip. If campfires are allowed, use existing fire rings and keep fires small. Never leave a fire unattended and ensure it is completely extinguished before leaving.


What to Bring
Essentials:
Navigation: Map, compass, and GPS.
Hydration: At least 3 liters of water.
Nutrition: High-energy snacks and meals.
Clothing: Layered clothing for varying weather, including a waterproof jacket.
Footwear: Sturdy hiking boots with good ankle support.
Sun Protection: Sunglasses, hat, and sunscreen.
Safety Gear: First aid kit, headlamp, and a whistle.
Camping Gear (if applicable):
Tent: Lightweight and weather-resistant.
Sleeping Bag: Rated for cold temperatures.
Cooking Supplies: Lightweight stove and fuel, bear-proof food storage.
Best Time to Climb
The optimal time to climb Mount of the Holy Cross is from late June to early September. During this period, the snow has typically melted, providing safer and more accessible trail conditions. Additionally, the weather is generally more stable, reducing the risk of encountering severe weather during your ascent.
Seasonal Conditions
Late June to Early September: This window is considered the prime climbing season for Mount of the Holy Cross. By late June, most of the snow on the trail has melted, reducing the risk of slipping and making the trail more navigable. Wildflowers bloom in the alpine meadows during this time, adding to the scenic beauty of the hike.
Weather Stability: Summer months in Colorado offer more predictable weather patterns compared to other seasons. However, it's essential to note that weather in the mountains can still be highly variable. Afternoon thunderstorms are particularly common in the summer, making it crucial to plan your climb to avoid being caught in a storm.
Timing Your Ascent
To maximize safety and enjoyment, consider the following tips for timing your climb:
Early Start: Begin your hike early in the morning, ideally around sunrise or even earlier. This allows you to reach the summit and start your descent before afternoon thunderstorms develop. The early start also means cooler temperatures during the initial part of your hike, making the climb more comfortable.
Thunderstorm Awareness: Afternoon thunderstorms are a significant risk in the Rockies during the summer months. Lightning is particularly dangerous at higher elevations. Aim to be below the treeline or back at your starting point by early afternoon to minimize exposure to these storms.
Daylight Hours: Long summer days provide ample daylight, giving you plenty of time to complete the climb within a single day. Ensure you bring a headlamp or flashlight just in case your hike takes longer than anticipated.
Additional Considerations
Trail Conditions: Even in the summer, some sections of the trail can remain wet or muddy, particularly after rain. Waterproof boots and gaiters can help keep your feet dry and comfortable.
Temperature Variations: While daytime temperatures can be warm, mornings and evenings can be quite cool, especially at higher elevations. Dress in layers to adjust to changing temperatures throughout your hike.
Crowds: Summer is the most popular time for hiking Mount of the Holy Cross, so expect more hikers on the trail, especially on weekends. For a quieter experience, consider climbing on a weekday.
Wildlife: Summer is also a time when wildlife is active. Be mindful of your surroundings and practice safe wildlife viewing habits. Keep a respectful distance from animals, and store food securely to avoid attracting them to your campsite or picnic area.
Safety Tips
Acclimatize: Spend a few days at higher elevations before the climb.
Pace Yourself: Maintain a steady pace to conserve energy.
Weather Awareness: Check the forecast and be prepared to turn back if conditions worsen.
Stay on Trail: Pay attention to trail markers and cairns, especially near the summit.
Scouting the route for Mount of the Holy Cross. Photo by Dalton Johnson
Climbing Mount of the Holy Cross is a memorable adventure that requires preparation, endurance, and respect for the mountain's challenges. With proper planning and the right gear, you can safely enjoy the stunning scenery and the accomplishment of summiting this iconic peak. Happy climbing!
Discover More Destinations


How To Stay Properly Hydrated on the Trail
Hiking, backpacking, and thru-hiking offer unparalleled opportunities to immerse oneself in nature, challenge physical limits, and rejuvenate the mind. However, ensuring proper hydration is crucial to making the most of these adventures. Whether you're a day hiker, a multi-day backpacker, or a dedicated thru-hiker, staying hydrated is key to your health, performance, and enjoyment on the trail.
Hiking, backpacking, and thru-hiking offer unparalleled opportunities to immerse oneself in nature, challenge physical limits, and rejuvenate the mind. However, ensuring proper hydration is crucial to making the most of these adventures. Whether you're a day hiker, a multi-day backpacker, or a dedicated thru-hiker, staying hydrated is key to your health, performance, and enjoyment on the trail.
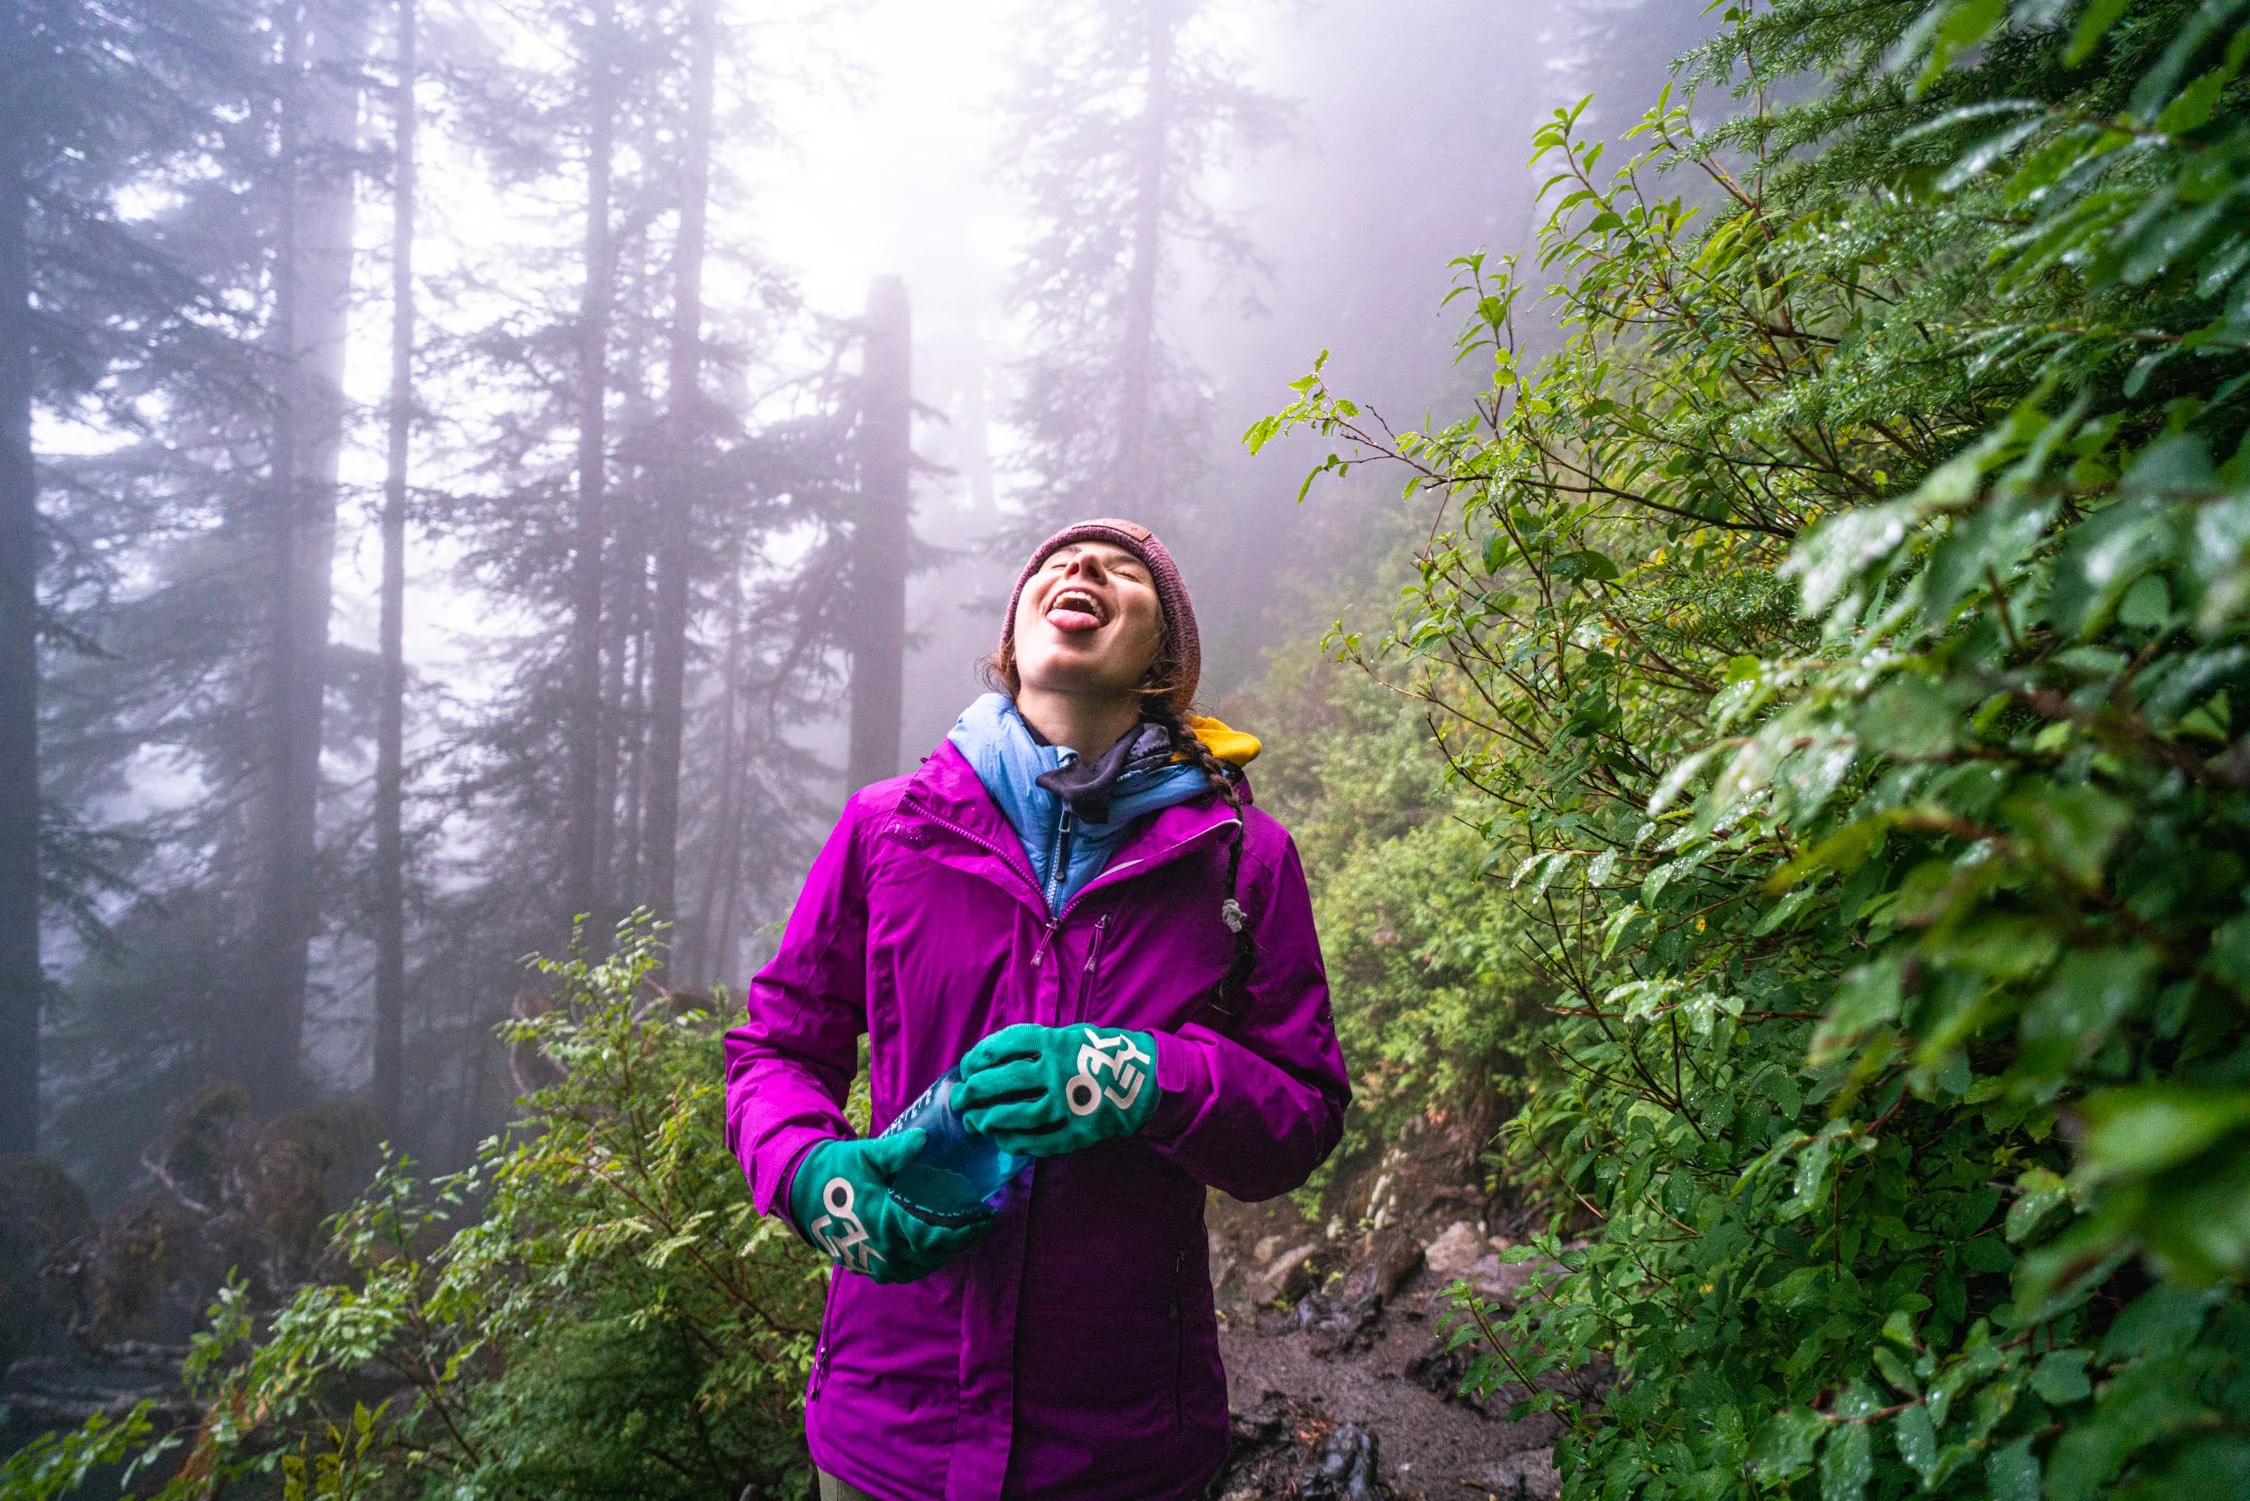
Drinking up some much needed water on a rainy hike in the PNW. Photo by Dalton Johnson
The Importance of Hydration in Hiking
Water plays a vital role in maintaining bodily functions, such as regulating temperature, lubricating joints, and transporting nutrients. Proper hydration enhances your stamina, reduces the risk of injury, and ensures mental clarity. Dehydration can lead to fatigue, disorientation, heat exhaustion, and even heat stroke, potentially turning an enjoyable hike into a dangerous situation.
Signs of Dehydration
Understanding the signs of dehydration can help prevent serious health issues. Common symptoms include:
Dry mouth and throat
Dark yellow urine
Fatigue and dizziness
Headaches
Muscle cramps
Decreased urination frequency
Severe dehydration can cause confusion, rapid heartbeat, and fainting. Recognizing these signs early allows you to take corrective actions before the situation worsens.
How Much Water Should I Drink While Hiking?
The amount of water you need varies depending on factors such as temperature, humidity, elevation, and your physical condition. A general guideline is to drink about half a liter (17 ounces) of water per hour of moderate activity in moderate temperatures. In hot and humid conditions, or at higher elevations, you might need more. Here are some specific recommendations:
Day Hikers: Carry at least 1-2 liters of water for a half-day hike and 2-4 liters for a full day.
Backpackers: Plan for 3-4 liters per day, with the ability to refill along the way.
Thru-Hikers: Assess water sources along the trail and carry enough to reach the next reliable source, plus a buffer for emergencies.
Tips for Staying Hydrated on the Trail
1. Pre-Hydrate
Before you hit the trail, drink plenty of water to ensure you start well-hydrated. A good rule is to drink about half a liter (17 ounces) in the hour before you start your hike.
2. Drink Regularly
Rather than waiting until you're thirsty, drink small amounts of water consistently throughout your hike. Thirst is a late indicator of dehydration.
3. Monitor Your Urine
Clear to light yellow urine indicates proper hydration. Dark yellow or amber urine suggests you need to drink more water.
4. Use Electrolytes
Sweating during a hike not only causes water loss but also the loss of electrolytes like sodium, potassium, and magnesium. Consider using electrolyte powders, tablets, or drinks to maintain electrolyte balance. These can help prevent cramps and fatigue.
5. Eat Hydrating Foods
Fruits and vegetables with high water content, such as oranges, watermelon, and cucumbers, can contribute to your hydration needs. Snacks like trail mix can also provide necessary electrolytes.
6. Plan Water Refills
Know the locations of water sources along your route and plan refills accordingly. Carrying a map or using a GPS app with water source information can be invaluable.
Gear Recommendations for Staying Hydrated
1. Water Bottles and Reservoirs
Hydration packs with reservoirs (such as CamelBaks) allow you to sip water continuously without stopping. Lightweight water bottles are also essential for shorter hikes.
2. Water Filters and Purifiers
For longer hikes and backpacking trips, water filters and purifiers are crucial. Options like the Sawyer Squeeze, LifeStraw, and SteriPEN can help you access safe drinking water from natural sources.
3. Electrolyte Supplements
Products like Nuun tablets, Liquid I.V., and Hammer Endurolytes provide convenient ways to replenish electrolytes lost through sweat. These can be added to your water for an extra boost.
4. Insulated Water Bottles
In hot weather, insulated water bottles keep your water cool, making it more refreshing and encouraging regular drinking.
5. Lightweight Hydration Bladders
Hydration bladders fit into your backpack and come with a hose for easy access to water while on the move. They are ideal for keeping your hands free and maintaining a steady intake of water.
FAQs on Hiking Hydration
Q: How do I know if I’m drinking enough water?
A: Monitor your urine color; it should be light yellow to clear. Drink regularly and adjust your intake based on exertion levels and environmental conditions.
Q: What should I do if I run out of water on the trail?
A: First, ration your remaining water and avoid exertion. Look for natural water sources such as streams or lakes, and use a water filter or purifier before drinking. In emergency situations, contact park authorities if available.
Q: Can I drink too much water?
A: Yes, overhydration can lead to hyponatremia, where sodium levels in your blood become dangerously low. This condition is rare but serious. Balance water intake with electrolyte replenishment and listen to your body's needs.
Q: What are the best times to hydrate during a hike?
A: Drink consistently throughout the hike, starting with pre-hydration. Sip water every 15-20 minutes and drink more when exertion or temperature increases.
Q: Are sports drinks a good option for hydration?
A: Sports drinks can be beneficial for replenishing electrolytes, but they often contain high sugar levels. Opt for electrolyte tablets or powders that offer similar benefits without excess sugar.
Q: How can I ensure safe drinking water on the trail?
A: Use water filters or purifiers to treat natural water sources. Boiling water for at least one minute is also effective. Avoid stagnant water and opt for flowing streams or springs when possible.
Hydration for Different Types of Hikers
Day Hikers
Day hikers can often carry all the water they need for their trip. A hydration pack or a couple of water bottles should suffice. Always check the weather forecast and trail conditions to gauge your water needs accurately.
Backpackers
Backpackers need to plan for multiple days, which involves knowing where to find water sources along the trail. Carry a reliable water filter and an extra water container for dry stretches. Electrolyte supplements can help maintain your energy levels over extended periods.
Thru-Hikers
Thru-hikers face the challenge of staying hydrated over weeks or months. Comprehensive planning and reliable water filters are essential. Invest in lightweight, durable hydration gear and regularly monitor water reports from other hikers. Proper hydration supports not just your physical health but also your mental well-being on such long journeys.
The Beauty of Hiking and Mental Health Benefits
Hiking offers numerous physical and mental health benefits. Regular hikes can improve cardiovascular health, strengthen muscles, and enhance flexibility. Additionally, the mental health benefits are profound:
Stress Reduction: Immersion in nature helps reduce stress and anxiety.
Mental Clarity: The combination of physical activity and natural beauty promotes mental clarity and focus.
Mood Enhancement: Exposure to natural sunlight increases serotonin levels, improving mood and combating depression.
Proper hydration ensures you can enjoy these benefits to the fullest, allowing you to hike longer and more comfortably.
Taking a dip in Upper Joffrey Lakes in British Columbia, Canada. Photo by Dalton Johnson
Proper hydration is fundamental to the enjoyment and safety of any hiking adventure. By understanding your hydration needs, recognizing the signs of dehydration, and utilizing the right gear, you can ensure a successful and enjoyable hike. Whether you're a day hiker, backpacker, or thru-hiker, staying hydrated keeps you healthy, energized, and ready to embrace the beauty of the trail. Always remember to plan ahead, drink regularly, and enjoy the myriad benefits that hiking brings to your body and mind.
Discover more Adventures
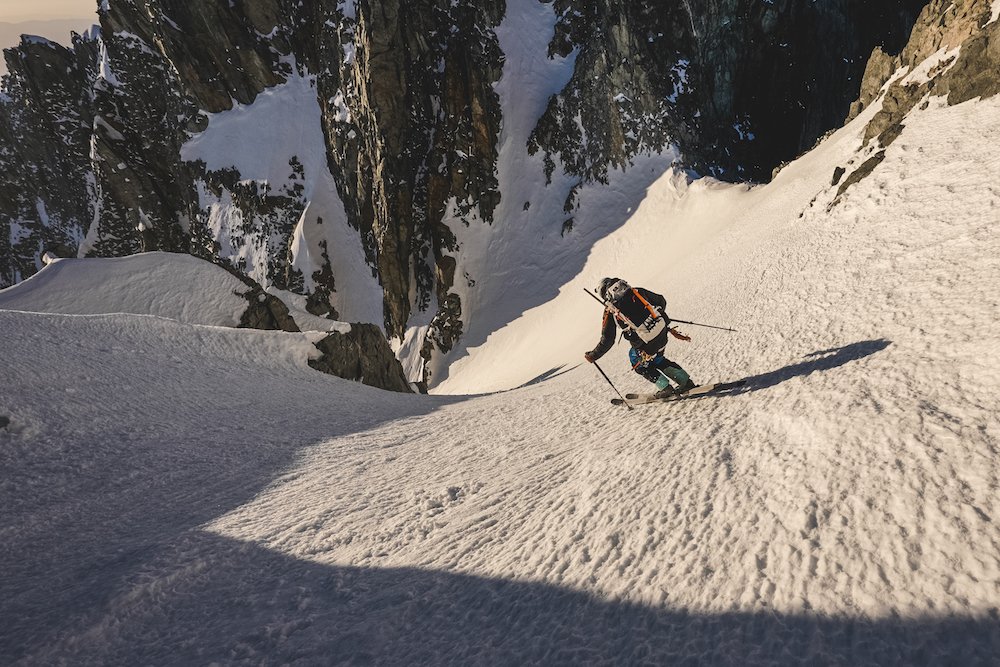
Cody Townsend Ticks Off Split Mountain 44 of 50
Cody Townsend is well on his way to finishing his mission to ski the fifty classic ski descents of North America. Ticking off number 44 of 50, Split Mountain was a line that took patience and perseverance. I don't want to ruin the story for you all, so go pop a bowl of popcorn and load Cody's latest video on Split Mountain. It's a good one!
Cody Townsend is well on his way to finishing his mission to ski the fifty classic ski descents of North America. Ticking off number 44 of 50, Split Mountain was a line that took patience and perseverance. I don't want to ruin the story for you all, so go pop a bowl of popcorn and load Cody's latest video on Split Mountain. It's a good one!
Q&A with Cody Townsend
Q: You had a quote in the film: "It's hard to tell the difference between my gut and nerves," could you elaborate on how to tell the difference?
A: I probably still don’t have a solid answer for that question. But ultimately, when you can distinguish between rational fear and irrational fear, that’s the beginning of being able to understand the difference between the intuition of something being off and the nerves that naturally build up when doing something scary. In that moment on Split, I realized I actually didn’t have much fear, nothing about looking down that couloir actually scared me once we got going. So when it became apparent that something inside me didn’t want to proceed, I asked myself over and over, “Why?” Ultimately coming to the conclusion that we didn’t have enough time for a series of complex rappels along with the margin of error being shrunken by the early sunset, the extreme cold and the hardpack conditions.
Q: Would you have shown up three times in one year for this line if it wasn't for the 50 project? Why/why not?
A: No. Well, unless I really really really wanted that line. But, that’s the good and bad of the FIFTY. I like that it pushes me to test my persistence, my patience and my will. Also, in the process of trying the line over and over, I learned a ton about the Sierra snowpack, weather patterns and knowledge of that area. At the same time, going back to the same place over and over and over for one line takes you away from other opportunities, goes against my philosophy of skiing what the mountains let you ski and drives ya a little crazy. So it’s a yin-yang sort of relationship with a specific objective.
Q: I've found people who spend a lot of time in the mountains reflect deeper than most, would you agree with this?
A: I think the mountains show you who you are. You have to be incredibly self-aware when challenging yourself in the mountains and the process of learning, exploring and surviving gives you insight into your true self like no other medium I’ve found. Plus, humans are meant to be in the wildness. Civilization is a relatively new phenomenon for humans. So, I think just being out there, among nature, listening to its lessons makes you feel natural, alive, a part of this world. It becomes philosophical the more time you’re out there.
Q: How do you process overcoming adversity in the mountains after a climb?
A: Everyone is different but I’m a pretty positive person. So, I take any time spent in the mountains as a blessing. Adversity is almost half the reason we go into the mountains, to challenge ourselves, to learn from the mountains and to overcome obstacles we may not have believed we could overcome.
Q: Do you think Split is safely ski-able without a 300% year?
A: [Split] will be safely skiable even on a snow year not as miraculous as 2023, but it will just require way more rope work, rappelling and time spent in the couloir. Unfortunately it’s a line that isn’t skiable very often anymore. But that just makes it sweeter when it does happen.
Discover more Adventures
Hike to New Heights: Discover Eastern Sierra Challenging Hiking Gems
Embarking on a challenging hike in the Eastern Sierra is not for the faint of heart. This rugged and majestic region of California offers a plethora of trails that will push your limits and reward you with awe-inspiring views and a profound sense of accomplishment. From towering peaks to alpine lakes and dramatic canyons, the Eastern Sierra presents hikers with a playground of adventure and natural beauty.
Embarking on a challenging hike in the Eastern Sierra is not for the faint of heart. This rugged and majestic region of California offers a plethora of trails that will push your limits and reward you with awe-inspiring views and a profound sense of accomplishment. From towering peaks to alpine lakes and dramatic canyons, the Eastern Sierra presents hikers with a playground of adventure and natural beauty.
The Eastern Sierra offers a variety of challenging hikes for adventurous hikers. Some notable options include Mount Whitney, the highest peak in the contiguous United States; Bishop Pass, with its stunning vistas of surrounding peaks and valleys; and the rugged Taboose Pass trail, offering panoramic views of the John Muir Wilderness.
In this blog we will cover several more difficult hikes in the Eastern Sierra, so lace up your boots, brace yourself for the challenge, and let's dive into the world of challenging hikes in the Eastern Sierra.
Hiking up one of the many challenging hikes in the High Sierra. Photo by Dalton Johnson
Mount Whitney:
The magnificent Mount Whitney, a hike that will test your limits and reward you with breathtaking views. As we ascend this towering peak, get ready to immerse yourself in awe-inspiring vistas that will leave you in utter wonder. From the summit, you'll be treated to a panoramic vista of the rugged Sierra Nevada range, with sweeping views of the Eastern Sierra, deep valleys, and the vast expanse of the surrounding wilderness.
Now, let's delve into the specifics of this extraordinary hike:
Elevation: Mount Whitney stands proudly as the highest summit in the contiguous United States, soaring to an impressive elevation of 14,505 feet (4,421 meters). The sheer magnitude of this elevation adds an extra layer of grandeur to the journey, as you find yourself surrounded by the majestic peaks of the Sierra Nevada.
Distance: The classic route to Mount Whitney via the Whitney Portal covers approximately 22 miles (35 kilometers) round trip. This distance allows you to fully immerse yourself in the changing landscapes, from dense forests to alpine meadows and, eventually, the rocky terrain near the summit. Each step brings you closer to the pinnacle of this majestic mountain.
Time to Hike: Typically, hikers complete the Mount Whitney hike in a day, starting early in the morning to maximize daylight hours. The total hiking time varies depending on individual fitness levels, pace, and the number of breaks taken along the way. It's essential to plan for a full day of hiking to ensure a safe and enjoyable experience.
Difficulty: The hike to Mount Whitney is renowned for its challenging nature, both in terms of elevation gain and overall distance. The high altitude, long trek, and steep sections demand physical endurance, mental resilience, and careful preparation. It's crucial to acclimatize to the altitude, stay well-hydrated, and be prepared for rapid weather changes, as conditions can vary dramatically throughout the day.
So, why go on this awe-inspiring hike to Mount Whitney? The answer lies in the unrivaled sense of accomplishment and the breathtaking beauty that awaits you. Standing atop the highest peak in the contiguous United States is an experience that will leave you humbled and in awe of nature's grandeur. The journey itself tests your physical and mental limits, as you push through the challenges and reach new heights.
Beyond the personal triumph, hiking Mount Whitney offers an intimate connection with the untamed wilderness of the Eastern Sierra. It is a chance to witness the rugged beauty, to breathe in the pure mountain air, and to be surrounded by the awe-inspiring landscapes that have captivated explorers for centuries.
Bishop Pass:
The breathtaking beauty of Bishop Pass is a trail that will immerse you in stunning vistas and unforgettable landscapes. As we make our way through this awe-inspiring hike, get ready to be captivated by panoramic views that stretch as far as the eye can see. From the summit of Bishop Pass, you'll be treated to breathtaking vistas of the surrounding peaks and valleys, where the raw beauty of the Eastern Sierra unfolds before your eyes.
Now, let's explore the specifics of this remarkable hike:
Elevation: Bishop Pass reaches an elevation of approximately 11,972 feet (3,649 meters), making it a high-altitude adventure that allows you to witness the grandeur of the Eastern Sierra from a lofty vantage point. The towering peaks and expansive vistas create a scene of unparalleled beauty.
Distance: The Bishop Pass trail covers a round-trip distance of approximately 9.6 miles (15.5 kilometers). This moderate distance provides a fulfilling hike that takes you through changing landscapes, from dense forests to open alpine meadows. The journey unveils a tapestry of natural wonders that will leave you in awe.
Time to Hike: The time required to hike Bishop Pass varies depending on your pace, the amount of time you spend admiring the scenery, and the number of breaks you take along the way. On average, hikers can complete the hike in around 6 to 8 hours, allowing for plenty of time to soak in the beauty and enjoy the views from the pass.
Difficulty: The hike to Bishop Pass is considered moderate to strenuous, mainly due to the high elevation gain and some steep sections of the trail. It demands physical endurance, proper acclimatization to the altitude, and basic hiking experience. However, the well-defined trail and the awe-inspiring views make it a highly rewarding and achievable adventure for hikers with determination and a moderate level of fitness.
So, why go on this incredible hike to Bishop Pass? The answer lies in the unparalleled views and the sense of accomplishment that awaits you at the summit. Standing atop Bishop Pass, surrounded by towering peaks and vast expanses of untouched wilderness, is an experience that will leave you humbled and in awe of the raw beauty of the Eastern Sierra.
Beyond the visual rewards, hiking Bishop Pass offers a chance to connect with nature in its purest form. The trail takes you through breathtaking landscapes, including serene lakes, pristine meadows, and the rugged beauty of the Eastern Sierra. It's an opportunity to find solace, challenge yourself physically and mentally, and forge a deeper connection with the untamed wilderness.
Taboose Pass:
Hiking Taboose Pass is a trail that will take you through stunning vistas and push your limits. As we embark on this challenging hike, get ready to be captivated by panoramic views that will leave you in awe. From the summit of Taboose Pass, you'll be rewarded with breathtaking vistas of the surrounding peaks and valleys, immersing yourself in the raw beauty of the Eastern Sierra.
Now, let's explore the specifics of this exhilarating hike:
Elevation: Taboose Pass reaches an elevation of approximately 11,375 feet (3,468 meters), making it a high-altitude adventure that allows you to witness the grandeur of the Eastern Sierra from a lofty vantage point. The towering peaks, rugged ridges, and expansive views create a scene of unparalleled beauty.
Distance: The Taboose Pass trail covers a round-trip distance of approximately 14 miles (22.5 kilometers). This challenging distance takes you through diverse landscapes, from desert-like canyons to alpine meadows, showcasing the rich variety of the Eastern Sierra. Each step unveils new wonders that will leave you in awe.
Time to Hike: The time required to hike Taboose Pass varies depending on your pace, the amount of time you spend taking in the scenery, and the number of breaks you take along the way. On average, hikers can complete the hike in around 8 to 10 hours, allowing for ample time to immerse yourself in the beauty and savor the views from the pass.
Difficulty: The hike to Taboose Pass is considered strenuous due to its high elevation gain, rugged terrain, and the long distance covered. It demands physical endurance, proper acclimatization to the altitude, and advanced hiking experience. The trail is challenging, but the incredible views and sense of accomplishment make it a highly rewarding adventure for experienced hikers seeking a thrilling challenge.
So, why go on this exhilarating hike to Taboose Pass? The answer lies in the unrivaled views and the profound sense of achievement that await you at the summit. Standing atop Taboose Pass, surrounded by towering peaks, vast expanses of untouched wilderness, and breathtaking panoramas, is an experience that will leave you humbled and in awe of the raw beauty of the Eastern Sierra.
Beyond the visual rewards, hiking Taboose Pass allows you to immerse yourself in the pristine wilderness of the Eastern Sierra. The trail takes you through diverse landscapes, from lush meadows to rocky ridges, and offers a chance to witness the untouched beauty of this remarkable region. It's an opportunity to push your limits, challenge yourself physically and mentally, and forge a deeper connection with nature.
Sawtooth Pass:
Sawtooth Pass is a trail that offers stunning views and a thrilling adventure. As we make our way through this rugged hike, get ready to be mesmerized by breathtaking vistas that will leave you in awe. From the summit of Sawtooth Pass, you'll be rewarded with panoramic views of the surrounding peaks, dramatic canyons, and the untouched beauty of the Eastern Sierra.
Now, let's explore the specifics of this remarkable hike:
Elevation: Sawtooth Pass reaches an elevation of approximately 11,600 feet (3,536 meters), immersing you in the grandeur of the Eastern Sierra. The towering peaks, rugged ridges, and expansive vistas create a scene of unparalleled beauty.
Distance: The Sawtooth Pass trail covers a round-trip distance of approximately 10 miles (16 kilometers). This moderate distance allows you to fully immerse yourself in the changing landscapes, from dense forests to open alpine meadows. Each step brings you closer to the breathtaking views that await at the pass.
Time to Hike: The time required to hike Sawtooth Pass varies depending on your pace, the amount of time you spend admiring the scenery, and the number of breaks you take along the way. On average, hikers can complete the hike in around 6 to 8 hours, allowing for plenty of time to soak in the beauty and enjoy the views from the pass.
Difficulty: The hike to Sawtooth Pass is considered moderate to strenuous due to its elevation gain and rugged terrain. It demands physical endurance, proper acclimatization to the altitude, and basic hiking experience. While challenging, the rewarding views and sense of accomplishment make it a highly fulfilling adventure for hikers seeking a thrilling and scenic experience.
So, why go on this incredible hike to Sawtooth Pass? The answer lies in the unparalleled views and the opportunity for a thrilling adventure. Standing atop Sawtooth Pass, surrounded by towering peaks and vast expanses of untouched wilderness, is an experience that will leave you humbled and in awe of the raw beauty of the Eastern Sierra.
Beyond the visual rewards, hiking Sawtooth Pass allows you to connect with nature in its purest form. The trail takes you through breathtaking landscapes, including serene lakes, lush meadows, and the rugged beauty of the Eastern Sierra. It's an opportunity to challenge yourself physically and mentally, to find solace in nature's embrace, and to create lasting memories in a remarkable corner of the world.


Palisade Glacier:
Hiking to Palisade Glacier, a trail that promises breathtaking views and an awe-inspiring adventure. As we make our way through this captivating hike, get ready to be mesmerized by the stunning vistas that will leave you in awe. From the trailhead to the grandeur of Palisade Glacier, you'll witness towering peaks, rugged terrain, and a sense of untouched beauty in the heart of the Eastern Sierra.
Now, let's explore the specifics of this remarkable hike:
Elevation: The hike to Palisade Glacier takes you to an elevation of approximately 11,100 feet (3,383 meters), immersing you in the raw beauty of the Eastern Sierra. The towering peaks, dramatic ridges, and the icy expanse of the glacier create a scene of unparalleled grandeur.
Distance: The trail to Palisade Glacier covers a round-trip distance of approximately 15 miles (24 kilometers), allowing you to fully immerse yourself in the changing landscapes. From dense forests to alpine meadows, and eventually the glacier itself, each step brings you closer to the breathtaking views that await.
Time to Hike: The time required to hike to Palisade Glacier varies depending on your pace, the amount of time you spend exploring, and the number of breaks you take along the way. On average, hikers can expect to spend around 10 to 12 hours on the trail, including time to savor the beauty and marvel at the glacier.
Difficulty: The hike to Palisade Glacier is considered strenuous due to its length, elevation gain, and rugged terrain. It demands physical endurance, proper acclimatization to the altitude, and intermediate to advanced hiking experience. The challenging aspects are well worth it, as the rewarding views and the experience of standing before the majestic glacier make it an unforgettable adventure.
So, why go on this incredible hike to Palisade Glacier? The answer lies in the unmatched views and the chance to witness the raw power of nature. Standing before Palisade Glacier, surrounded by towering peaks, icy slopes, and the untouched beauty of the Eastern Sierra, is an experience that will leave you humbled and in awe of the grandeur of the natural world.
Beyond the visual rewards, hiking to Palisade Glacier offers a profound connection with nature. The trail takes you through diverse landscapes, from serene lakes to rocky slopes, showcasing the unspoiled beauty of the Eastern Sierra. It's an opportunity to challenge yourself physically and mentally, to find solace in the remote wilderness, and to witness the resilience of nature in the face of changing climates.
Mount Langley:
Hiking Mount Langley is a trail that promises breathtaking views and a thrilling adventure. As we make our way through this majestic hike, get ready to be mesmerized by the stunning vistas that will leave you in awe. From the summit of Mount Langley, you'll be rewarded with panoramic views of the surrounding peaks, expansive valleys, and the remarkable beauty of the Eastern Sierra.
Now, let's explore the specifics of this remarkable hike:
Elevation: Mount Langley stands proudly as one of the southernmost fourteeners in the Sierra Nevada range, reaching an elevation of 14,026 feet (4,275 meters). As you ascend the trail, you'll find yourself surrounded by towering peaks, rugged ridges, and breathtaking views that extend as far as the eye can see.
Distance: The classic route to Mount Langley covers a round-trip distance of approximately 22 miles (35 kilometers), allowing you to fully immerse yourself in the changing landscapes. From serene lakes to alpine meadows and rocky slopes, each step reveals new wonders that will leave you in awe.
Time to Hike: The time required to hike Mount Langley varies depending on your pace, the amount of time you spend admiring the scenery, and the number of breaks you take along the way. On average, hikers can expect to spend around 12 to 14 hours on the trail, including time to savor the beauty and reach the summit.
Difficulty: The hike to Mount Langley is considered strenuous due to its elevation gain, length, and rugged terrain. It demands physical endurance, proper acclimatization to the altitude, and intermediate to advanced hiking experience. The challenging aspects of the hike are well worth it, as the rewarding views and the accomplishment of summiting a fourteener make it a truly memorable adventure.
So, why go on this incredible hike to Mount Langley? The answer lies in the unparalleled views and the sense of achievement that await you at the summit. Standing atop Mount Langley, surrounded by towering peaks, vast valleys, and the untouched beauty of the Eastern Sierra, is an experience that will leave you humbled and in awe of the raw grandeur of the natural world.
Beyond the visual rewards, hiking Mount Langley offers an opportunity to challenge yourself both physically and mentally. It's a chance to push your limits, conquer a fourteener, and experience the exhilaration of reaching new heights. Additionally, the journey allows you to immerse yourself in the pristine wilderness of the Eastern Sierra, disconnect from the daily routine, and find solace in nature's embrace.
White Mountain Peak:
The exhilarating journey of hiking White Mountain Peak, a trail that promises stunning views and a memorable adventure. As we make our way through this captivating hike, get ready to be awed by the breathtaking vistas that will surround us. From the summit of White Mountain Peak, you'll be treated to panoramic views of the Eastern Sierra, neighboring mountain ranges, and the vast expanse of the surrounding region.
Now, let's delve into the specifics of this remarkable hike:
Elevation: White Mountain Peak stands tall at an elevation of 14,252 feet (4,344 meters), making it one of the towering peaks in the Eastern Sierra. As we ascend the trail, the landscape will transform, revealing the raw beauty of the high alpine environment and the surrounding peaks.
Distance: The hike to White Mountain Peak covers a round-trip distance of approximately 14 miles (22.5 kilometers), allowing us to fully immerse ourselves in the changing landscapes. From arid desert-like terrain to rugged slopes, each step unveils new wonders that will leave us in awe.
Time to Hike: The time required to hike White Mountain Peak varies depending on our pace, the amount of time we spend soaking in the scenery, and the number of breaks we take along the way. On average, hikers can expect to spend around 6 to 8 hours on the trail, including time to savor the beauty and reach the summit.
Difficulty: The hike to White Mountain Peak is considered moderately difficult due to its elevation gain, length, and rugged terrain. It demands physical endurance, proper acclimatization to the altitude, and intermediate hiking experience. While challenging, the incredible views and the accomplishment of summiting a high peak make it a highly rewarding adventure.
So, why go on this incredible hike to White Mountain Peak? The answer lies in the unparalleled views and the sense of accomplishment that await us at the summit. Standing atop White Mountain Peak, surrounded by vast expanses of untouched wilderness, towering peaks, and the endless beauty of the Eastern Sierra, is an experience that will leave us humbled and in awe of the grandeur of the natural world.
Beyond the visual rewards, hiking White Mountain Peak allows us to challenge ourselves both physically and mentally. It's an opportunity to push our limits, conquer a high summit, and experience the exhilaration of reaching new heights. Moreover, the journey allows us to immerse ourselves in the serenity of the high alpine environment, disconnect from the daily hustle, and connect with the awe-inspiring landscapes that make the Eastern Sierra a hiker's paradise.
Piute Pass:
Hiking Piute Pass is another trail that offers breathtaking views and an unforgettable adventure. As we make our way through this captivating hike, get ready to be immersed in stunning vistas that will leave you in awe. From the start of the trail to the summit of Piute Pass, you'll be rewarded with panoramic views of the John Muir Wilderness, Humphreys Basin, and the majestic peaks of the Eastern Sierra.
Now, let's explore the specifics of this remarkable hike:
Elevation: Piute Pass reaches an elevation of approximately 11,423 feet (3,482 meters), allowing you to witness the grandeur of the Eastern Sierra from a lofty vantage point. The towering peaks, alpine lakes, and the vastness of the surrounding wilderness create a scene of unparalleled beauty.
Distance: The Piute Pass trail covers a round-trip distance of approximately 10 miles (16 kilometers), taking you through diverse landscapes and showcasing the natural wonders of the Eastern Sierra. From dense forests to picturesque meadows, each step reveals new breathtaking views.
Time to Hike: The time required to hike Piute Pass varies depending on your pace, the amount of time you spend taking in the scenery, and the number of breaks you take along the way. On average, hikers can complete the hike in around 6 to 8 hours, allowing for ample time to enjoy the beauty and soak in the vistas from the pass.
Difficulty: The hike to Piute Pass is considered moderate in difficulty, making it accessible to hikers with varying experience levels. It involves a gradual ascent, some rocky sections, and moderate elevation gain. With proper preparation and basic hiking skills, it offers a rewarding and enjoyable adventure for hikers seeking a taste of the Eastern Sierra's beauty.
So, why go on this incredible hike to Piute Pass? The answer lies in the unparalleled views and the sense of serenity that await you at the summit. Standing atop Piute Pass, surrounded by majestic peaks, pristine alpine lakes, and the untouched wilderness of the Eastern Sierra, is an experience that will leave you humbled and in awe of the raw beauty of nature.
Beyond the visual rewards, hiking Piute Pass allows you to connect with nature on a profound level. The trail takes you through diverse ecosystems, offering glimpses of wildlife, vibrant wildflowers, and tranquil lakes along the way. It's an opportunity to find solace in the serenity of the wilderness, to disconnect from the noise of everyday life, and to rejuvenate your mind and spirit in the embrace of nature.
Mather Pass:
The exhilarating journey of hiking Mather Pass is a trail that promises stunning views and a thrilling adventure. As we venture on this captivating hike, get ready to be awe-inspired by the breathtaking vistas that will surround us. From the ascent to the top of Mather Pass, you'll be rewarded with panoramic views of the surrounding peaks, alpine lakes, and the raw beauty of the Eastern Sierra.
Now, let's explore the specifics of this remarkable hike:
Elevation: Mather Pass sits at an elevation of approximately 12,100 feet (3,688 meters), allowing us to witness the grandeur of the Eastern Sierra from a lofty vantage point. The towering peaks, deep valleys, and the vastness of the surrounding wilderness create a scene of unparalleled beauty.
Distance: The hike to Mather Pass covers a round-trip distance that varies depending on the starting point. Generally, it ranges from 16 to 20 miles (25 to 32 kilometers). Throughout the hike, we'll encounter diverse landscapes, from lush meadows to rocky slopes, showcasing the remarkable variety of the Eastern Sierra.
Time to Hike: The time required to hike Mather Pass varies depending on our pace, the amount of time we spend admiring the scenery, and the number of breaks we take along the way. On average, hikers can expect to spend around 8 to 12 hours on the trail, including time to savor the beauty and conquer the pass.
Difficulty: The hike to Mather Pass is considered challenging due to its elevation gain, length, and rugged terrain. It demands physical endurance, proper acclimatization to the altitude, and intermediate to advanced hiking experience. The challenging aspects are well worth it, as the rewarding views and the accomplishment of reaching the pass make it an unforgettable adventure.
So, why go on this incredible hike to Mather Pass? The answer lies in the unparalleled views and the sense of achievement that await us at the summit. Standing atop Mather Pass, surrounded by the majestic peaks, alpine lakes, and the untamed beauty of the Eastern Sierra, is an experience that will leave us humbled and in awe of the grandeur of nature.
Beyond the visual rewards, hiking Mather Pass offers an opportunity to challenge ourselves physically and mentally. It allows us to push our limits, conquer a high mountain pass, and experience the exhilaration of reaching new heights. Moreover, the journey allows us to immerse ourselves in the serenity of the wilderness, disconnect from the chaos of daily life, and connect with the awe-inspiring landscapes that make the Eastern Sierra a hiker's paradise.
Lamarck Col:
Lamarck Col is a challenging trail that promises breathtaking views and an unforgettable adventure. As we make our way through this captivating hike, get ready to be awe-inspired by the stunning vistas that will surround us. From the ascent to the top of Lamarck Col, you'll be rewarded with panoramic views of the surrounding peaks, glacial lakes, and the raw beauty of the Eastern Sierra.
Now, let's explore the specifics of this remarkable hike:
Elevation: Lamarck Col reaches an elevation of approximately 12,960 feet (3,950 meters), allowing us to witness the grandeur of the Eastern Sierra from a lofty vantage point. The towering peaks, deep valleys, and the vastness of the surrounding wilderness create a scene of unparalleled beauty.
Distance: The hike to Lamarck Col covers a round-trip distance of approximately 11 miles (17.7 kilometers), taking us through diverse landscapes and showcasing the natural wonders of the Eastern Sierra. From lush meadows to rocky slopes, each step unveils new breathtaking views.
Time to Hike: The time required to hike Lamarck Col varies depending on our pace, the amount of time we spend soaking in the scenery, and the number of breaks we take along the way. On average, hikers can complete the hike in around 7 to 9 hours, allowing for ample time to enjoy the beauty and reach the col.
Difficulty: The hike to Lamarck Col is considered moderately difficult due to its elevation gain, length, and rugged terrain. It demands physical endurance, proper acclimatization to the altitude, and intermediate hiking experience. While challenging, the incredible views and the sense of accomplishment make it a highly rewarding adventure.
So, why go on this incredible hike to Lamarck Col? The answer lies in the unparalleled views and the chance to experience the pristine beauty of the Eastern Sierra. Standing atop Lamarck Col, surrounded by majestic peaks, glacial lakes, and the untouched wilderness, is an experience that will leave us humbled and in awe of the grandeur of the natural world.
Beyond the visual rewards, hiking Lamarck Col allows us to challenge ourselves both physically and mentally. It's an opportunity to push our limits, conquer a high mountain pass, and experience the exhilaration of reaching new heights. Moreover, the journey allows us to immerse ourselves in the serenity of the wilderness, disconnect from the noise of everyday life, and find solace in the awe-inspiring landscapes of the Eastern Sierra.
Enjoying the lakeside view during a morning hike up Kearsarge Pass. Photo by Dalton Johnson
As we conclude our exploration of the challenging hikes in the Eastern Sierra, we leave behind a trail of unforgettable memories, exhilarating adventures, and a deeper connection with the raw and untamed beauty of this remarkable region. From conquering the heights of Mount Whitney to navigating the remote passes and breathtaking vistas, these challenging hikes have tested our limits, rewarded our efforts, and left an indelible mark on our souls.
The Eastern Sierra has proven time and again to be a haven for adventurers seeking thrilling trails, stunning scenery, and a sense of accomplishment. It is a place where we have pushed our boundaries, challenged ourselves physically and mentally, and discovered the incredible resilience within us. With each step, we have been treated to panoramic vistas, hidden alpine lakes, and rugged landscapes that have left us in awe of nature's grandeur.
So, whether you are an experienced hiker looking for your next great challenge or someone seeking to push beyond your comfort zone, the challenging hikes of the Eastern Sierra beckon you. As you navigate the steep trails, rocky terrain, and high altitudes, remember to respect the wilderness, prepare diligently, and stay safe. The rewards are plentiful - breathtaking views, personal triumphs, and a profound connection with the raw and untamed wilderness of the Eastern Sierra.