
How to Sleep Warm While Winter Camping
Winter camping can be a thrilling and beautiful experience, but the bitter cold can make getting a good night's sleep a real challenge. However, with the right strategies and gear, you can stay warm and comfortable even in sub-zero temperatures. In this article, we'll explore six tips to help you sleep warm and cozy during your winter camping adventures.
Winter camping can be a thrilling and beautiful experience, but the bitter cold can make getting a good night's sleep a real challenge. However, with the right strategies and gear, you can stay warm and comfortable even in sub-zero temperatures. In this article, we'll explore six tips to help you sleep warm and cozy during your winter camping adventures.

Sleeping warm on Denali in Alaska. Photo by Dalton Johnson
Tip 1: Use Two Pads
One of the most effective ways to insulate yourself from the cold ground is to use two sleeping pads. Start with a closed-cell foam pad for its excellent insulation and durability. Place an inflatable pad on top for added comfort. The combination of these two pads will create an extra layer of insulation, preventing the cold from seeping into your sleeping bag. Make sure your pads are long enough to cover your entire body.
Tip 2: Get a Sleeping Bag With a Comfort Rating Colder Than Expected Temps
Choosing the right sleeping bag is crucial for staying warm during winter camping. Opt for a sleeping bag with a comfort rating that is lower than the expected temperatures you'll encounter. This ensures you have a buffer to keep you cozy even when the mercury drops unexpectedly. Also, consider a mummy-style sleeping bag for its snug fit, which minimizes cold air pockets inside.
Tip 3: Use a Pee Bottle
Getting out of your warm sleeping bag to brave the frigid night air for a bathroom break can be unpleasant. To avoid this, keep a designated pee bottle within reach. Make sure it's well-sealed and easy to access in the dark. Using a pee bottle not only keeps you warm but also saves precious body heat that might be lost during multiple trips outside.


Tip 4: Sleep Naked, But Stuff Your Clothes Around You
While it may sound counterintuitive, sleeping naked can actually help you stay warmer during the night. Your body heat warms the air within your sleeping bag more efficiently without the insulating barrier of clothing. However, keep your warm clothing readily accessible. If you get cold, you can quickly layer up with these clothes, creating an extra insulation layer between your body and the cold air.
Tip 5: Go to Bed Full
Eating a hearty meal before bedtime is a great way to generate internal heat and keep you warm during the night. Choose calorie-dense foods that release energy slowly, such as nuts, cheese, and complex carbohydrates. Avoid consuming excessive caffeine or alcohol, as they can disrupt your sleep patterns and hinder your body's ability to maintain warmth.
Tip 6: Put a Hot Water Bottle in Your Bag (but don't burn yourself)
A hot water bottle can be a fantastic source of warmth during winter camping. Before bed, fill a sturdy, leak-proof water bottle with hot (but not boiling) water and place it inside your sleeping bag. Make sure it's adequately sealed to prevent any unfortunate leaks. This will provide a consistent source of radiant heat, helping you stay warm throughout the night. Just be cautious not to overheat the water, as you don't want to risk burns or damage to your gear.
Winter camping in Yosemite Nationa Park. Photo by Dalton Johnson
Winter camping can be a rewarding experience, but ensuring a warm and comfortable night's sleep is essential for your safety and enjoyment. By following these tips, you can insulate yourself from the cold ground, choose the right gear, and create a cozy sleep environment that allows you to embrace the beauty of winter camping without the chill. Remember to plan and prepare meticulously, and always prioritize safety and comfort when heading into the winter wilderness.
Discover more Adventures


Sailing Terms to Know Before Hitting the High Seas
Sailing is a thrilling and adventurous endeavor that allows you to explore the vastness of the open sea, but it comes with its own unique language. If you're a new sailor about to embark on your maiden voyage, understanding sailing terminology is essential for safety, effective communication, and, of course, looking like a seasoned sailor. In this article, we'll introduce you to some fundamental sailing terms that will help you navigate the high seas with confidence.
Sailing is a thrilling and adventurous endeavor that allows you to explore the vastness of the open sea, but it comes with its own unique language. If you're a new sailor about to embark on your maiden voyage, understanding sailing terminology is essential for safety, effective communication, and, of course, looking like a seasoned sailor. In this article, we'll introduce you to some fundamental sailing terms that will help you navigate the high seas with confidence.
Exloring the fjords of Alaska via sailboat. Photo by Dalton Johnson
Port and Starboard
When aboard a ship, the terms "port" and "starboard" are used to specify the left and right sides of the vessel, respectively. "Port" and "left" both have four letters, which can help you remember the corresponding sides.
Bow and Stern
The "bow" refers to the front of the ship, while the "stern" is the rear. These terms are crucial when discussing directions and navigation, particularly when making adjustments to the ship's course.
Aft and Forward
When moving around the vessel, you may hear crew members referring to directions as "aft" (towards the stern) and "forward" (towards the bow). Knowing these terms will help you follow instructions and find your way around the ship.
Windward and Leeward
Understanding the wind's direction is vital for sailing. The side of the ship facing the wind is called the "windward" side, while the side sheltered from the wind is referred to as the "leeward" side. Sailors adjust the sails and their course based on these wind directions to achieve optimal speed and stability.
Tack and Jibe
Sailing often involves changing the direction of the boat to navigate around obstacles or to make the best use of the wind. "Tacking" is when the boat turns into the wind, while "jibing" involves turning away from the wind. Knowing when and how to tack or jibe is essential for effective sailing.
Sheets and Lines
"Sheets" are ropes or lines used to control the sails. The "mainsheet" controls the main sail, while the "jib sheet" manages the jib. Learning how to handle these sheets and adjust them according to the wind conditions is crucial for sail control.
Boom
The "boom" is a horizontal spar that extends from the bottom of the main mast and holds the bottom edge of the mainsail. Understanding the boom's operation and safety measures, such as "watch your head" when it swings, is important to prevent accidents.
Helm and Rudder
The "helm" is the steering mechanism used to control the direction of the ship. The "rudder" is the underwater component that responds to the helm's movement, directing the vessel's course. Learning how to steer the ship accurately is a fundamental skill for any sailor.
Knots
Sailors use various knots to secure lines and sails. Essential knots include the bowline, clove hitch, and square knot. Mastering these knots ensures the safety of your crew and equipment.
Heeling
When the boat tilts to one side due to the force of the wind on the sails, it's referred to as "heeling." Understanding how to counteract heeling and maintain balance is crucial for safety and comfort while sailing.
Soaking up the sun in Nicaragua on a catamaran. Photo by Dalton Johnson
Sailing is a rich and rewarding experience, but mastering the language of the sea is essential for safety and effective communication. These basic sailing terms are just the beginning of your nautical education, but they will provide you with a solid foundation as you embark on your seafaring adventures. Remember that practice, experience, and the guidance of experienced sailors will help you become a proficient and confident sailor as you navigate the high seas. Bon voyage!
Discover more Adventures

17 Solo Hiking Tips You Need to Know Before Going
Solo hiking can be an incredibly rewarding and enriching experience, allowing you to connect with nature on a deeper level and discover your inner strength. However, it also comes with its own set of challenges and responsibilities. Before setting out on a solo hiking adventure, it's essential to be well-prepared and informed.
Solo hiking can be an incredibly rewarding and enriching experience, allowing you to connect with nature on a deeper level and discover your inner strength. However, it also comes with its own set of challenges and responsibilities. Before setting out on a solo hiking adventure, it's essential to be well-prepared and informed.
In this article, we'll explore 17 solo hiking tips that will help you stay safe and make the most of your solitary trek into the great outdoors.

1) Plan Your Route Thoroughly
Before embarking on a solo hike, research your chosen trail extensively. Know the distance, elevation gain, and potential hazards. Ensure that the trail is within your skill and fitness level.
2) Share Your Itinerary
Let someone you trust know your hiking plans, including your intended start and end times, as well as the route you'll be taking. This information is crucial in case of emergencies.
3) Check the Weather Forecast
Weather conditions can change rapidly, so check the forecast for your hiking area and be prepared for any unexpected changes.
4) Pack Essentials
Carry the Ten Essentials:
navigation tools (map and compass or GPS)
headlamp
extra food
extra clothing
a first-aid kit
fire-starting materials
a multi-tool or knife
shelter (like a space blanket)
sun protection
a whistle
5) Hike During Daylight Hours
It's safer to hike during daylight hours to avoid getting caught in the dark. Plan your hike so that you have plenty of time to complete it before sunset.
6) Stay Hydrated and Nourished
Bring enough water and snacks to keep you fueled throughout the hike. Dehydration and low energy levels can lead to poor decision-making and increased risk. As a general rule of thumb, aim to consume at least half a liter to a liter of water per hour, adjusting based on the factors mentioned.
7) Know Your Limits
Be honest with yourself about your fitness and hiking abilities. Don't push yourself too hard, especially when you're alone. It's okay to turn back if you encounter difficulties.
8) Stay on Marked Trails
While solo hiking can be an opportunity for exploration, it's safest to stick to established and well-marked trails, especially if you're new to the area.
9) Wildlife Awareness
Research the wildlife in the area you're hiking and learn how to respond to encounters with animals. Carry bear spray or other appropriate deterrents if needed.


10) Carry a Fully Charged Phone
Ensure your phone is fully charged and keep it in a waterproof case or bag. Use it sparingly to preserve battery life for emergencies.
11) Navigation Skills
Know how to use a map and compass or a GPS device. A basic understanding of navigation can be a lifesaver when you're hiking alone.
12) Emergency Signaling
Carry a whistle, mirror, or other signaling devices that can help rescuers locate you in case of an emergency.
13) Enjoy the Solitude
Solo hiking can be a meditative and introspective experience. Take the time to appreciate the beauty of nature and the opportunity for self-discovery.
14) Stay Calm in Emergencies
If you find yourself in a difficult situation, stay calm and think logically. Use your resources, such as your map and communication device, to call for help if necessary.
15) Listen to Your Intuition
Trust your gut instincts. If something doesn't feel right or safe, it's okay to change your plans or turn back.
16) Basic First Aid Knowledge
Carry a first-aid kit and know how to use it. Basic first-aid skills can be invaluable in treating minor injuries.
17) Leave No Trace
Practice Leave No Trace principles by packing out all trash and minimizing your impact on the environment. Leave nature as you found it for future generations.
Solo hiking can be an incredible adventure, but it requires careful planning and preparation. By following these 17 tips, you can minimize risks and make the most of your solitary journey into the wilderness. Remember that safety should always be your top priority, allowing you to fully enjoy the beauty and serenity of the great outdoors while hiking alone.
Discover more Adventures

Unleash Your Inner Trailblazer with Nike Trail Running Shoes
In the world of running, few brands are as iconic and revered as Nike. Known for their innovation, style, and performance, Nike has consistently delivered top-notch athletic footwear. But, what about their trail running shoes? Well, when it comes to trail running, Nike is no exception, offering a range of trail running shoes that cater to both beginners and seasoned trailblazers.
In the world of running, few brands are as iconic and revered as Nike. Known for their innovation, style, and performance, Nike has consistently delivered top-notch athletic footwear. But, what about their trail running shoes? Well, when it comes to trail running, Nike is no exception, offering a range of trail running shoes that cater to both beginners and seasoned trailblazers.
Nike
Performance and Protection:
Nike trail running shoes are designed to tackle rugged terrains with ease. They come equipped with durable outsoles that provide excellent traction on a variety of surfaces, from rocky trails to muddy paths. The advanced cushioning systems, such as Nike React foam and Zoom Air units, offer exceptional comfort and responsiveness, ensuring a smooth ride over uneven terrain. Moreover, many Nike trail running shoes feature reinforced toe caps and sturdy uppers to protect your feet from debris and rocks, allowing you to focus on your run without worrying about potential injuries.
Adaptive Fit:
Nike is renowned for its attention to detail when it comes to fit, and their trail running shoes are no exception. Many models feature Flyknit or mesh uppers that conform to your foot's shape, providing a snug yet flexible fit. This ensures that your feet remain comfortable and secure, even during long runs on challenging trails. Additionally, the inclusion of padded collars and cushioned insoles enhances overall comfort, preventing discomfort and blisters.
Versatility and Style:
Nike understands that trail runners often transition between different terrains. That's why their trail running shoe lineup offers versatility. Whether you prefer a lightweight shoe for speed or a more cushioned one for endurance, Nike has options to suit your preferences. Plus, Nike's commitment to style means you won't have to compromise on aesthetics while conquering the trails. Their shoes feature sleek designs and a wide range of color choices, allowing you to express your personal style as you explore the great outdoors.
Innovation:
Nike is constantly pushing the boundaries of innovation, and this extends to their trail running shoes. From the incorporation of eco-friendly materials to cutting-edge technologies like Nike ACG (All Conditions Gear) for superior water resistance, Nike ensures that their trail running shoes are at the forefront of performance and sustainability.
Hiking Boot Companionship:
While Nike's trail running shoes excel at helping you conquer the rugged trails, the brand also offers a range of hiking boots that are perfect for those who want to take their outdoor adventures to the next level. Nike's hiking boots combine the same commitment to performance and style that you find in their trail running shoes. These boots feature sturdy construction, rugged outsoles for superior grip, and waterproof materials to keep your feet dry during wet and muddy hikes. Whether you're trekking through dense forests or scaling rocky peaks, Nike hiking boots provide the support and protection you need to explore with confidence.
Relaxing at Camp with the Moc:
After a challenging day on the trails or a strenuous hike, it's essential to unwind and recharge. Nike's Moc collection is the perfect solution for post-adventure relaxation at camp. These slip-on shoes offer unbeatable comfort and ease of wear. With a soft and plush interior, they provide a cozy haven for your feet, allowing them to recover from the day's exertion. The Moc's lightweight design makes them easy to pack for any outdoor excursion, and their durable outsoles mean you can wear them around the campfire or to grab essentials from your tent without worrying about wear and tear.
Nike trail running shoes are a testament to the brand's commitment to excellence. Whether you're a novice looking to explore the trails for the first time or a seasoned trail runner seeking the latest advancements in footwear technology, Nike has something to offer. With their combination of performance, protection, fit, style, and innovation, Nike trail running shoes are your trusted companion for every off-road adventure. So, lace up a pair of Nike trail runners and embark on your next trailblazing journey with confidence and style.
Discover More Gear


Exploring the Greek Islands by Sailboat
Sailing the Greek islands offers a unique and enchanting way to experience Greece's rich history, stunning landscapes, and vibrant culture. With a myriad of islands scattered across the Aegean and Ionian Seas, each boasting its own distinct charm, a sailboat vacation provides the flexibility to explore hidden coves, picturesque villages, and ancient ruins at your own pace. Here’s a guide to help you plan the perfect sailing adventure in the Greek islands.
Sailing the Greek islands offers a unique and enchanting way to experience Greece's rich history, stunning landscapes, and vibrant culture. With a myriad of islands scattered across the Aegean and Ionian Seas, each boasting its own distinct charm, a sailboat vacation provides the flexibility to explore hidden coves, picturesque villages, and ancient ruins at your own pace. Here’s a guide to help you plan the perfect sailing adventure in the Greek islands.

Watching the sunrise from the bow of the sailboat in the Aegean Sea while sailin around the Greek Islands. Photo by Dalton Johnson
Pros:
Scenic Beauty: The Greek islands offer breathtaking scenery, from crystal-clear waters and sandy beaches to dramatic cliffs and charming villages. Sailing allows you to witness these landscapes from unique vantage points and discover hidden gems inaccessible by land.
Flexibility and Freedom: Sailing gives you the freedom to create your own itinerary and explore at your own pace. You can visit multiple islands, anchor in secluded bays, and change your plans on the fly, making for a highly personalized and adventurous vacation.
Rich Cultural Experiences: Each Greek island has its own unique history, culture, and traditions. Sailing allows you to immerse yourself in the local way of life, visit ancient ruins, participate in festivals, and enjoy authentic Greek cuisine in picturesque settings.
Ideal Sailing Conditions: The Greek islands boast favorable sailing conditions, particularly from late spring to early autumn. The warm Mediterranean climate, steady winds, and calm seas make for enjoyable and safe sailing experiences, suitable for both novice and experienced sailors.
Variety of Islands: The Greek islands are diverse, with each island group offering distinct experiences. From the cosmopolitan vibe of Mykonos to the tranquil beauty of the Ionian islands, sailing allows you to experience a wide variety of destinations within a single trip.
Cons:
Weather Variability: While the weather is generally favorable, the Meltemi winds in the Aegean Sea can be quite strong during the summer months, which can be challenging for less experienced sailors. Sudden weather changes can also impact sailing plans.
Crowds in Peak Season: Popular islands like Mykonos and Santorini can become very crowded during the peak tourist season (July and August). This can lead to busy harbors, limited docking space, and higher prices for mooring, dining, and attractions.
Logistical Challenges: Sailing requires careful planning and navigation. Ensuring your sailboat is well-equipped, managing provisions, and dealing with technical issues can be challenging, especially for those new to sailing. Chartering a boat can also be expensive.
Limited Onshore Time: While sailing provides flexibility, it also means you might have limited time to explore each island in-depth. Frequent sailing to different destinations can reduce the time available for onshore activities, sightseeing, and relaxation.
Seasickness and Comfort: Seasickness can be an issue for some travelers, potentially affecting the enjoyment of the trip. Additionally, sailboats have limited space and amenities compared to hotels, which might not be as comfortable for everyone, especially on longer voyages.
Why Choose Sailing in the Greek Islands?
The Greek islands are a sailor's paradise. With over 6,000 islands and islets, only 227 of which are inhabited, there are endless opportunities for discovery. Sailing allows you to visit secluded beaches, dive into crystal-clear waters, and dock at charming port towns, all while enjoying the freedom and serenity that comes with being on the open sea.
Moreover, the Mediterranean climate ensures plenty of sunshine and warm temperatures, creating ideal conditions for sailing. The Greek islands also offer a rich tapestry of experiences, from bustling nightlife and gourmet dining to quiet, unspoiled natural beauty and historical landmarks.
When to Visit the Greek Islands
The best time to visit the Greek islands for a sailing trip is from late April to early October. During this period, the weather is warm, the sea is calm, and the winds are favorable for sailing.
Spring (April to June): This is an excellent time for sailing, with mild temperatures, blooming landscapes, and fewer tourists. The winds are generally calm, making it perfect for those who prefer a more relaxed sailing experience.
Summer (July to August): The peak tourist season, characterized by hot temperatures and bustling islands. The Meltemi winds in the Aegean Sea can be strong, providing exhilarating sailing conditions for experienced sailors. However, popular islands can be crowded.
Autumn (September to October): Another ideal time to visit, with warm sea temperatures and fewer crowds. The weather remains pleasant, and the winds are moderate, making it suitable for all sailing skill levels.
Planning Your Sailing Route
The Greek islands are divided into several groups, each offering a distinct experience. Here are some popular routes to consider:
The Cyclades: Known for their iconic white-washed buildings and blue-domed churches, the Cyclades include famous islands like Mykonos, Santorini, and Paros. This group is perfect for those seeking a mix of vibrant nightlife, historic sites, and stunning scenery. The winds can be strong, especially during the Meltemi season, so it's ideal for more experienced sailors.
The Ionian Islands: Located on the western side of Greece, these islands, including Corfu, Zakynthos, and Kefalonia, are known for their lush green landscapes and calm waters. This area is suitable for all sailing levels and is great for family vacations, with plenty of sheltered bays and picturesque harbors.
The Dodecanese: Situated near the Turkish coast, the Dodecanese islands offer a mix of medieval architecture, vibrant culture, and beautiful beaches. Islands like Rhodes, Kos, and Patmos are rich in history and offer a more laid-back atmosphere compared to the bustling Cyclades.
The Saronic Gulf: Close to Athens, this group includes islands like Aegina, Poros, and Hydra. It's an excellent choice for shorter trips or for combining a sailing adventure with a visit to the mainland. The distances between islands are short, making it ideal for less experienced sailors.
Essentials for a Greek Sailing Adventure
Charter Options: You can choose between a bareboat charter (where you sail the boat yourself) or a skippered charter (where a professional skipper handles the sailing). For those new to sailing, a skippered charter is recommended.
Packing Tips: Bring lightweight clothing, swimwear, sun protection (sunscreen, hats, sunglasses), and non-slip shoes. Don’t forget a light jacket for cooler evenings.
Safety First: Ensure your sailboat is equipped with essential safety gear, including life vests, first aid kits, and navigation equipment. Familiarize yourself with local sailing regulations and weather patterns.
Experiencing Greek Island Culture
While sailing the Greek islands, take the time to immerse yourself in the local culture. Visit ancient ruins, explore charming villages, and indulge in delicious Greek cuisine. Each island has its own specialties, from fresh seafood and traditional mezes to local wines and spirits.
Engage with the locals, who are known for their warm hospitality. Participate in local festivals and traditions to get a deeper understanding of the rich cultural heritage that each island holds.

Taking in the view from the windmills on Mykonos Island in Greece. Photo by Dalton Johnson
A sailing trip around the Greek islands promises an unforgettable vacation filled with adventure, relaxation, and cultural enrichment. Whether you're navigating the vibrant Cyclades, the serene Ionian islands, or the historical Dodecanese, the beauty and diversity of the Greek islands will leave you with lasting memories. Plan your voyage, set sail, and let the magic of Greece unfold before you.
Discover More Destinations


Exploring the Top 4 Fly Fishing Destinations Stateside
Imagine standing at the water's edge, the gentle current brushing against your waders as you prepare to make your first cast. The world around you fades away, and all that remains is the rhythmic dance of the fly rod in your hands. In this article, we'll take you on a journey to discover four extraordinary domestic fly fishing destinations that offer this immersive experience.
Imagine standing at the water's edge, the gentle current brushing against your waders as you prepare to make your first cast. The world around you fades away, and all that remains is the rhythmic dance of the fly rod in your hands. In this article, we'll take you on a journey to discover four extraordinary domestic fly fishing destinations that offer this immersive experience.
From the pristine streams of Asheville, North Carolina, to the majestic Colorado River in Arizona, these locations promise not only exceptional angling but also the sheer thrill of getting into the river with your waders on and making that exhilarating first cast.
1. Asheville, North Carolina
Nestled in the heart of the Blue Ridge Mountains, Asheville, North Carolina, is a haven for outdoor enthusiasts and fly fishing aficionados. The region offers a diverse range of fly fishing experiences, from casting your line in pristine mountain streams to navigating the waters of the French Broad River.
The Davidson River: Located in Pisgah National Forest just outside Asheville, the Davidson River is renowned for its crystal-clear waters and abundant trout populations. This river is famous for its year-round trout fishing, with rainbow, brown, and brook trout providing exciting opportunities for fly anglers.
The Catawba River: For those seeking a more challenging adventure, the Catawba River offers excellent smallmouth bass and musky fishing. As you navigate the rocky shoals and swift currents, you'll have the chance to test your fly fishing skills against these formidable opponents.
2. Colorado River, Arizona
While the Colorado River is most famous for its grandeur within the Grand Canyon, there are incredible fly fishing opportunities along its course in Arizona, outside of national park boundaries.
Lee's Ferry: Situated just below Glen Canyon Dam, Lee's Ferry is a world-renowned fly fishing destination. The stunning red rock scenery and deep blue waters provide an unforgettable backdrop for anglers. This stretch of the Colorado River is known for its trophy-sized rainbow trout, making it a must-visit spot for serious fly fishers.
Lees Ferry to Lake Mead: Further downstream, as the Colorado River flows towards Lake Mead, you'll find excellent fishing for striped bass, largemouth bass, and catfish. The river's wide and slow-moving sections make it ideal for both beginner and experienced fly fishers.
3. Bozeman, Montana
Though Bozeman, Montana, doesn't feature any national parks in the immediate vicinity, it's a legendary hub for fly fishing enthusiasts. With its proximity to Yellowstone National Park, you can easily base yourself in Bozeman and venture into the park for incredible fishing experiences.
Yellowstone River: The Yellowstone River, originating in Yellowstone National Park but accessible outside the park, offers some of the most iconic fly fishing in the region. It's home to a variety of trout species, including native cutthroat and feisty rainbow and brown trout.
4. Driftless Area, Wisconsin
For anglers seeking a unique fly fishing experience, the Driftless Area in southwestern Wisconsin is a hidden gem. This region is characterized by its rolling hills, spring-fed creeks, and abundant wildlife.
The Kickapoo River: This meandering river boasts some of the most beautiful scenery in the Midwest. It's known for its wild brown and brook trout, and the technical aspects of fishing these small waters make it a rewarding challenge for fly fishers.
As we wrap up our exploration of these remarkable domestic fly fishing destinations, remember that the beauty of fly fishing lies not only in the abundance of fish but in the moments when you stand in the water, the cool flow embracing your waders, and the anticipation of that first, perfect cast. Whether you find yourself in the tranquil mountain streams of Asheville, North Carolina, or the iconic waters of the Colorado River in Arizona, each of these destinations offers a unique and immersive experience that every fly angler should savor. So, pack your gear, embark on these angling adventures, and let the magic of fly fishing take you on a journey of both skill and serenity.
Discover More Destinations

Surf Nicaragua Without the Fuss
Right now, swells are pulsing through Central America. Which means, if you are reading this article, you are sitting at a desk wishing you could be getting shacked instead of reading this article. Well, don't worry, traveling to Nicaragua for surfing is easier than you think thanks to Rise Up Surf Retreats.
Right now, swells are pulsing through Central America. Which means, if you are reading this article, you are sitting at a desk wishing you could be getting shacked instead of reading this article. Well, don't worry, traveling to Nicaragua for surfing is easier than you think thanks to Rise Up Surf Retreats.
Rise Up Surf Retreats has you covered for all this surfing in Northern Nicaragua. This all-inclusive resort is tucked away in northern Nicaragua and has access to secluded surf breaks that we dream of having here in North America. Let alone be able to surf without a wetsuit holding us back.
A Little Bit About the Surf:
"Surf with backdrops of vivid green palm trees and perfectly blue skies. From small and gentle longboarding waves to fast and barreling A-frames, Nicaragua has waves for every style and every level. Whether you have been surfing for years or have never been on a board before, we will be sure to take you to the right spot for your abilities. The beach directly in front of the resort has a right and left point break, as well as a beach break in the middle."
When you book an all-inclusive surf trip with Rise Up you get:
8 days/7 nights
All meals, drinks, and snacks
Surfboard rental
1 yoga class per day
Surf videos from your week (included in surf photo package – extra cost)
Surf photos (extra cost)
Airport transfers (to and from)
More Than just Surfing
If you are looking for something else to do, outside of surfing, you have options.
Sunset horseback ride on the beach
Daily yoga practices
Learn to make tortillas the Nicaraguan way
Go on a boat trip and wake surf through the estuary
Get involved with our NGO, Rise Up Kids!
What will you be eating:
Every day your meals will be made for you, but what would that look and taste like? At Rise Up, they believe "food should not only taste good, but make you feel good." So, they locally source their ingredients for all of the meals that will fuel you for the week.
Here is an example of a daily menu:
Cold breakfast: Fresh fruit, homemade banana bread and peanut butter, yogurt, almond granola, fresh juice, coffee, and tea.
Hot brunch: Mango-chia chocolate yogurt cup, scrambled eggs, tomato basil salad, roasted veggies, avocado toast, and gallo pinto (a Nica staple!)
Lunch: Veggie burgers with beetroot hummus, yucca chips, cabbage salad, and fried plantains
Appetizer: Local fish ceviche
Dinner: Thai green curry, green mango, and fried rice
Dessert: Roasted banana with rum toffee sauce and a coconut cookie
Sunrise at the Mittens in Monument Valley. Photo by Dalton Johnson
As the swells and spaces fill up during this holiday time, you should start booking your trips ASAP, or you will have to wait until 2024 season, which means a full year of mind surfing. Nobody wants that, so book your trip and start shredding.
Discover More Destinations

Best Rock Climbing Places Around Moab, UT
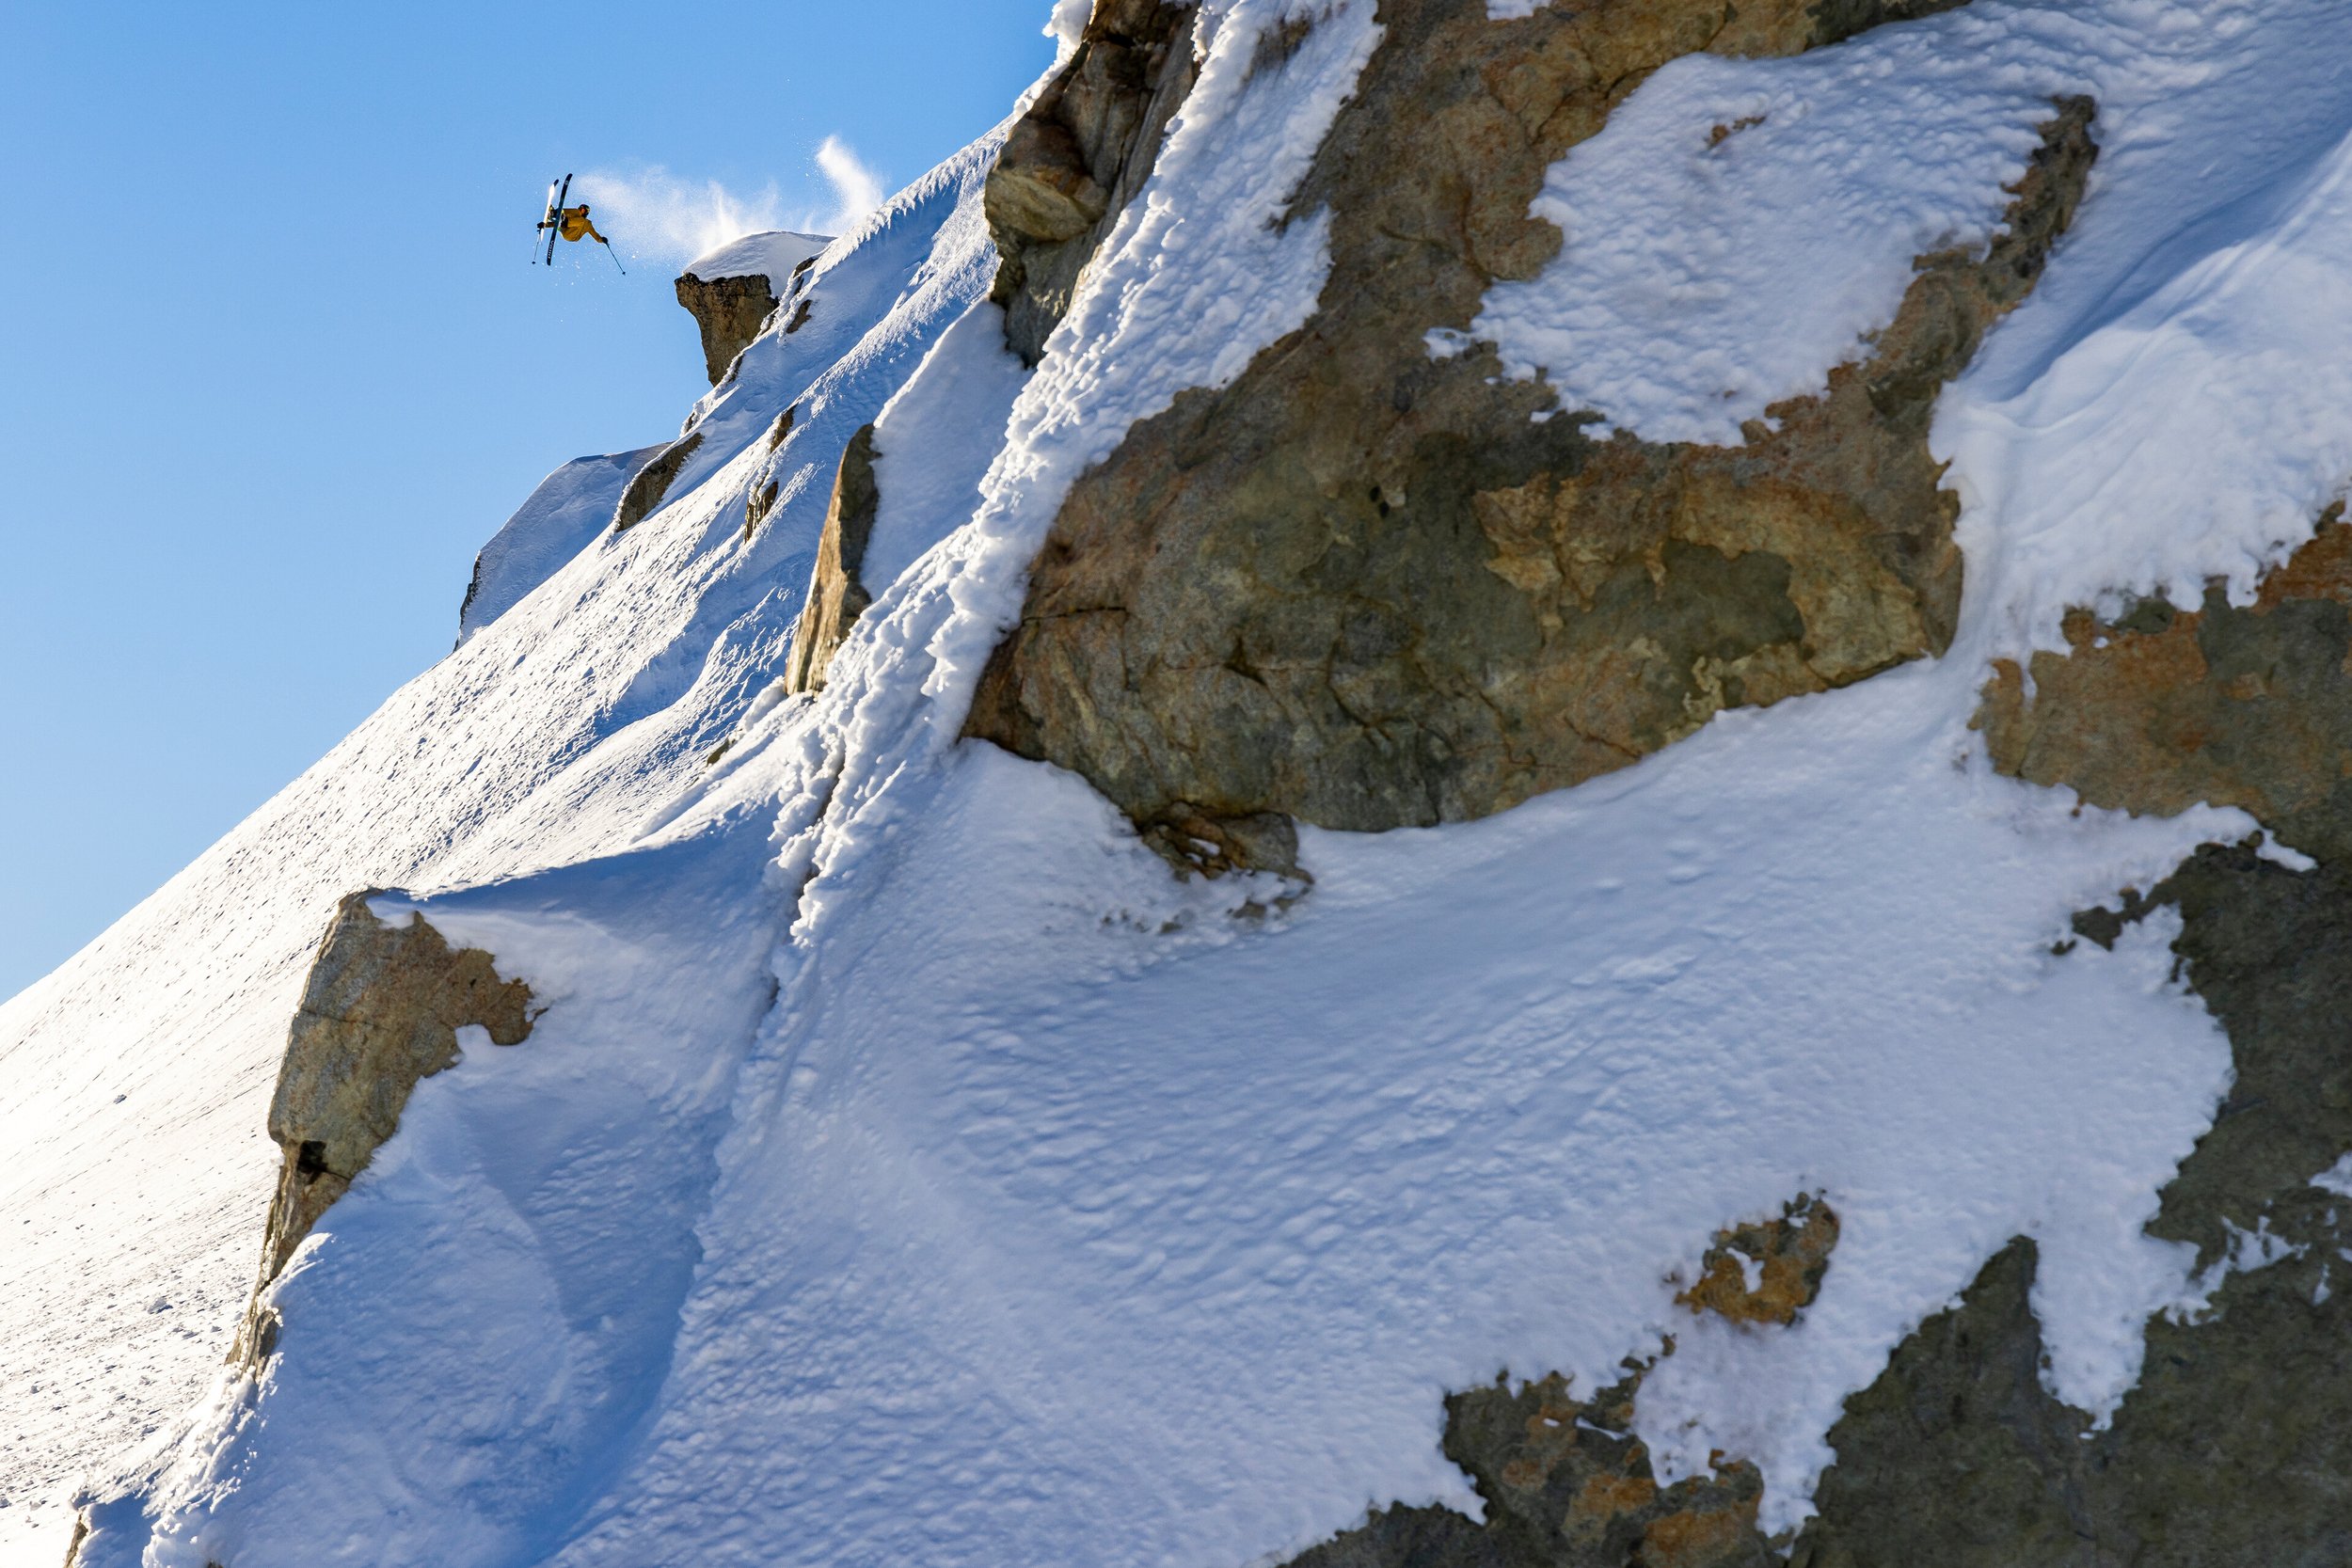
Moab, Utah, a place renowned for its breathtaking red rock landscapes and outdoor adventures, is a paradise for rock climbers. The dramatic sandstone formations that dominate the region provide an ideal playground for climbers of all levels. From the classic splitters of Indian Creek to the awe-inspiring spires of Fisher Towers and the iconic routes of Wall Street, Moab offers a diverse range of climbing experiences. In this article, we'll explore the world of rock climbing in and around Moab, highlighting some of the top climbing destinations that make this region a must-visit for climbing enthusiasts.
Moab, Utah, a place renowned for its breathtaking red rock landscapes and outdoor adventures, is a paradise for rock climbers. The dramatic sandstone formations that dominate the region provide an ideal playground for climbers of all levels. From the classic splitters of Indian Creek to the awe-inspiring spires of Fisher Towers and the iconic routes of Wall Street, Moab offers a diverse range of climbing experiences. In this article, we'll explore the world of rock climbing in and around Moab, highlighting some of the top climbing destinations that make this region a must-visit for climbing enthusiasts.
Castleton Tower glowing red in sunset light cascading across the desert landscape. Photo by Dalton Johnson
Indian Creek: The Crack Climbing Mecca
Indian Creek is an internationally renowned climbing destination situated just south of Moab. It's often considered the ultimate mecca for crack climbing. What sets Indian Creek apart is its dense concentration of parallel sandstone cracks that vary in width from thin fingers to off-widths. These iconic cracks offer a unique challenge to climbers looking to test their jamming and laybacking skills.
One of the most famous climbs in Indian Creek is Supercrack, a stunning hand and fist crack that lures climbers from all corners of the globe. The splitter cracks of this area are a constant draw, with a wide range of difficulty levels, making it an excellent location for both beginners and seasoned climbers. Whether you're climbing with friends or flying solo, Indian Creek is a must-visit for anyone looking to immerse themselves in the world of crack climbing.
Pros:
Internationally renowned for crack climbing.
Dense concentration of parallel sandstone cracks.
Wide range of crack widths, suitable for all skill levels.
Classic routes like "Supercrack" attract climbers from around the world.
Cons:
Harsh desert conditions can make summer climbing uncomfortable.
Limited shade, so plan climbing trips accordingly.
Wall Street: Belay From Your Bumper
If you're looking for a climbing experience that's just a stone's throw away from the heart of Moab, look no further than Wall Street. This climbing area is a local favorite and provides climbers with a unique urban climbing experience. Nestled along the Colorado River, Wall Street offers diverse climbing opportunities on the iconic sandstone walls that line the road.
Climbers at Wall Street can enjoy the convenience of climbing during the day and savoring Moab's vibrant nightlife afterward. With routes that cater to both beginners and experienced climbers, this area is a fantastic place to spend a few hours or a full day. Whether you're looking to top-rope, lead, or boulder, Wall Street has it all.
Pros:
Conveniently located close to Moab.
Diverse climbing opportunities for all skill levels.
Beautiful riverside setting.
Easy access and proximity to Moab's amenities.
Cons:
Can get crowded, especially during peak tourist seasons.
Limited camping options, so consider alternative accommodations.
Fisher Towers: Spires in the Desert
Venturing deeper into the desert near Moab, you'll discover Fisher Towers, a surreal and captivating climbing destination. Fisher Towers is renowned for its awe-inspiring spires, such as the Titan, the largest free-standing tower in the United States. Climbing these towering monoliths is an experience like no other.
Climbers can test their skills on classic routes like Ancient Art, a spire with a "corkscrew" summit that offers both technical climbing and exposure that will leave your heart pounding. Fisher Towers provides a unique blend of adventure and wilderness, with routes that range from traditional aid climbs to challenging free climbs.
The surreal and otherworldly landscape, combined with the exhilaration of climbing these spires, makes Fisher Towers a top choice for climbers seeking a true desert adventure.
Pros:
Awe-inspiring spires provide a unique climbing experience.
Iconic formations like the Titan.
Surreal and captivating desert landscape.
A blend of adventure and wilderness.
Cons:
More remote and less accessible than other climbing areas.
Requires careful route selection and gear due to the adventurous nature of climbing.
Castle Valley: The Tower of Towers
Just a short drive from Moab, Castle Valley beckons climbers with its impressive and iconic sandstone formations. The valley is home to several renowned climbing destinations, each offering its own set of challenges and unique beauty.
Castleton Tower is perhaps the most famous formation in Castle Valley, featuring routes like the Kor-Ingalls Route and the North Chimney. Climbing Castleton Tower is a rite of passage for many climbers, offering a mix of traditional and sport climbing on its steep and exposed walls.
The Rectory and The Priest are two more captivating formations in Castle Valley, known for their remarkable splitters and challenging cracks. The Rectory, in particular, is a favorite among climbers for its classic route Fine Jade, a majestic finger crack that attracts climbers seeking a thrilling challenge.
Pros:
Home to renowned formations like Castleton Tower, The Rectory, and The Priest.
Iconic routes that attract climbers seeking a challenge.
Beautiful desert scenery and varied climbing opportunities.
Cons:
Routes on Castleton Tower can be crowded.
Be prepared for potentially challenging and exposed climbing conditions.
Climbing Logistics and Tips
When planning a climbing trip to Moab, it's essential to consider the logistics and safety precautions:
Permits and Regulations: Be aware of any climbing permits or regulations in the specific climbing areas you intend to visit. Indian Creek, for example, has camping and climbing regulations to protect the fragile desert environment.
Weather: Moab can experience extreme temperatures, so plan your climbing trips accordingly. Spring and fall are the best seasons for climbing, as summer can be scorching, and winter can bring cold and potentially icy conditions.
Safety: Always prioritize safety. Familiarize yourself with the local climbing conditions, communicate with other climbers, and check your gear before heading out.
Leave No Trace: As with any outdoor activity, respect the environment and practice Leave No Trace principles. Pack out all trash, and be mindful of the impact of chalk and climbing hardware on the rock.
Local Beta: Local climbing shops and guides can provide valuable information about current conditions, route recommendations, and any access issues.

Bryce onsighting Hooker’s and Blow in Indian Creek, Utah. Photo by Dalton Johnson
Moab, Utah, is a climber's dream destination, offering a diverse range of climbing experiences amid stunning desert landscapes. From the iconic splitters of Indian Creek to the towering spires of Fisher Towers and the accessible routes at Wall Street, there's something for climbers of all levels and preferences.
If you're looking for adventure, breathtaking views, and the chance to climb on some of the most unique and challenging rock formations in the world, Moab should be at the top of your climbing bucket list. Just remember to be prepared, follow safety guidelines, and respect the environment, so you can enjoy a memorable climbing experience in this desert paradise.
Discover More Destinations
Four Ski Films On YouTube You Need To Watch
As the winter season is coming, YouTube is getting flooded with incredible ski films that you should watch. The diversity is vast in these films ranging from big and remote landscapes to "in your backyard" kind of videos. All together the excitement after last years incredible 300% snow pack is still paying dividends. Hopefully this year will be similar!
As the winter season is coming, YouTube is getting flooded with incredible ski films that you should watch. The diversity is vast in these films ranging from big and remote landscapes to "in your backyard" kind of videos. All together the excitement after last years incredible 300% snow pack is still paying dividends. Hopefully this year will be similar!
A Colorado Summit Frenzy
A Remote and Philosophical Story
A Bro Session in the Mountains of Idaho
Pushing the Limits in the Eastern Sierra Mountains
Discover more Adventures

12 Essential Tips for Winter Camping
When the world is blanketed in snow and the air turns brisk, some adventurers welcome the opportunity to go winter camping. While the idea of sleeping outdoors in freezing temperatures might sound daunting, with the right knowledge and gear, it can be an incredible and unforgettable experience. In this comprehensive guide, we will explore 12 essential tips to ensure a safe and enjoyable winter camping trip.
When the world is blanketed in snow and the air turns brisk, some adventurers welcome the opportunity to go winter camping. While the idea of sleeping outdoors in freezing temperatures might sound daunting, with the right knowledge and gear, it can be an incredible and unforgettable experience. In this comprehensive guide, we will explore 12 essential tips to ensure a safe and enjoyable winter camping trip.

Headed out in the winter into the PNW for a camping trip on Mount Baker. Photo by Dalton Johnson
1. Layer Up
The key to staying warm in cold weather is layering your clothing. Instead of relying on a single thick garment, wear multiple layers to trap heat and manage moisture effectively. Start with a moisture-wicking base layer that pulls sweat away from your skin. On top of this, add an insulating mid-layer to keep you warm. Finally, don a waterproof and insulated outer layer to protect against wind and moisture. Remember, you can always remove or add layers to regulate your body temperature as needed.
2. Stay Dry
One of the greatest threats in winter camping is moisture. Wet clothing can quickly lead to hypothermia, so it's crucial to stay dry. Ensure that your outer layer is waterproof and breathable, and carry extra waterproof gear like gloves, a rain jacket, and rain pants. Additionally, pay attention to perspiration; avoid overexerting yourself to prevent excessive sweating.
3. Sleep with Your Gear
In extreme cold, your gear can freeze overnight, making it difficult to use in the morning. To prevent this, store essential items like boots, water bottles, and clothing inside your sleeping bag with you. This not only keeps them from freezing but also pre-warms them for when you need to use them in the morning.
4. Plan Your Pee Or Bring a Bottle
Winter nights can be unforgiving, and getting out of your cozy sleeping bag for a bathroom break can be a dreaded ordeal. To maintain your warmth and comfort, plan your bathroom trips. A practical solution is to use a wide-mouth bottle for urination. This prevents the need to brave the frigid outdoors. However, make sure it's a dedicated container for this purpose and is properly sealed to prevent any unwanted spills. This simple tactic not only keeps you warm and comfortable but also preserves the peaceful ambiance of your winter camping experience, allowing you to focus on the breathtaking beauty of your surroundings. So, before you hunker down for the night, have your bottle ready as a valuable ally in your battle against the cold.
5. Choose the Right Sleeping Bag
Your choice of sleeping bag is crucial to staying warm during winter camping. Look for a cold-weather sleeping bag rated for the lowest temperatures you expect to encounter. There are two main types: down-filled and synthetic. Down is lightweight and highly insulating but loses its warmth when wet. Synthetic bags are more water-resistant, making them a safer choice in wet conditions. Choose accordingly based on your destination and expected conditions.
6. Choose Your Campsite Wisely
The location of your campsite can significantly impact your winter camping experience. Look for sheltered areas that are protected from strong winds. Avoid setting up camp in areas prone to avalanches or other hazards. Pay attention to drainage, as you'll want to prevent your tent from flooding due to melting snow.
7. Double Up on Sleeping Pads
The ground in winter can be extremely cold, making it essential to insulate yourself from it. Utilize two sleeping pads for extra insulation. Start with a foam pad to create a barrier between your body and the cold ground. Then, add an inflatable pad on top for added comfort and warmth.
8. Wake Up With a Hot Beverage, Ideally Some Coffee
A steaming cup of coffee in the morning is a comforting ritual for many campers. During winter camping, it serves a dual purpose by helping to warm you up. Use a reliable camp stove to brew coffee, and consider bringing a thermos to keep it hot throughout the day.
9. Check the Weather
Before embarking on a winter camping trip, always check the weather forecast. Winter conditions can change rapidly, and being caught in a sudden storm or temperature drop can be dangerous. Stay informed and be prepared to adjust your plans accordingly.
10. Stay Warm with the Old Hot Water Bottle Trick
Cold nights can be challenging to endure, but there's a simple and effective trick to help keep you warm in your sleeping bag. Fill a heat-resistant water bottle with hot (but not boiling) water, seal it tightly, and place it inside your sleeping bag. The bottle will release heat, creating a cozy and toasty environment to sleep in.
11. Consume Plenty of Calories
In cold weather, your body burns more calories to maintain its temperature. Therefore, it's essential to consume a diet rich in high-calorie foods. Choose energy-dense snacks and meals to keep your energy levels up. Hot meals and beverages are particularly beneficial for maintaining body heat and morale.
A few of our favorite meals on the go:
All-In-One Container: Tippins Foods (their container can be your kindling)
Best Dehydrated: Good To-Go
Highest Protein: Peak Refuel
Best All Around: Heather's Choice
12. Bring the Right Footwear
Your choice of footwear is crucial in winter camping. Insulated, waterproof boots with good traction are a must. Make sure they are adequately insulated to keep your feet warm, and consider using gaiters to prevent snow from entering your boots.
Winter camping in Yosemite National Park. Photo by Dalton Johnson
Winter camping can be an incredible and rewarding adventure if you're well-prepared. Following these 12 essential tips will help you stay safe, warm, and dry while winter camping. Remember to choose the right gear, stay informed about the weather, and practice good campsite selection to make your winter camping experience a memorable one.
Discover more Adventures

How to Properly Layer for Winter Camping
Winter camping offers a unique opportunity to experience the serene beauty of nature in its frozen state. However, to fully enjoy the experience, it's essential to stay warm and comfortable in the chilly conditions. Proper clothing is the key to surviving and thriving during a winter camping trip. The secret to staying warm in the frigid outdoors is layering your clothing effectively. This strategy allows you to regulate your body temperature, manage moisture, and stay comfortable throughout your winter adventure. In this article, we'll guide you on how to properly layer for winter camping.
Winter camping offers a unique opportunity to experience the serene beauty of nature in its frozen state. However, to fully enjoy the experience, it's essential to stay warm and comfortable in the chilly conditions. Proper clothing is the key to surviving and thriving during a winter camping trip. The secret to staying warm in the frigid outdoors is layering your clothing effectively. This strategy allows you to regulate your body temperature, manage moisture, and stay comfortable throughout your winter adventure. In this article, we'll guide you on how to properly layer for winter camping.
The Three-Layer System
The concept of layering is all about creating a balance between warmth and moisture management. In cold weather, you'll want to wear a system of three main layers, each serving a specific purpose. These layers are the base layer, mid-layer, and outer layer.
Base Layer: Moisture-Wicking
The base layer is your first line of defense against the cold. It is in direct contact with your skin and should efficiently wick moisture away from your body to keep you dry and prevent chilling. Your base layer should be made of moisture-wicking and breathable materials such as merino wool or synthetic fabrics like polyester. Avoid cotton as it retains moisture and can leave you feeling damp and cold.
Key points for the base layer:
Choose a snug, but not restrictive, fit to maximize its moisture-wicking capabilities.
Opt for a long-sleeve top and long pants to cover as much skin as possible.
Make sure the base layer is comfortable, as it's the layer closest to your skin.
We suggest a Merino wool layer, and if you can, find a Nuyarn Merino wool layer.
Mid-Layer: Insulating
The mid-layer's primary function is to provide insulation, trapping heat close to your body. Depending on the severity of the cold, you can adjust the thickness and type of mid-layer. For moderate winter conditions, consider fleece or down jackets and pants. In extremely cold weather, use thicker insulating layers or combine several thinner ones. This layer should provide warmth without causing overheating.
Key points for the mid-layer:
Adjust the thickness and number of mid-layers based on the temperature and your activity level.
Look for moisture-wicking mid-layers to ensure that sweat and moisture are effectively transported away from your body.
Outer Layer: Waterproof and Insulated
The outer layer is your shield against the elements. It should be both waterproof and insulated to protect you from wind, rain, or snow. Look for a high-quality winter jacket and pants that can withstand harsh weather conditions while allowing your body to breathe to prevent moisture buildup.
Key points for the outer layer:
Choose an outer layer with a breathable membrane, such as GORE-TEX, for effective moisture management.
Make sure your outer layer has adjustable cuffs, hoods, and ventilation zippers to adapt to changing conditions.
Additional Considerations
Apart from the three primary layers, you should also pay attention to other elements of your winter camping clothing system:
Headgear: A warm hat or beanie is crucial for preventing heat loss through your head. Additionally, consider a balaclava or neck gaiter to protect your face and neck.
Gloves and Mittens: Invest in high-quality insulated gloves or mittens to keep your hands warm and dry. It's a good idea to bring an extra pair in case one gets wet.
Socks: Choose moisture-wicking, thick, and warm socks. Consider wearing a thin liner sock under your primary sock for extra insulation and moisture control.
Footwear: Insulated, waterproof boots with good traction are essential for winter camping. Make sure they are the right size to accommodate your thermal socks comfortably.
Accessories: Sunglasses, goggles, and a good pair of snowshoes or crampons may be necessary depending on your activities and the terrain.
Proper layering is the key to staying warm and comfortable during your winter camping adventures. By implementing the three-layer system, consisting of a moisture-wicking base layer, an insulating mid-layer, and a waterproof and insulated outer layer, you can regulate your body temperature and manage moisture effectively. Don't forget to pay attention to other essential items like headgear, gloves, socks, and footwear. With the right clothing and gear, you can make the most of the winter wonderland and create unforgettable memories while staying warm and cozy in the great outdoors.
Discover More Gear


Plan Your First Surf Trip to Hawaii
Hawaii, with its idyllic beaches, warm waters, and consistent waves, has always been a surfer's paradise. For surfers around the world, the mere thought of planning a surf trip to the Hawaiian Islands is enough to set their hearts racing. Hawaii is not just a destination; it's a dream come true. Whether you're a seasoned pro or a novice in the water, this article will guide you through the essential steps to ensure that your surf trip to Hawaii is nothing short of epic.
Hawaii, with its idyllic beaches, warm waters, and consistent waves, has always been a surfer's paradise. For surfers around the world, the mere thought of planning a surf trip to the Hawaiian Islands is enough to set their hearts racing. Hawaii is not just a destination; it's a dream come true. Whether you're a seasoned pro or a novice in the water, this article will guide you through the essential steps to ensure that your surf trip to Hawaii is nothing short of epic.
A casual day at Waikiki, HI. Photo by Dalton Johnson
1. Choose the Right Island:
Hawaii is an archipelago of eight major islands, each with its unique character and surf spots. The four most popular islands for surfing are Oahu, Maui, Kauai, and the Big Island (Hawaii). The choice of the island plays a pivotal role in the success of your surf trip.
Oahu: Oahu is often considered the heart of the surfing world, known for its bustling surf towns like Waikiki. Oahu is home to world-famous spots such as Pipeline and Sunset Beach, making it a mecca for surfers. However, these North Shore breaks are reserved for expert surfers who can handle the powerful, barreling waves.
Maui: For a more relaxed vibe and a diverse range of surf breaks, Maui's North Shore is an excellent choice. Maui offers opportunities for surfers of all skill levels, from beginners to advanced. Ho'okipa Beach Park is famous for its windsurfing and kitesurfing, while Honolua Bay offers long rides and a peaceful atmosphere.
Kauai: Kauai, also known as the "Garden Isle," provides a more pristine and less crowded surfing experience. Hanalei Bay is a great spot for beginner and intermediate surfers, while advanced riders can challenge themselves at breaks like Kalihiwai and North Shore Reef.
The Big Island (Hawaii): The Big Island offers a diverse range of surf breaks and an overall more relaxed atmosphere. Honolii Beach Park on the Hilo side is perfect for longboarders and beginners. The west side of the island offers more challenging waves for advanced surfers.
To make an informed choice, research each island's surf conditions, vibe, and culture to see which one aligns best with your preferences.
2. Timing is Everything:
The timing of your surf trip to Hawaii is crucial because the waves vary greatly throughout the year. The best time to go largely depends on the type of waves you want to ride.
Winter (November to February): Hawaii's North Shore, particularly Oahu, is famous for its massive winter swells. If you're an advanced surfer and dream of tackling powerful, barreling waves, this is the season to visit. The Vans Triple Crown of Surfing takes place during this time, featuring some of the most prestigious surf competitions in the world.
Summer (May to September): For smaller, more manageable waves, consider visiting during the summer months. The South Shore and other spots come to life, offering a more suitable environment for beginner and intermediate surfers. While the waves are less colossal, they still provide ample opportunities for fun and progression.
3. Surf Skill Level:
Your level of experience and expertise in surfing will greatly influence your choice of surf destination in Hawaii. Each island has waves suitable for various skill levels.
Oahu's North Shore: This is the mecca for expert surfers. World-famous spots like Pipeline and Sunset Beach offer some of the most challenging waves on the planet. If you're not a seasoned pro, it's best to watch in awe and respect from the shore.
South Shore of Oahu: If you're a beginner or intermediate surfer, the South Shore of Oahu is your haven. Waikiki Beach, in particular, offers gentle, rolling waves that are perfect for learning and practicing your skills.
Other Islands: Each of the Hawaiian Islands has surf breaks catering to surfers of all levels. Be sure to do your research and choose a spot that aligns with your skill level and comfort.
4. Accommodations:
Hawaii offers a diverse range of accommodations to suit all budgets and preferences. Whether you're looking for a luxury resort, a budget-friendly hostel, or a cozy vacation rental, you'll find it in Hawaii. It's advisable to book your accommodations in advance, especially during peak surf seasons when demand is high.
Luxury Resorts: Hawaii boasts a plethora of world-class resorts, offering not only luxurious accommodations but also convenient access to surf spots. Oahu's Turtle Bay Resort, for instance, provides easy access to the North Shore's legendary waves.
Vacation Rentals: Many travelers opt for vacation rentals, which can be a more economical and personalized option. These range from beachfront cottages to charming condos, providing you with a home away from home.
Budget-Friendly Options: If you're on a tight budget, consider hostels or budget hotels. While you may sacrifice some luxuries, you'll still be in close proximity to the ocean and waves.
5. Surfboard and Gear:
Now, let's talk surfboards and gear. Your decision here depends on your personal preferences, your level of commitment to the sport, and the practicality of traveling with surf gear.
Renting Surfboards: Many surf shops in Hawaii offer rental boards and other surf gear. Renting can be a convenient option, particularly if you're flying in from a long distance, as it saves you the hassle and expense of transporting your board. Plus, it allows you to try different boards suited to the local conditions.
Bringing Your Own Board: If you're accustomed to your own board and are planning an extended stay, bringing your own surfboard may be the way to go. Just be aware of the additional travel costs and ensure your board is well-protected during transit.
6. Explore Beyond Surfing:
While surfing is the main attraction, Hawaii offers a wide range of activities and attractions that are worth exploring.
Hiking: Hawaii is known for its stunning hiking trails. Whether it's the Napali Coast Trail in Kauai, the Pipiwai Trail in Maui, or the Diamond Head Crater Hike on Oahu, the islands offer incredible natural beauty and awe-inspiring vistas.
Snorkeling and Diving: Hawaii's crystal-clear waters provide excellent opportunities for snorkeling and diving. Explore vibrant coral reefs, swim alongside sea turtles, and discover the marine wonders of the islands.
Traditional Luaus: Immerse yourself in Hawaiian culture by attending a traditional luau. Enjoy delicious local cuisine, hula dancing, and the spirit of aloha.
Exploring Local Culture: Each island has its own unique culture and history, from the Polynesian heritage to the fusion of traditions from various immigrant groups. Take the time to learn about the local culture and interact with the warm and welcoming Hawaiian people.

Nose riding on at one of the many Waikiki breaks in Hawaii. Photo by Dalton Johnson
A surf trip to Hawaii is a dream come true for many, and by following these steps, you can turn that dream into a reality. The key is to choose the right island, time your trip correctly, consider your skill level, book accommodations in advance, decide on your surf gear options, and explore the incredible attractions that go beyond the waves. Whether you're a seasoned pro seeking the thrill of massive winter swells or a beginner looking
Discover More Destinations

Did Nat Geo Deliver on Lost in the Arctic?
Mark and Renan are at it again with the new National Geographic film Lost in the Arctic. A film documenting the trials and tribulations of retracing the footsteps of legendary Arctic explorer John Franklin.
Filmmaker, Renan Ozturk, and writer, Mark Synnott, tried to achieve the impossible again, but this time it was in the ocean.
A few years back, Renan and Mark chased down a lead for National Geographic on Mount Everest. Making the film The Ghost Above, which told the story of an ongoing search to find bodies on Everest that could, and would, change history forever. However, they came up short; no body.
Now, Mark and Renan are at it again with the new National Geographic film Lost in the Arctic. A film documenting the trials and tribulations of retracing the footsteps of legendary Arctic explorer John Franklin.
But, will they find a body this time?
To do this, the crew set sail from the East Coast of the United States and picked up on the last known whereabouts of Franklin's expedition. Exploring, what are now, deserted fishing villages, the crew of explorers wanted to find the answer to the unsolved mystery of, "What happened to John Franklin and his crew?"
Did they achieve it? I'll let you watch the 48-minute film that keeps you on the edge of your seat as this crew gets trapped in the ice, rides ATVs, and uses the latest drone technology to search for the tomb of John Franklin.
Discover more Adventures

My First Week With WHOOP
WHOOP is unavoidable at this point. If you haven't heard an ad on a podcast, seen a friend rock'n their WHOOP, or passed by somebody on a run tracking their life through a WHOOP, you must live under a rock.
I know the peer pressure of sitting at a table and missing out on a conversation as friends talk about their sleep score and their day's strain was foreign to me, yet I was the only one at the table without it. So, I wanted to give it a try, to see if the buzz was worth it.
To do this, I tracked my daily thoughts about my life with a WHOOP.
Day One:
Out of the box and onto my wrist, my initial question is, "Why is this not a watch?" The look is clean, and the strap is nice, but, now, I need to wear two things on my wrist all of the time. Is that going to look weird? I thought to myself at the kitchen table.
But, do I? I already have my phone which is almost always with me, so a watch is mostly a status symbol. I will see what life will be like without a watch.
While still at the table, I quickly set up my account, fit the strap to my wrist (this took me longer than it should have), charged it up a little bit, then headed to bed.
Day Two:
I am first to admit, I do not like to sleep with anything besides the bed sheets. A quick story:
When I was in college (this is never a good way to start a story) I tore my labrum in my shoulder while playing water polo for Santa Clara University and had to be in a sling after having surgery. My body hated it so much, I would take my sling off while sleeping. There was nothing I could do about it. Each morning, for the weeks I needed to be in the sling, my body would take off the sling in the middle of the night.
Fast forward to waking up my first morning, the WHOOP was still on. I was surprised!
After a short while of being up, I got my first sleep score. I now belonged to the club ;-)
That excitement put a smile on my face as I walked around the block in the crisp morning air, without a watch, only my WHOOP.
While sipping coffee, my phone binged, without clicking any tracking info, an activity strain from going for a morning walk was calculated. This is cool! I thought as I started to learn about the features this WHOOP has to offer.
Day Three:
During my lunch break, I looked through the workouts WHOOP has in their database, as well as the hundreds of exercises you can pull from to create your own workout. Since my main goal with WHOOP is to get back in shape and have the data to hold myself accountable, I put together a bodyweight workout that would kick my butt.
To my surprise, stringing together a grouping of familiar workouts was easy. So easy, I made a couple so that I could do three a week. Each workout would be simple, but now I had data to hold myself accountable.
Since it is day three, WHOOP hasn't adjusted to my body yet, so everything I do still has a gray line. Soon, these will unlock and I am excited for that.
Day Four:
I've started to become accustomed to checking my sleep score each morning, the data fascinates me. In addition to the data, there is a journaling feature, called WHOOP journal, that helps me stay accountable.
Within the journal there are simple questions like:
Have any alcoholic drinks?
Spend time stretching?
Consume meat?
Connected with friends and family?
Then, there are more personal questions that caught me off-guard like:
Engage in sexual activity?
Masturbate?
Felt you had control over your life?
Share your bed?
My initial reaction was that these questions overstepped, but then I started to think about it. Why would they ask these questions? How do these contribute to my overall health? Then it clicked as continued to look at the data.
WHOOP isn't just about shedding pounds or lowering your alcohol intake. Until today, I missed the section about stress levels. Turns out, I spend time each day in the high-stress zone. Personally, I did not think this was the case. I am a writer, how stressful can meetings, writing on a computer, working out, and reading really be?
Apparently, it can be high.
In an effort to reduce my stress levels, I laced up my running shoes and headed for a run. This has been the strangest feeling of them all. With only a WHOOP (no tracking watch), vanity metrics are gone. There is no:
Average pace
Best mile
Distance
Elevation gain/loss
Nope, none of the data I have tracked my entire running career (which isn't very long, about 7 years now). I was furious. Why would I not get this data? I thought to myself, I need this data. But, then again, I reflected upon it, do I really need it?
No. My goal is to become a healthier human. I do not race. I do not care how fast I actually run. Besides fireside chats with friends, I don't care to know how many miles a week I run. Really, all I care about is becoming a healthier human. So, do I need the above data? No.
Day Five:
Call me a data-aholic but I don't care. Yes, I was a math nerd in college (yup, that is right, my college degree was in Mathematics because I wasn't a fan of reading and writing... the irony), but having metrics at my fingertips helps me understand what is going on in my life beyond what I can feel, blows me away.
Today is a perfect example:
All day, I have been stressed about a meeting. Yet, I didn't know I was stressed all day until the day was winding down and I looked at my data. Here is what it told me:
Two hours before my big meeting, all of my biometrics went into hyperdrive as I sat behind a computer, planning for the meeting.
As the meeting occurred, my stress level spiked and caused my body a strain level that was on par with doing a short HIIT workout.
After my meeting, my biometrics dropped, but you could see the effects of the strain on my resting heart rate being higher than normal.
This shows me that I should try to do some of the breath work in the WHOOP app when I see my stress levels peaking to keep a collected headspace.
Day Six:
I made a mistake. You know how I said this app has a ton of widgets and gadgets? Well, I laced up my Merrell Skyfire 2 and went for another run, today. Still, watch free and embrace the concept of a minimalist runner.
Ready to strut my stuff loud and proud knowing I wouldn't be collecting vanity metrics, I tossed in my airpods, opened my WHOOP app, and started a new activity; running. Then, on the top right-hand corner, I saw a toggle I could press to track all of the data I had missed on my previous run.
So, what did I do? I caved. I pressed the button. I tracked my vanity metrics for the run.
Day Seven:
As I opened my phone and checked my sleep score from the night before, I got a new notification: "Your Weekly Performance Assessment has been calculated".
What is this? I asked myself as my thumb landed on the notification.
Oh, to my surprise, it was the major data points all wrapped up in a nice report, like a weekly report card, that showed me how I could improve as well as make inferences as to what I didn't that was hurting my daily productivity.
That is why I decided to join the WHOOP club!
What is even more exciting is that for the next 23 days, WHOOP will continue to build a baseline of metrics specific to myself.
If there is one thing that I have learned so far, the data I put in = the more WHOOP can help me live a long life.
Curious about joining the cool kids at the table wearing a WHOOP?
Discover More Gear

Did Patagonia Just Change The Wetsuit Game... Again?
Patagonia just dropped their new Yulex Regulator, a stretchier, softer (even though that's hard to believe), and more durable wetsuit line when compared to its predecessor, the OG Yulex.
Patagonia just dropped their new Yulex Regulator, a stretchier, softer (even though that's hard to believe), and more durable wetsuit line when compared to its predecessor, the OG Yulex.
The Regulator suits were designed with performance, simplicity, repairability, and recyclability as the focus. Wait a second... designed with repairability in mind, how so?
The Wetsuit Forge. If you don't know what that is, this video below tells the story:
There is no doubt that Patagonia is committed to sustainability and constantly making headlines for their innovations, so who is surprised by this set? Nobody, but that doesn't mean it should go unrecognized!
Patagonia's onsite wetsuit repair and design teams compared notes, removed seams from high-tension zones, and modified the most commonly repaired areas. Making the durability of the new Yulex Regulator line at the forefront of design.
Does this mean the suit is harder to get into now? No.
Does this mean you are saving the planet by purchasing this wetsuit? No.
Does this mean you can feel better about what you are wearing? Yes.
Does this mean you can recycle your wetsuit once you can longer repair it? Yes.
Long story short, don't run out and buy this suit if you have a wetsuit that is in good shape and keeps you warm. Wear that one out, then, do yourself a favor and start purchasing wetsuits, like the new Yulex Regulator, that put sustainability, repairability, and durability at the forefront of design.
Discover More Gear


Delicate Arch vs. Landscape Arch vs. Balanced Rock
Arches National Park in Utah is a wonderland of sandstone formations, and it's known for hosting some of the most iconic natural arches in the world. Among these captivating structures, three prominent arches stand out: Delicate Arch, Landscape Arch, and Balanced Rock.
Arches National Park in Utah is a wonderland of sandstone formations, and it's known for hosting some of the most iconic natural arches in the world. Among these captivating structures, three prominent arches stand out: Delicate Arch, Landscape Arch, and Balanced Rock.
Each of these formations has its unique character, charm, and hiking experience to offer. In this article, we'll explore what you can expect to see at each arch, the length and difficulty of the hikes, and the pros and cons of visiting each site. So, let's embark on a journey through the mesmerizing world of Arches National Park.
Delicate Arch under the Milky Way Galaxy in Moab, UT. Photo by Dalton Johnson
Landscape Arch: Nature's Masterpiece
What You Will See
Landscape Arch is a different kind of marvel. It is not as immediately eye-catching as Delicate Arch, but its sheer size and elegance make it a true wonder. This arch is the longest natural arch in North America, with a span of 306 feet. Its name is fitting, as it creates an awe-inspiring, natural landscape painting in the sky.
Hiking to Landscape Arch takes you along a relatively flat, easy trail that provides fantastic views of the surrounding landscape. The arch is framed by towering sandstone walls, and the trail offers a glimpse into the park's unique geology.
How Long Is the Landscape Arch Hike?
The hike to Landscape Arch is a leisurely 1.6-mile round trip along the Devil's Garden Trail. The trailhead is located at the Devil's Garden parking area, and it's relatively level for most of the way, making it suitable for all skill levels. It's an excellent choice for families and those looking for a less strenuous hiking experience.
Pros and Cons of Landscape Arch
Pros:
Unique Geological Experience: The trail to Landscape Arch allows visitors to explore and learn about the park's fascinating geological features.
Easy Hike: The relatively flat, well-maintained trail is accessible to a wide range of hikers, including families and those with limited mobility.
Iconic Arch: Landscape Arch's incredible size and delicate appearance are a sight to behold and photograph.
Cons:
Lack of Solitude: While it's not as crowded as Delicate Arch, Landscape Arch still attracts many visitors. To avoid the crowds, consider going early in the morning.
Less Dramatic Lighting: Unlike Delicate Arch, Landscape Arch does not provide the same kind of sunset or sunrise photography opportunities.
Fewer Facilities: The Devil's Garden parking area has limited amenities compared to the larger visitor centers in the park.
Delicate Arch: Nature's Elegance
What You Will See
Delicate Arch is perhaps the most famous and iconic natural arch in the entire park. Its graceful, freestanding design, surrounded by stunning red rock formations, is often featured in brochures, postcards, and films. This arch is renowned for its unique shape and the captivating view it provides as the sun sets behind it, casting an orange glow on the sandstone.
Hiking to Delicate Arch offers visitors a chance to witness the unparalleled beauty of Utah's red rock country. The arch frames the distant La Sal Mountains and creates a mesmerizing contrast between the sharp angles of the arch and the sweeping, open vistas.
How Long Is the Delicate Arch Hike?
The hike to Delicate Arch is not an easy stroll; it's a moderately strenuous 3.2-mile round trip. It's important to note that the park authorities classify it as a difficult hike due to the elevation gain and exposure to the elements. The trailhead is located at the Wolfe Ranch parking lot, where you can view the historical Wolfe cabin. As you hike, you'll ascend a steep, rocky terrain and traverse an open, slickrock bowl. The arch becomes visible as you approach the edge of a narrow sandstone ledge, and the payoff is well worth the effort.
Pros and Cons of Delicate Arch
Pros:
Iconic Beauty: Delicate Arch is one of the most famous natural arches in the world, and witnessing it in person is an unforgettable experience.
Spectacular Sunset Views: Sunset at Delicate Arch is a must-see. The arch frames the setting sun, creating a magical, fiery glow.
Photography Paradise: If you're a photographer, you'll love capturing the arch's beauty in various lighting conditions.
Challenging Hike: For those seeking adventure, the moderate difficulty level of the hike can be a pro, providing a sense of accomplishment.
Cons:
Crowds: Delicate Arch is incredibly popular, and it can get crowded, particularly during sunset. To avoid the crowds, consider going early in the morning.
Weather Concerns: The exposed terrain can be unforgiving in hot weather, so bring plenty of water and sun protection.
Limited Parking: The trailhead parking lot is small, and it fills up quickly, especially during peak season.
Balanced Rock: Nature's Marvel
What You Will See
Balanced Rock is one of the most recognizable features in Arches National Park due to its unusual and precarious-looking formation. It consists of a massive boulder perched on top of a slender pedestal, creating a captivating contrast between the rock's size and the support beneath it. The balance between these two elements is a testament to the forces of erosion that have shaped the park's landscape.
Visitors to Balanced Rock can take a short, easy loop trail that passes close to the formation, providing excellent photo opportunities. The surrounding area also showcases a variety of other interesting rock formations, showcasing the park's rich geology.
How Long Is the Balanced Rock Hike?
The hike to Balanced Rock is a brief and easy 0.3-mile loop. The trailhead is located near the formation, making it a convenient stop for visitors. The short distance and minimal elevation gain make this hike suitable for all ages and fitness levels.
Pros and Cons of Balanced Rock
Pros:
Iconic Formation: Balanced Rock is one of the most famous features in the park, and it's easily accessible for all visitors.
Photography Opportunities: The unique shape of the formation, coupled with the surrounding scenery, offers fantastic photo opportunities.
Family-Friendly: This hike is short and easy, making it a great option for families with children and those with limited time.
Cons:
Limited Hike: The short loop around Balanced Rock may not be as fulfilling for those seeking a more extensive hiking experience.
Limited Shade: The area around Balanced Rock can be scorching during the day, so bring sun protection.
Crowds: Due to its accessibility, Balanced Rock can attract a fair number of visitors, particularly during peak times.
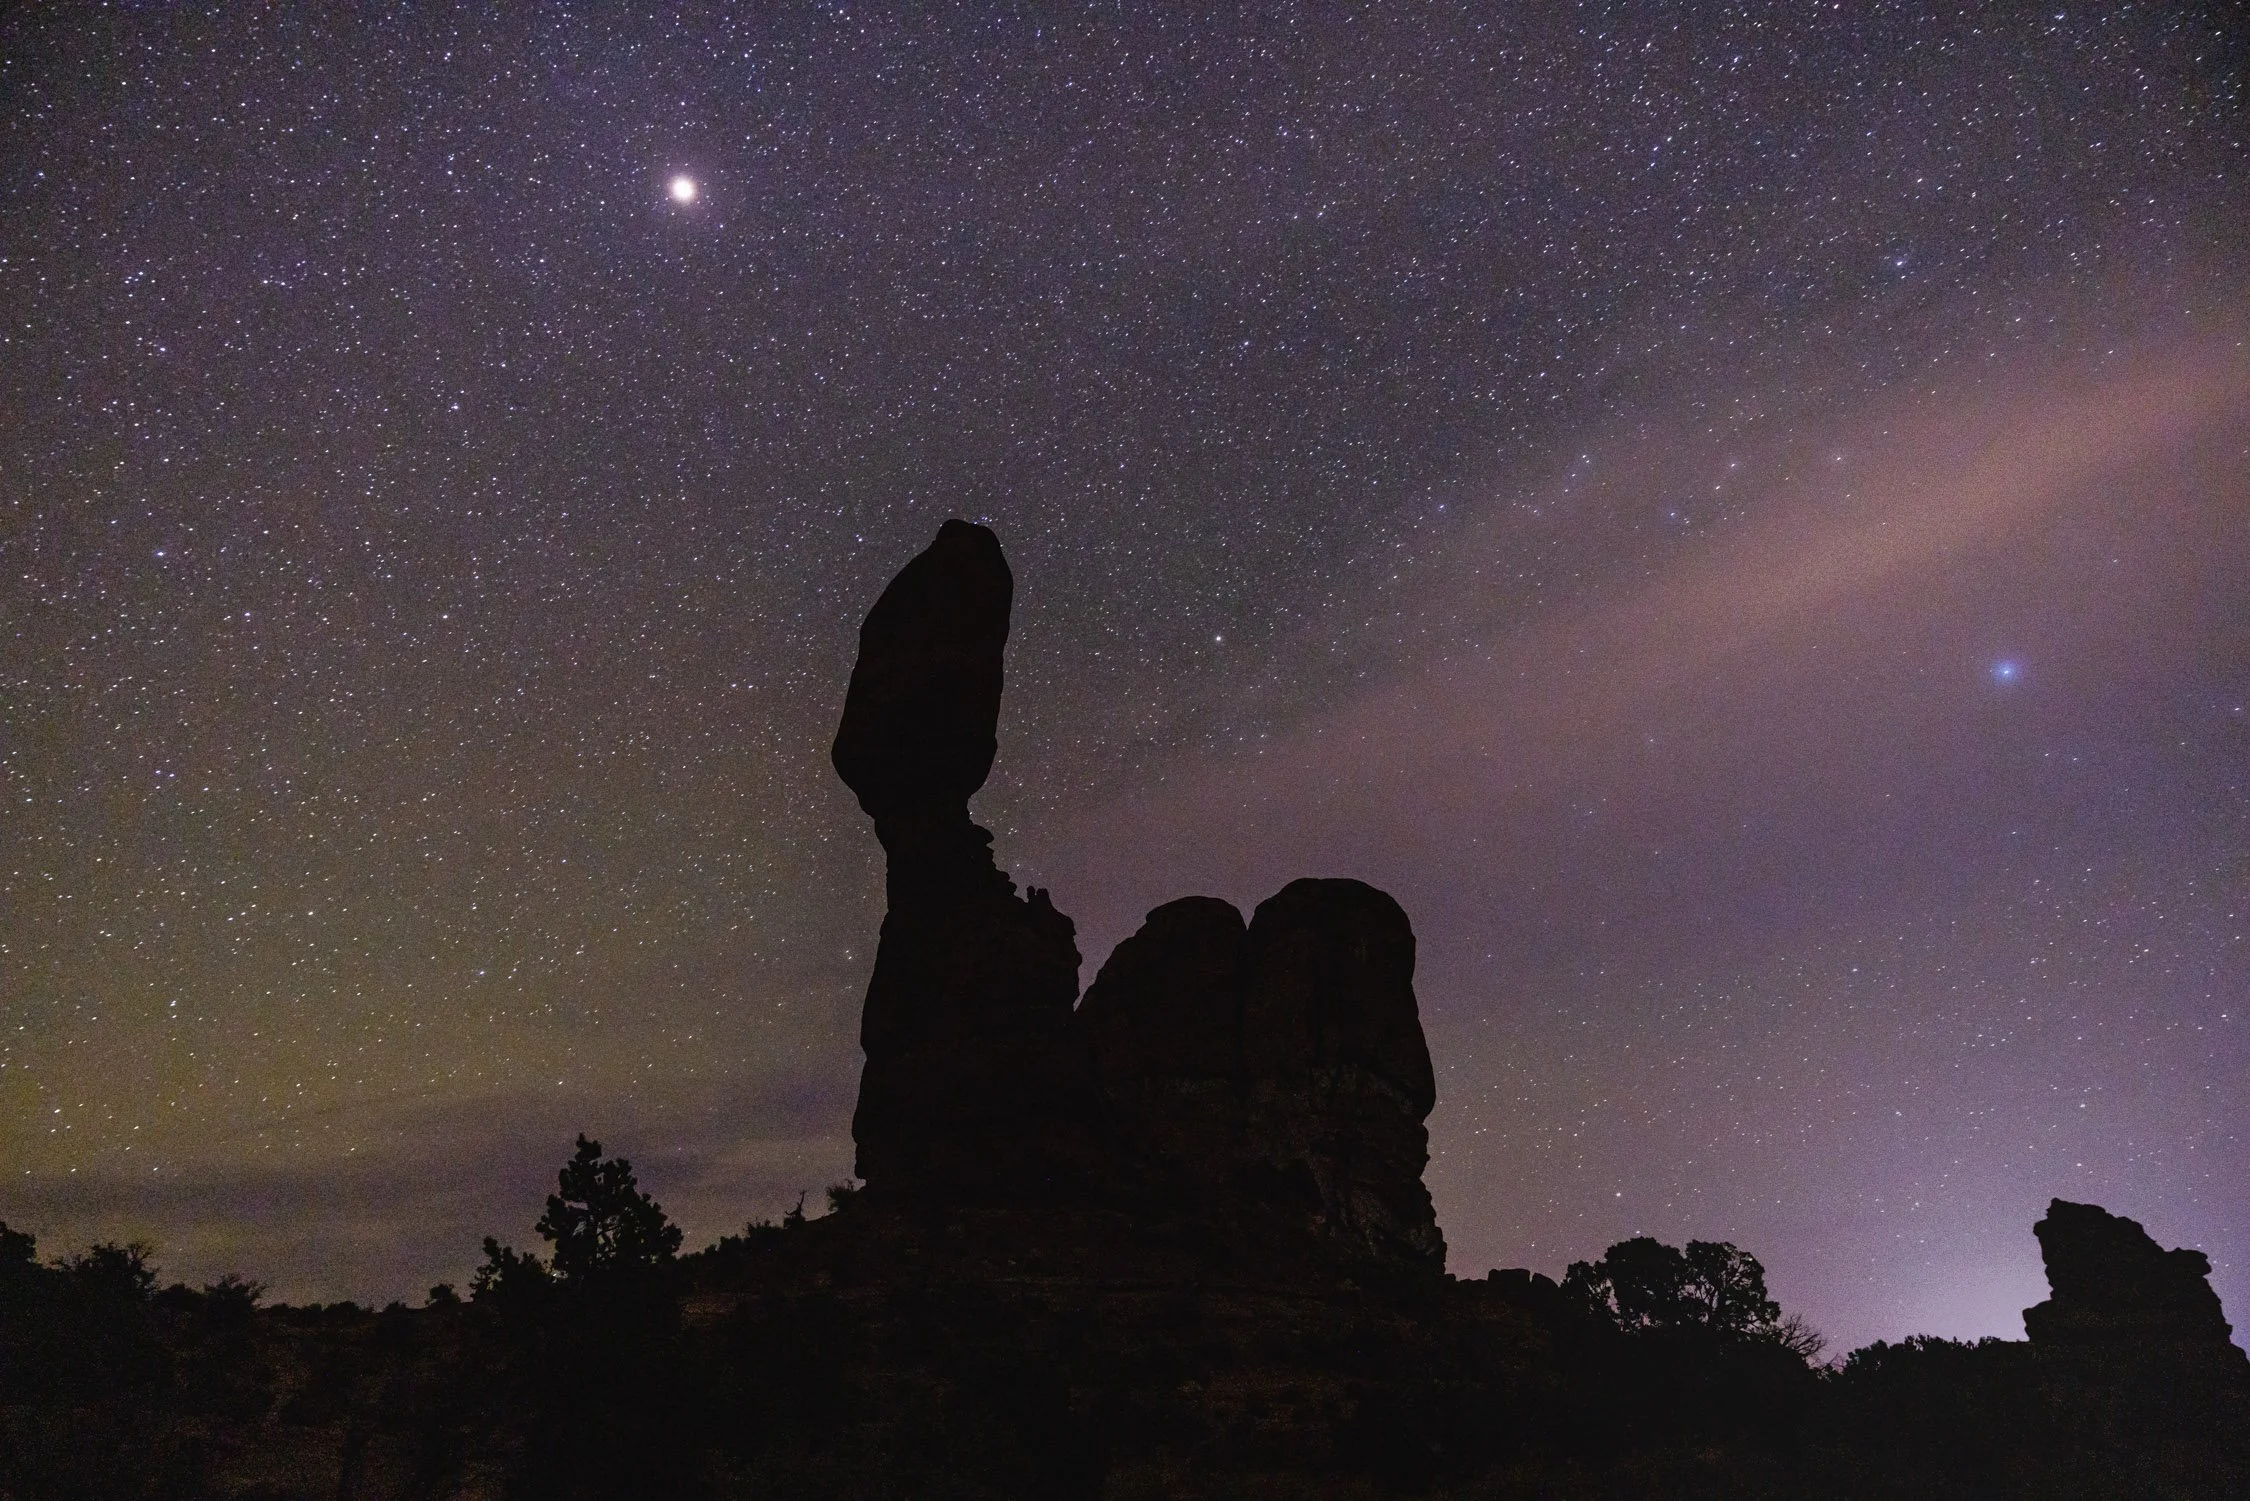
Balanced rock sitting precariously under the night sky. Photo by Dalton Johnson
Arches National Park is a treasure trove of awe-inspiring natural wonders, and each of these arches offers a unique and mesmerizing experience for visitors. Delicate Arch captivates with its iconic beauty and unforgettable sunset views, but the hike can be challenging. Landscape Arch provides an excellent opportunity to explore the park's geology on an easy trail, but it may lack the dramatic lighting and solitude some seek. Balanced Rock stands out as an easily accessible marvel, perfect for a quick visit and family-friendly adventure.
Ultimately, the choice of which arch to visit depends on your preferences, physical abilities, and the kind of experience you desire. No matter which arch you choose, Arches National Park promises to leave you in awe of the extraordinary beauty and geological wonders that Mother Nature has sculpted over millions of years.
Discover More Destinations

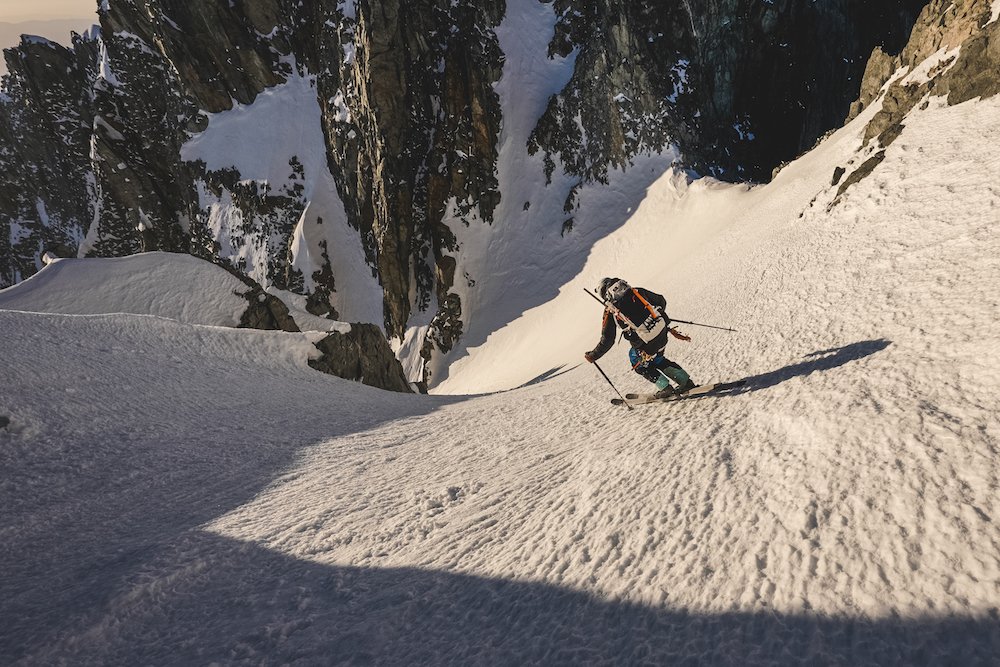
Cody Townsend Ticks Off Split Mountain 44 of 50
Cody Townsend is well on his way to finishing his mission to ski the fifty classic ski descents of North America. Ticking off number 44 of 50, Split Mountain was a line that took patience and perseverance. I don't want to ruin the story for you all, so go pop a bowl of popcorn and load Cody's latest video on Split Mountain. It's a good one!
Cody Townsend is well on his way to finishing his mission to ski the fifty classic ski descents of North America. Ticking off number 44 of 50, Split Mountain was a line that took patience and perseverance. I don't want to ruin the story for you all, so go pop a bowl of popcorn and load Cody's latest video on Split Mountain. It's a good one!
Q&A with Cody Townsend
Q: You had a quote in the film: "It's hard to tell the difference between my gut and nerves," could you elaborate on how to tell the difference?
A: I probably still don’t have a solid answer for that question. But ultimately, when you can distinguish between rational fear and irrational fear, that’s the beginning of being able to understand the difference between the intuition of something being off and the nerves that naturally build up when doing something scary. In that moment on Split, I realized I actually didn’t have much fear, nothing about looking down that couloir actually scared me once we got going. So when it became apparent that something inside me didn’t want to proceed, I asked myself over and over, “Why?” Ultimately coming to the conclusion that we didn’t have enough time for a series of complex rappels along with the margin of error being shrunken by the early sunset, the extreme cold and the hardpack conditions.
Q: Would you have shown up three times in one year for this line if it wasn't for the 50 project? Why/why not?
A: No. Well, unless I really really really wanted that line. But, that’s the good and bad of the FIFTY. I like that it pushes me to test my persistence, my patience and my will. Also, in the process of trying the line over and over, I learned a ton about the Sierra snowpack, weather patterns and knowledge of that area. At the same time, going back to the same place over and over and over for one line takes you away from other opportunities, goes against my philosophy of skiing what the mountains let you ski and drives ya a little crazy. So it’s a yin-yang sort of relationship with a specific objective.
Q: I've found people who spend a lot of time in the mountains reflect deeper than most, would you agree with this?
A: I think the mountains show you who you are. You have to be incredibly self-aware when challenging yourself in the mountains and the process of learning, exploring and surviving gives you insight into your true self like no other medium I’ve found. Plus, humans are meant to be in the wildness. Civilization is a relatively new phenomenon for humans. So, I think just being out there, among nature, listening to its lessons makes you feel natural, alive, a part of this world. It becomes philosophical the more time you’re out there.
Q: How do you process overcoming adversity in the mountains after a climb?
A: Everyone is different but I’m a pretty positive person. So, I take any time spent in the mountains as a blessing. Adversity is almost half the reason we go into the mountains, to challenge ourselves, to learn from the mountains and to overcome obstacles we may not have believed we could overcome.
Q: Do you think Split is safely ski-able without a 300% year?
A: [Split] will be safely skiable even on a snow year not as miraculous as 2023, but it will just require way more rope work, rappelling and time spent in the couloir. Unfortunately it’s a line that isn’t skiable very often anymore. But that just makes it sweeter when it does happen.
Discover more Adventures

Out & Back vs Loop Hikes
Hiking is a cherished activity that allows outdoor enthusiasts to connect with nature, breathe in the fresh air, and discover the beauty of the world. Whether you're a seasoned hiker or a novice looking to embark on your first adventure, understanding the different types of hikes can enhance your outdoor experience. Two common types of hikes are the "Out and Back" and the "Loop" hike, each offering a distinct set of advantages and experiences.
[embed]https://www.instagram.com/p/p:CylTvYgO4eG[/embed]
Hiking is a cherished activity that allows outdoor enthusiasts to connect with nature, breathe in the fresh air, and discover the beauty of the world. Whether you're a seasoned hiker or a novice looking to embark on your first adventure, understanding the different types of hikes can enhance your outdoor experience. Two common types of hikes are the "Out and Back" and the "Loop" hike, each offering a distinct set of advantages and experiences.
Hiking along the Big Sur coastline. Photo by Dalton Johnson
Out and Back Hikes
The "Out and Back" hike, also known as a "there and back" hike, is one of the simplest and most straightforward hiking formats. In this type of hike, you begin at a designated trailhead and travel along the path until you decide to turn around and return to your starting point. Here are some key features of Out and Back hikes:
Simplicity: Out and Back hikes are ideal for beginners and those who prefer a straightforward, no-fuss approach. Since you retrace your steps, navigation is often more straightforward, reducing the chances of getting lost.
Predictable Terrain: Knowing that you'll return on the same trail means you have a good understanding of the terrain. This allows you to plan and pace your hike more accurately.
Scenic Views: Out and Back hikes often lead you to the same stunning viewpoints on your return journey, offering a different perspective of the landscape you've just traversed.
Flexibility: You can customize the length of your hike by choosing how far you want to venture from the trailhead, making it suitable for hikers of all levels.
However, there are limitations to Out and Back hikes. The monotony of retracing your steps can become less engaging for some, and the predictability of the terrain might not provide the variety that loop hikes offer.
Loop Hikes
The "Loop" hike is a more intricate and diverse form of hiking. As the name suggests, in a Loop hike, you start and finish at the same trailhead, but you follow a circuitous route that doesn't require retracing your steps. Here are the characteristics that make Loop hikes appealing:
Variety: Loop hikes offer a rich diversity of scenery, as you traverse different terrains, ecosystems, and vistas. You won't see the same section of the trail twice.
Sense of Accomplishment: Completing a loop hike often feels more satisfying, as you've circumnavigated a specific area and returned to your starting point without repeating any segments of the trail.
Adventure: The element of uncertainty and exploration is more prominent in loop hikes, as you might not know exactly what's around each bend. This adds excitement and a spirit of adventure to the experience.
Efficiency: Loop hikes make efficient use of your time and energy since they don't require doubling back. This can be especially appealing when you have a limited amount of time for your hike.
However, Loop hikes also have their challenges, such as potentially more complex navigation and the need for good trail markers. Some hikers might find the unpredictability of the terrain and the possibility of getting lost a bit daunting.
What’s The Difference?
Both Out and Back and Loop hikes offer their own set of advantages and unique experiences. The choice between them depends on your preferences, hiking goals, and experience level. Out and Back hikes provide a simple, accessible, and predictable hiking experience, making them ideal for beginners and those looking for a relaxed outdoor adventure. On the other hand, Loop hikes offer a dynamic, diverse, and often more adventurous experience, making them a great choice for hikers seeking variety and a sense of accomplishment.
Hiking the out and back of Joffre Lakes in British Columbia. Photo by Dalton Johnson
Ultimately, the type of hike you choose should align with your personal preferences and what you hope to gain from your time in the great outdoors. Whichever you opt for, remember to take proper safety precautions, have the right gear, and, most importantly, cherish the beauty of nature as you explore the world one trail at a time.