
Kinda Sorta Headed Home: Salt Lake City to Great Basin National Park

Wheeler Peak, the highest point in Great Basin National Park, bathing in sunset shower of warm light. Photo by Dalton Johnson.
Few moments are more dear to me than spending time with Chestnut, especially in the early mornings. Today, we are heading out of Salt Lake City, UT and beginning the journey home. It’s been 11 days on the road so far and few thousand miles, so this hotel was a nice treat. Now, it’s time to pack ourselves back into the van and start bouncing down some secluded roads to our goal destination for the day: Great Basin National Park.

A not totally dry Chestnut acting as a weighted blanket, “cuddling” with me this morning. Photo by Dalton Johnson
I would say my intentions for this trip of posting a daily article was ambitious and maybe a bit stupid. Sure, everyday might have enough happen to warrant writing a few hundred words in a journal format, but, wow, I didn’t realize to make that happen I would need to grind away for a few hours each night to get the edit the images, write the article, proofread with tired eyes, and then hit publish.
Sustainable, I am unsure.
However, Craig Mod writes a daily newsletter and edits his images when he walks around Japan, so I figured I would be able to do the same thing, because I’ll have a van. Turns out, it’s a grind that I didn’t expect. But, hey, I kinda like the process.

Writing while driving, because the grind is real and well the view is… meh. Photo by Dalton Johnson
During our 4+ hour drive along barren desert roads that seemed to blend into the horizon, I was grateful for the van and 20-something gallons of water we carried. My mind couldn’t stop imagining what would happen if we broke down and got stranded out here. There was nothing. When I say nothing, I mean, at times we were 100 miles from a gas station and obviously no water to found anywhere.
That is not comforting for a person who loves to swim daily.


The good news, we didn’t break down and our water supply was topped off at the Great Basin National Park visitor center when we arrived. Can I be honest for a quick second? I heavily questioned the idea and decision to drive to this national park. It is out of the way and didn’t have much of an appeal on when I searched, “things to do in Great Basin National Park”. The list was short and uninteresting:
sight seeing
caves, but you need a reservation months in advance
camping, but you need a reservation months in advance
hiking
And that was pretty much it. Would that be worth a 200 mile detour? I didn’t think so, but Kristin is one of those people that wants to visit every national park, so we went with a dog. Dumb idea? Most would say dogs and national parks don’t mix, I would agree with them, but were are here now.

Proof I’m a bad dog dad by bribing Chestnut with a peanut butter filled Kong before leaving for a trail run. Photo by Dalton Johnson
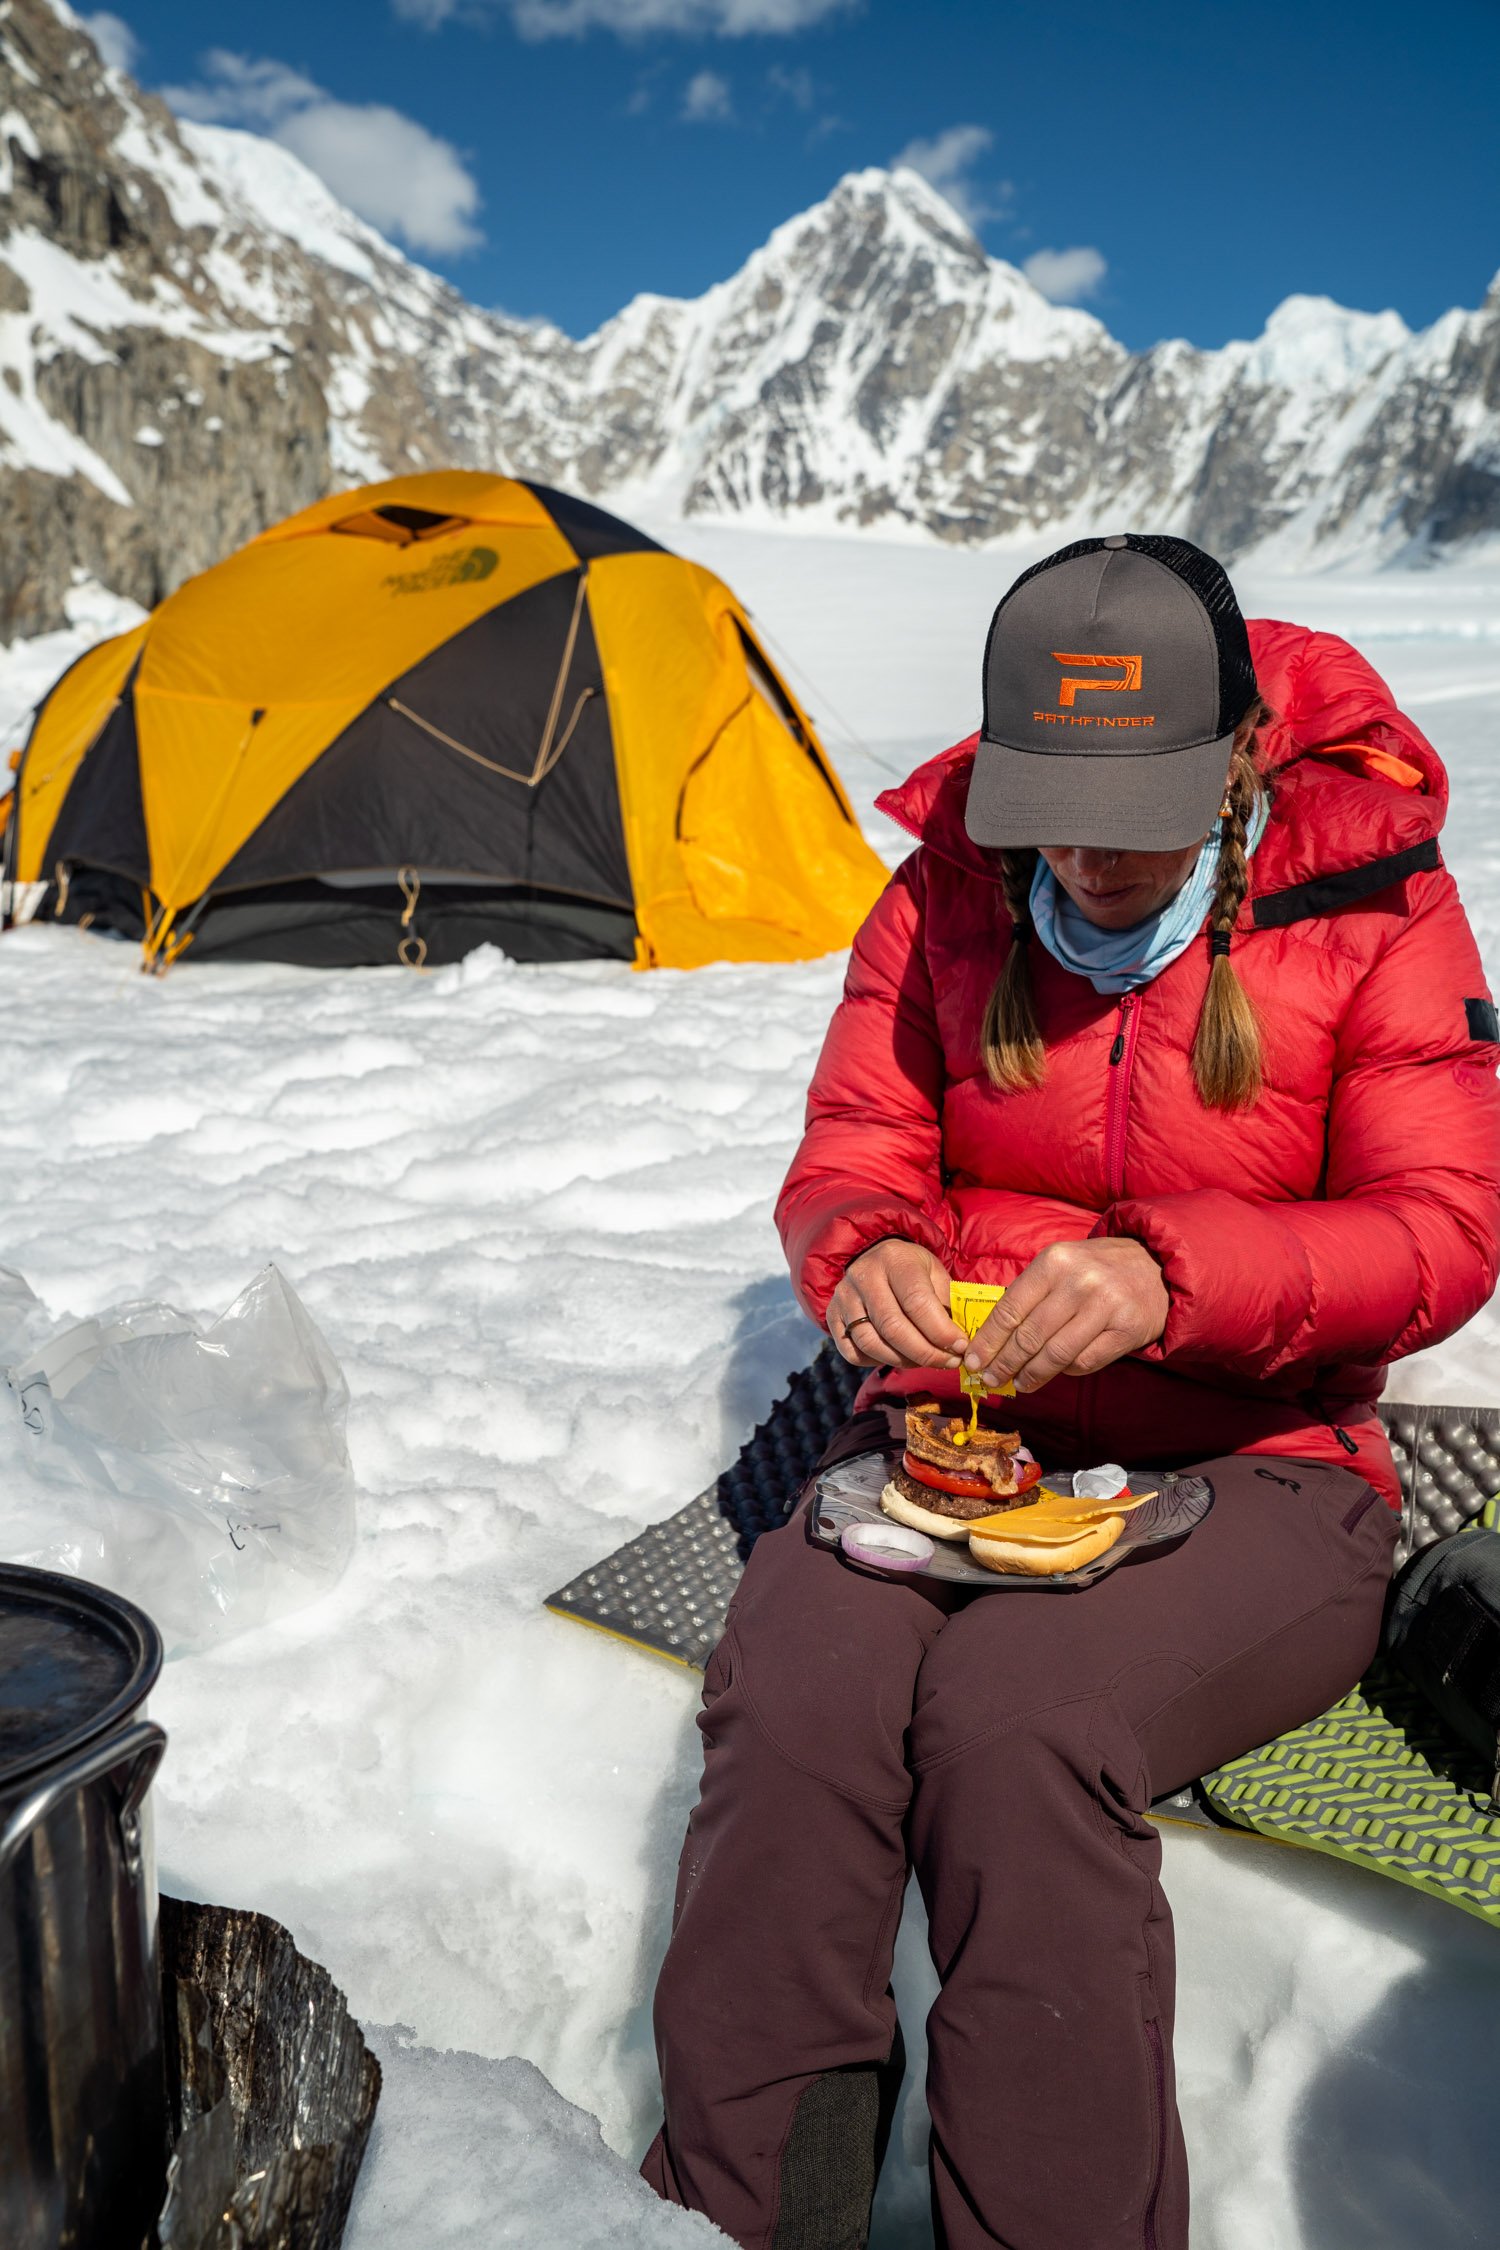
Worrying for Chestnut’s safety, as the outdoor temperature at the visitor center reads 93F, I know we can’t leave him in the van, yet we want to go walk around the park. Kristin and I go back and forth, but ultimately decide to drive the main road to Wheeler Peak, which is the tallest peak in Nevada (with some subjectivity), and see what we can see from the van.
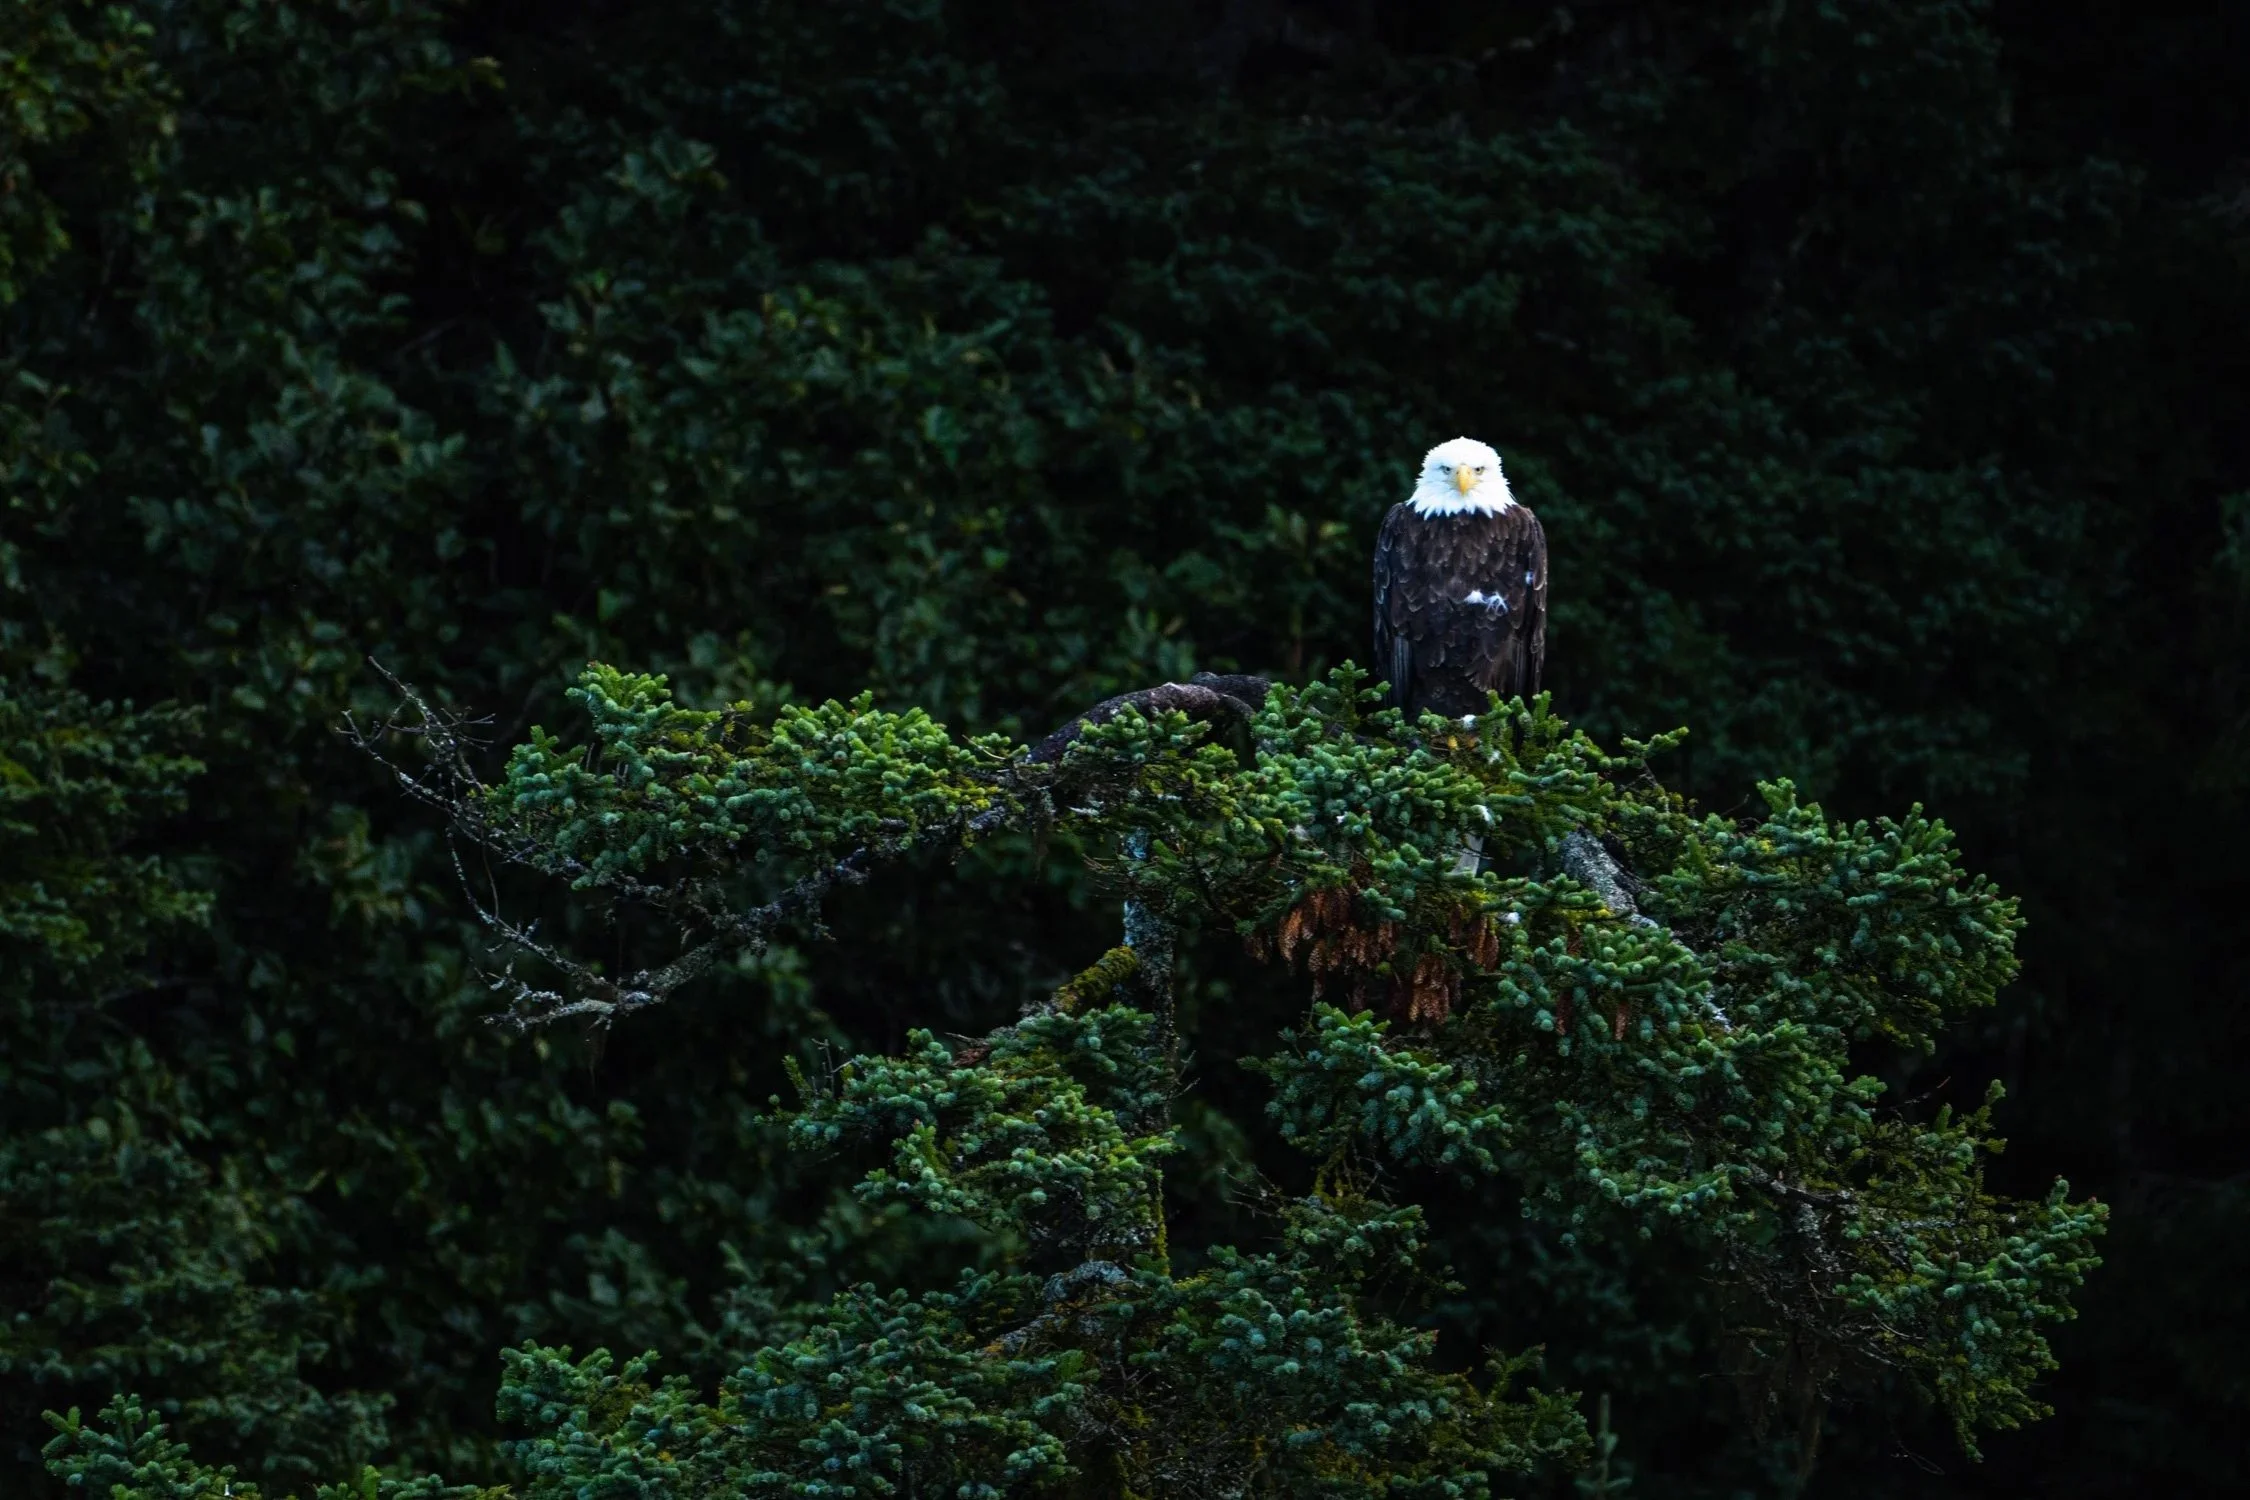
Chugging up the steep incline, the van is working hard in the heat. The road twists and turns up this stunning road with evergreen trees and there is a ton of wildlife. Birds, foxes, more birds, squirrels, chipmunks, and rabbits are all visible while driving the road. In the distance you can see the road we drove to get to Great Basin National Park cutting a straight line, as far as the eye can see, through the desert.
How does this place exist? I ask myself while navigating the bends of the mountain road.
Surely I would not have thought this place would exist in the middle of Nevada.
Looking down at the temperature gauge it reads 85F. We are halfway up the road, so my fingers are crossed the temps will continue dropping enough to leave Chestnut behind and go for a trail run. Also, the sun is about 2 hours from setting, so that should help.


Trail run

Wheeler Peak soaking up the moments of sun before the dark night arrives. Photo by Dalton Johnson
Soaking in the views.

Headed back to the heat well below 10,000 feet. Photo by Dalton Johnson
Unfortunately, we the campsite up here are full and there are no spots to park the van overnight, so we can’t sleep up here in the cool temps. Begrudgingly, we begin twisting our way back down the road to some BLM land nearby we can post up on for the night. Hopefully, it won’t be too hot!
Keep reading the journey:
coming tomorrow

Never Skip a Meal With Friends in the Dirt
Partially rehydrated bites of pad thai crunch between my teeth. If I was Alex Honnold, I’d use the the word, “mastication” but I’m just a simple outdoors guy who enjoys hanging with friends and eating food in the dirt. I mean, what more could you ask for than pretty view, some dirt under the nails, and a good night sleep under the stars?
Partially rehydrated bites of pad thai crunch between my teeth. If I was Alex Honnold, I’d use the the word, “mastication” but I’m just a simple outdoors guy who enjoys hanging with friends and eating food in the dirt. I mean, what more could you ask for than pretty view, some dirt under the nails, and a good night sleep under the stars?
Honestly, I could think of a few things, but let’s not get ahead of ourselves as your next meal with friends should be right around the corner. If you are anything like me, you’re probably asking yourself what you’re going to cook, so here are a few camping meals that I have enjoyed over the years.

Pre-surf breakfast burritos in San Juanico, Baja. Follow Dalton Johnson on Instagram for more stunning images & stories
The Perfect Breakfast Burrito
Now, there is no “right way” to make a breakfast burrito, but there surely is a wrong way. So, let me just establish some of those faux paws:
not heating up your tortilla
only having eggs and cheese in your burrito
a poorly wrapped torilla
forgetting the salsa
forgetting the avocado
the burrito not feeling heavy in your hand
cold eggs
While it doesn’t take a foody to know the difference between a good breakfast burrito and an average breakfast burrito, if you are camping, a breakfast burrito can fuel your full day adventure. As an avid remote surfer, especially when surfing in Baja, here’s how I think you make the best breakfast burrito:
STEP 1: skillet your veggies in oil; onions, bell peppers, jalapeños (if you like it spicey)
STEP 2: mix with eggs (add salsa to eggs for more flavor/fluff) into your veggies
STEP 3: add cheese
STEP 4: heat tortilla on separate pan until soft
STEP 5: add scramble to burritos and wrap
STEP 6: cook the full burrito on all sides until crispy
That final step makes the burrito next level.
Taking a break to fill the belly while bikepacking outside of Phoenix, AZ. Follow Dalton Johnson on Instagram for more stunning images & stories
The Classic Dehydrated Meal (hopefully spiced up a little)
Boring without a doubt, but there are a few tricks to make your dehydrated, or freeze dried food, better. Obviously, every meal has it’s own additions that are worth add, but here is a general rule of thumb:
hot sauce
condiments, ideally ones that come in packet form
veggies, pre-sliced if you are a hero
Also, dehydrated food has come a long ways in terms of flavor and options, so don’t just grab the tried and true lasagna. Here are few meals to try out that I have enjoyed recently:
Day one burgers on the glacier are the perfect way to send off on an expedition to climb Mount Denali. Follow Dalton Johnson on Instagram for more stunning images & stories
Burgers at Basecamp (don’t forget to bring the mustard)
While burgers may seem like the impossible food to bring on most camping trips, they really aren’t. You just need to eat them early in the trip or go to a really cold place, like a glacier. While filming a documentary on Denali (you can watch it for free on PBS, click here) we had burgers on day one. If you are car camping, just use a cooler and some ice to keep your meat cold. If you are backpacking… well, I wouldn’t suggest it.
Burgers don’t have to be complicated to taste really freak’n good, but here are some tricks to make your friends wanting more:
add some fajita spice to the meat
make your patties thick and char the outside for an added flavor
bring along cheese and not that Craft singles cheese, but real cheese
invest in good buns, this goes a long ways!
make sure to have some veggies like lettuce, onions, tomatoes

Katy cooking up some pasta during a vanlife meet up. Follow Dalton Johnson on Instagram for more stunning images & stories
The Ever Classic Pasta
Lame as it sounds, pasta is a classic. Sure, most people will think of pasta as a camping food that is easy to make and keeps forever, but doing pasta right will raise any and all spirits on the trail or at the campsite. Here are my tricks to making good pasta:
cook till al dente, then add the sauce to finish cooking
make a great sauce and add extra cheese
did I say cheese, yes, add more please
salt and pepper
try this before saying no… add mushrooms chopped up small. I started to do this and it levels up the pasta

You know they are a good friend when they offer you the last slice of pizza. Follow Dalton Johnson on Instagram for more stunning images & stories
Pizza Over The Fire
True friends will give you last slice a pizza. I don’t when this started, but I cook a backcountry pizza whenever I go backpacking with a stove. When I say “have a stove” I mean with a whisperlite stove and some pots. While these stoves are notorious for being scary to cook over your first time, they offer a lot of versatility for a cook in the backcountry. Cobbler, scrambles, pizza, calzones, pasta, cake, brownies, oat meal, you name it, it can most likely be cook with a whisperlite.
Pizza is hard to make, but it doesn’t have to be. In the backcountry use a whisperlite and at a campsite use your campfire. Here’s the easy button for pizza:
Trader Joe’s pizza mix
Cheese, lots of cheese
Red sauce
Pepperoni, mushrooms, bell peppers, whatever you want
The trick to cooking a great pizza is to almost finish the crust before adding any toppings. I know this sounds strange, but your fire or stove isn’t going to be hot enough, so cook and flip your crust like a pancake, then top it.
Here's Why You Need To Visit Sedona In December
Sedona is a destination that I've returned to time and time again as its stunning red rock formations, mystical vortexes, and a unique blend of outdoor adventures pull me back. Sometimes I live large in hotels and other visits to Sedona, AZ I sleep in the red dirt while camping in the expansive BLM land surrounding the town.
Sedona is a destination that I've returned to time and time again as its stunning red rock formations, mystical vortexes, and a unique blend of outdoor adventures pull me back. Sometimes I live large in hotels and other visits to Sedona, AZ I sleep in the red dirt while camping in the expansive BLM land surrounding the town.
However, I had never been to Sedona in December and that lingering feeling pulled at my curiosity string, so I packed my bags and headed for the land of red rocks. What did I find? Stunning beauty and maybe the best time to visit. Here’s why:
What You Will Learn From This Article:
The pros and cons of visiting Sedona in December
What there is to do in Sedona during the month of December
Hiking trails to explore during winter
A few sleeping recommendations (from camping to living large)
Answers to your FAQ about visiting Sedona in December, scroll to the bottom for these

Additional Information:
Please allow 5-10 days for printing and shipping.
I have the ability to print custom sizes and material (like wood, gatorboard, etc.). If this interests you, please reach out to dj@dalton-johnson.com for a free quote with the size and material you desire.
The Pros and Cons of Visiting Sedona in December:
Pros:
Mild Winter Weather: December in Sedona offers a mix of weather. While there might be occasional rain and snow, the majority of the days are showered with sunlight. The average temperature hovers around a comfortable 58 degrees Fahrenheit, making it an ideal escape for those seeking a reprieve from harsher winter conditions elsewhere.
Open for Exploration: Unlike some tourist destinations that wind down in the winter months, Sedona remains vibrant and accessible in December. Most tourist operators and activities are open in December.
The Iconic Winter Landscape: Witnessing Sedona's iconic red rocks wearing a blanket of snow is a magical sight. If you are a photographer, this is even more exciting! The winter landscape adds a layer of charm to the already awe-inspiring scenery, creating a unique and picturesque setting.
Cons:
Occasional Rain and Snow: While Sedona experiences mostly sunny days, occasional rain and snowfall can be expected in December. Visitors should be prepared for changing weather conditions and plan accordingly, especially if participating in outdoor activities.
Crowds During Peak Times: Despite being a quieter season compared to the bustling spring and fall months, December can still attract its fair share of visitors, particularly around the holidays. Popular attractions and accommodations may experience increased demand, so planning and reservations are advisable.
Limited Nightlife: Sedona is not known for its bustling nightlife, and December is no exception. While the daytime offers a plethora of activities, those seeking vibrant nightlife options may find the options limited.

Kristin embracing her inner convict as she watches over the landscape, pretending to be on look out while at the Robber’s Roost. Follow Dalton on your favorite social media platform.
Top Activities to Experience Sedona Like Never Before:
Without a doubt, Sedona is filled with adventure and that is why I continually return to this epic landscape. The best part of visiting in Sedona in December is that the crowds are smaller and the temperates are more manageable for full day outings. After several visits to Sedona, this trip during December was by far my most active. Below are a handful of the adventures Kristin and I embarked upon during this three-week long trip to Sedona:
1) Helicopter Tours with Guidance Air:
With all the the activities I have done in Sedona, by far one of the best has been soaring above the iconic red rocks with a helicopter tour provided by Guidance Air. This unique perspective opened my eyes into the vast network of sandstone walls and the fortitude the indigenous people had when living here. One of the cool things we saw along the flight were cliff dwellings from the indigenous people that seemed impossible to reach.
If you have the chance, and the funds, I highly suggest taking a flight with with Guidance Air. The pilot loved his job and was a great eye in the sky, pointing out cool things I would have never spotted on my own.
>>> You can watch the video of our experience from our sunset tour with Guidance Air here.
2) Off-Roading with Polaris Adventures at Red Rock ATV Rentals:
Hands down, this is the most fun I have ever had in Sedona!
For those seeking a more hands-on experience, renting a side-by-side from Polaris Adventures at Red Rock ATV Rentals offers an adrenaline-pumping adventure. Tearing up the trails and going way too fast was such a fun adventure for both Kristin and I while in Sedona. The days were sunny, so we didn’t have to battle weather conditions while off-roading.
Since both Kristin and I are beginners, having “perfect weather” was needed for us to feel safe alone on the trails. If you can and want to do something completely memorable, I highly suggest renting a side-by-side and exploring the trails of Sedona.
Here’s Where We Went in the Side-by-Side:
3) Endless Hiking Trails and Cave Seeking:
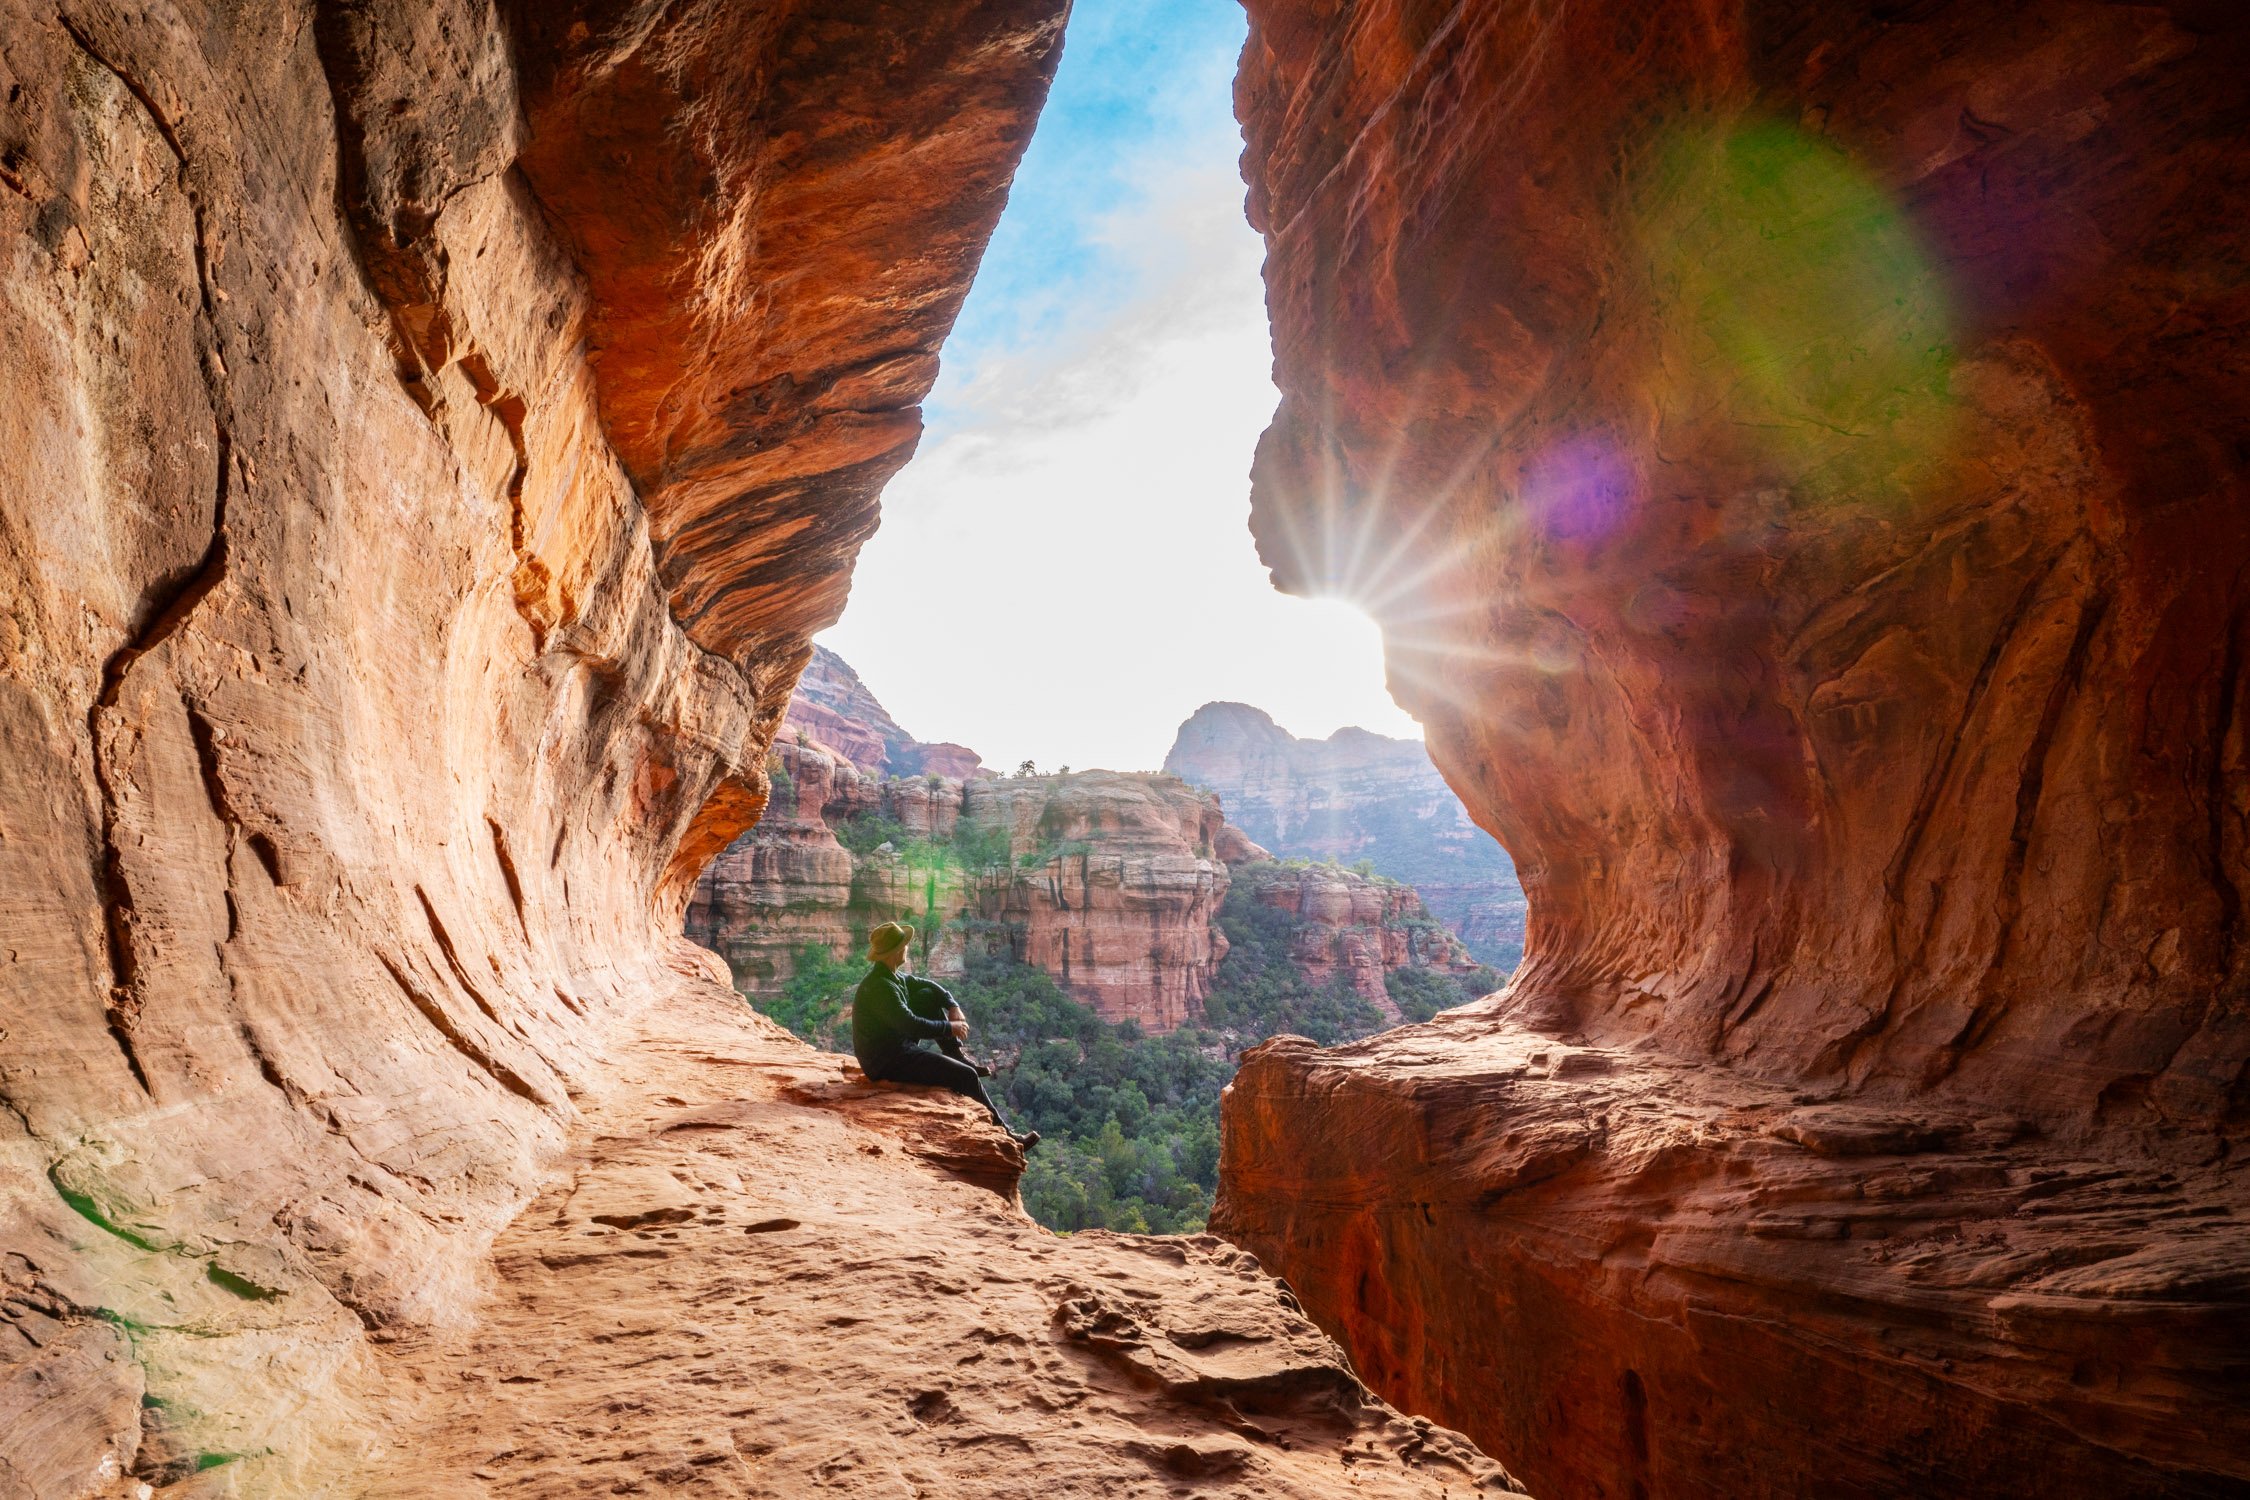
Even in the cooler months, Sedona’s hiking trails remain open and ready to welcome adventurers. The mild winter weather provides an ideal opportunity to explore the area’s stunning red rock formations and unique landscapes without the intense heat of summer. For those seeking truly memorable experiences, three standout hikes—Subway Cave, Robber’s Roost, and Seven Sacred Pools—offer a mix of geological marvels, breathtaking views, and tranquil escapes into Sedona’s natural beauty.
The Subway Cave is one of Sedona’s most iconic hiking destinations. Accessible via the Boynton Canyon Trail, this hike offers a moderate challenge and rewards explorers with a stunning natural cave shaped like a subway tunnel.
What to Expect: The hike spans approximately 6 miles round trip, weaving through dense forests and towering red rock cliffs. As you approach the cave, you’ll be greeted by panoramic views and the unique, tunnel-like formation that makes the Subway Cave a favorite among photographers.
Pro Tip: Arrive early to avoid crowds and catch the morning light streaming into the cave for spectacular photos.
Related Read: Sedona's Boynton Hike and Subway Cave Are Overrun By Influencers, Here's How to Avoid Them
For a more secluded and adventurous experience, head to Robber’s Roost, a hidden cave perched high above the valley floor. This trail is less trafficked, offering solitude and a sense of discovery.
What to Expect: The hike to Robber’s Roost is relatively short—about 1.5 miles round trip—but it involves a steep ascent, so sturdy footwear and some scrambling are required. Once at the top, you’ll be rewarded with a sweeping view of Sedona’s rugged landscape, framed perfectly by the cave’s circular opening.
Historical Note: The cave was once rumored to be a hideout for outlaws, adding a touch of mystery to your adventure.
The Seven Sacred Pools is a unique hike that combines easy access with stunning natural features. Located along the Soldier Pass Trail, this hike is perfect for those who want a shorter excursion without sacrificing beauty.
What to Expect: The trail is 2.4 miles round trip and leads you to a series of naturally carved rock pools filled with water, depending on recent rainfall. The pools are surrounded by towering cliffs and offer a tranquil spot to pause and take in Sedona’s serene atmosphere.
Wildlife Spotting: Keep an eye out for birds and other wildlife that frequent the area, particularly near the pools.
4) Crescent Moon State Park:
For a serene escape, head to the river at Crescent Moon State Park. The park offers a peaceful setting along the banks of Oak Creek, with picturesque views of Cathedral Rock. Whether for a leisurely stroll or a contemplative moment by the water, Crescent Moon State Park provides a tranquil retreat.
5) Rent a Mountain Bike from Thunder Mountain Bikes:
Mountain biking Sedona during the month December is hit or miss. You could be pedaling through a thick sticky mud or ripping down a trail without dust. There really isn’t a good way to time this other than watching the weather, but when you time the weather right, you’ll understand why Sedona is considered one of the world’s best mountain bike spots.
We didn’t travel with mountain bikes for this trip, so we rented from Thunder Mountain Bikes. They provide an excellent option for those looking to test out the trails for themselves. Renting a mountain bike from Thunder Mountain Bikes is quick and easy, just give them a call or walk into the store.

Dispersed camping for free in Sedona, AZ. Follow Dalton on your favorite social media platform.
Sleeping Options in Sedona:
L'Auberge de Sedona, nestled along the banks of Oak Creek, offers a luxurious retreat amidst the red rocks. With cozy accommodations and upscale amenities, this resort provides a serene escape for those looking to unwind after a day of exploration. Make sure to enjoy their Sunday Brunch!
The Wilde, a boutique hotel in the heart of Sedona, blends modern comfort with the town's distinct charm. Conveniently located, it provides easy access to Sedona's attractions while offering a stylish and cozy place to rest.
For those seeking a more adventurous and budget-friendly option, dispersed camping is permitted in certain areas around Sedona. This allows visitors to connect with nature on a deeper level, sleeping under the stars while surrounded by the enchanting red rock landscape.

Hard to complain about views like sunrise from our BLM camping spot. Follow Dalton on your favorite social media platform.
Experiencing Sedona in December is like stepping into a winter retreat where red rocks and mystical energy create an unforgettable backdrop. With mild weather, fewer crowds, and a variety of open attractions, it’s the perfect destination to escape the typical winter chill. Whether you're soaring above the majestic landscape on a helicopter tour, exploring rugged trails in an off-road vehicle, or immersing yourself in the town’s vibrant culture, Sedona offers a one-of-a-kind experience that blends adventure, relaxation, and natural beauty.
Pack your bags, prepare for awe-inspiring views, and let the magic of Sedona in December captivate you. From starlit evenings under the crisp desert sky to the warmth of Sedona’s welcoming community, your journey here will leave you with memories that last a lifetime. Let the red rocks inspire and enchant you this season.
About Dalton:

Dalton Johnson is a photographer, filmmaker, and writer.
Over the last 10 years, Dalton’s creative work has taken him to every continent, above the arctic circle, and below the antarctic circle.
His travels are documented in a free, weekly newsletter called UnBound, which is written for those daring to build their dream life.
FAQ — Visiting Sedona in December
Q: What is the weather like in Sedona during December?
A: December in Sedona, Arizona is cool but generally pleasant for exploring. Daytime highs tend to be in the mid-50s °F (around 55–58 °F / ~13–14 °C), while nighttime lows often dip into the low 30s °F (around 32 °F / ~0–2 °C).
Many days remain sunny or partly sunny, though occasional rain or light snow — just enough to dust the red rocks — is possible.
Q: Will snow make hiking or exploring difficult?
A: Snow in Sedona during December is usually light and infrequent. When it does snow, it rarely accumulates enough to seriously affect roads or trail access.
That said — because evenings and early mornings are cold — if you plan to hike at dawn or dusk, bring warm clothing and be aware that trails might be slick or icy when there has been precipitation.
Q: Are popular hikes and outdoor activities still available in December?
A: Yes — most hiking trails, scenic drives, and outdoor attractions remain open in December.
Because the weather is milder than summer, December can be a great time to hike or explore without the extreme heat.
Q: Is December a good time to avoid crowds and save on lodging or rentals?
A: December tends to be quieter than peak tourist seasons. As a result, parking lots fill up less quickly, restaurants and accommodations are easier to book, and prices — for lodging or car rentals — can be more favorable.
But keep in mind: the holiday season (around Christmas / New Year) can bring a bump in visitor numbers, so it’s still smart to book early if you plan to travel around then.
Q: What should I pack for a December visit to Sedona?
A: A layering system works best. Expect cool mornings and evenings (so warm jackets, hats, gloves may be needed), but comfortable mid-day temps — a mix of long sleeves, sweaters, and T-shirts will serve you well.
Also bring sturdy hiking shoes or boots (especially if snow or rain has made trails slick), possibly a light waterproof shell, sunglasses (the desert sun still shines), and maybe a scarf or buff for windy/red-rock dust exposure.
Q: Is swimming or water-based recreation realistic in December?
A: Not likely. December temperatures are too cool for comfortable swimming, and any water-based activities would probably feel chilly.
That said, winter brings its own charm — red rocks dusted with snow, crisp air, and often quieter rivers/creeks for peaceful views.
Q: What unique benefits does Sedona in December offer compared to summer or peak season?
A: Visiting in December offers a mix of milder, pleasant daytime weather (no scorching desert heat), fewer crowds — which means easier trail access, more available lodging, and less competition for parking or restaurant tables.
Plus, the possibility of a light dusting of snow on the red rocks adds a striking, distinctive aesthetic — offering a different vibe than typical desert-sun photos.

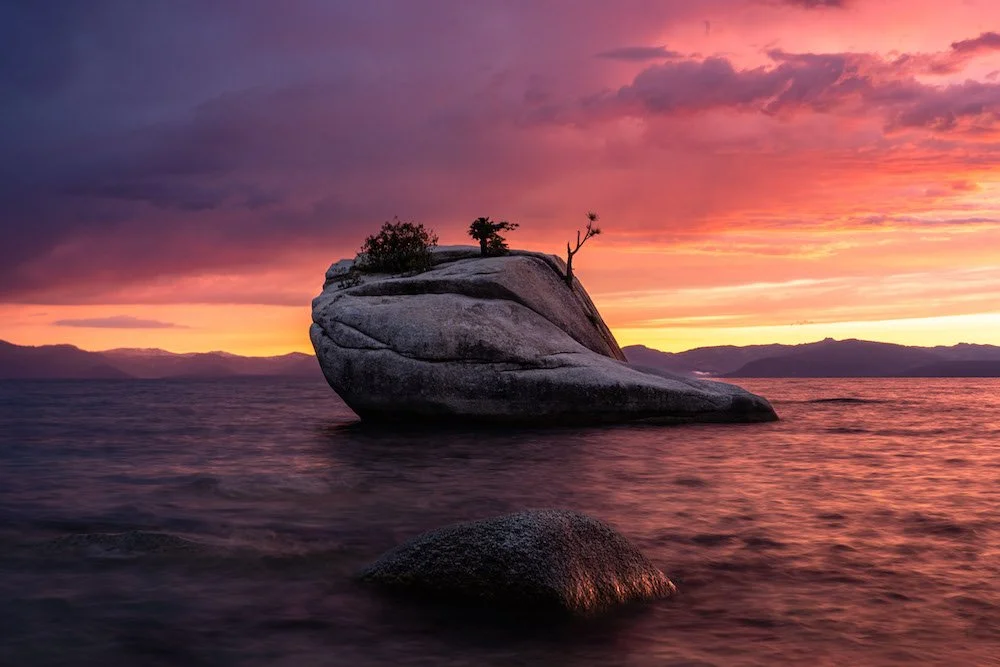
The Ultimate Visitors Guide To Lake Tahoe's Bonsai Rock
For the last decade, I have called Lake Tahoe my home and there are few spots that I return to several times throughout a year. However, Bonsai Rock, on the northeast shore of the lake, is one of those places.
For the last decade, I have called Lake Tahoe my home and there are few spots that I return to several times throughout a year. However, Bonsai Rock, on the northeast shore of the lake, is one of those places. From rock jumping to hanging with friends on a quiet beach (hard to find in Lake Tahoe) to kayaking to photography, Bonsai Rock is a must visit. At least, I take all of my friends and family here whenever they come to see me and here’s why.
What You’ll Learn In This Article:
How to get to Bonsai Rock
How to actually find parking at Bonsai Rock
Water activities for everyone at Bonsai Rock
Stargazing and astrophotography when visiting Bonsai Rock
Photography tips I’ve used to capture stunning images at Bonsai Rock
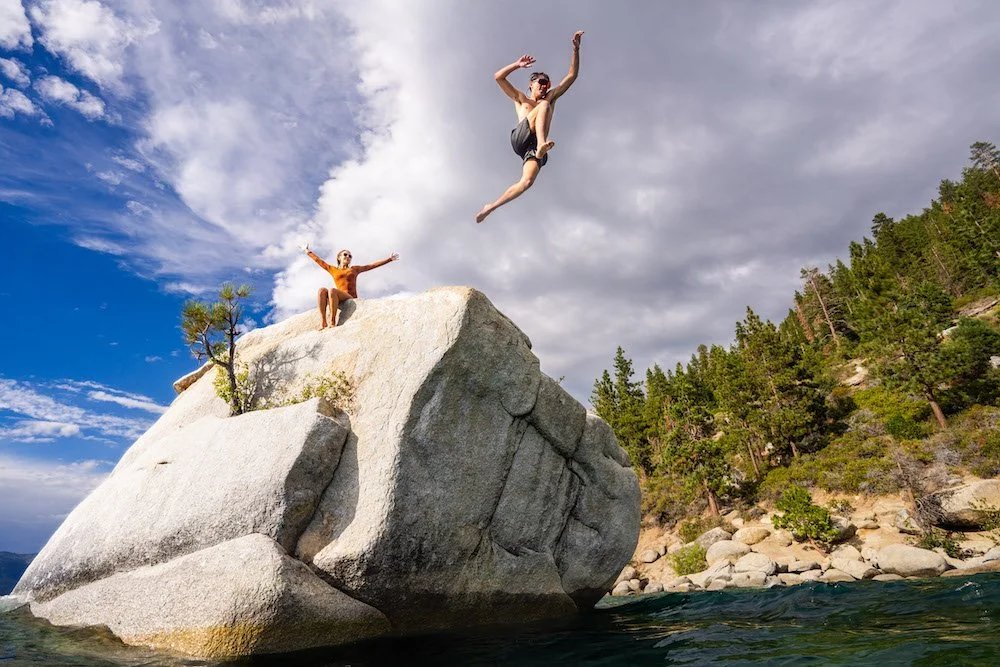
For those without a fear of heights, go ahead and leap into the chilly waters of Lake Tahoe. Follow Dalton Johnson on Instagram for more stunning images & stories
Pros of Visiting Bonsai Rock
Unique Photography Opportunities: The rock's picturesque setting and the bonsai trees atop the main rock make this spot a fantastic subject for photographers, especially during the golden hours of sunrise and sunset.
Sunset Views: Sunset at Bonsai Rock is particularly magical, offering breathtaking views and a serene atmosphere that's perfect for relaxation (as long as nobody is blasting music from a speaker).
Short Hike: Bonsai Rock is relatively easy to access, with a short hike if you can snag a parking spot in the pull out.
Cons of Visiting Bonsai Rock:
Crowds: Bonsai Rock can get crowded during the peak summer season and parking is limited, so get there early
Limited Parking: There are only two parking areas for Bonsai Rock, one is free and one is paid.
Seasonal Access: The accessibility of Bonsai Rock during the snowy season can be dangerous, I don’t recommend it.
Limited Amenities: There are no toilets, ADA ramps, or, well, any infrastructure. Please practice all LNT principles when visiting.
It’s all smiles for Kati after leaping off Bonsai Rock into the cold waters on a summer day in Lake Tahoe. Follow Dalton Johnson on Instagram for more stunning images & stories
How To Get To Bonsai Rock and Parking Options (hint, parking is the hardest part)
There is no easy way to say this, but getting to Bonsai Rock and parking for this area is a bit of a nightmare. While I wish I had local tips for you, the reality is you just have to show up early or get lucky. My personal preference is to stay late to watch sunset at Bonsai Rock, so I always opt for the free parking areas.
This Is How You Get to Bonsai Rock:
GPS Coordinates (the easiest way): If you're using GPS navigation, the coordinates for Bonsai Rock are [39.2167° N, 119.9122° W].
Also, here’s a Google Maps link for you: https://maps.app.goo.gl/5qgNxTgrTGSGFGUVA
From North Lake Tahoe: Drive to Sand Harbor State Park, located on the northeastern shore of Lake Tahoe. From there, continue driving south for another mile to a small pullout on the lake side of the highway. If there isn’t parking here, continue driving up the hill.
From South Lake Tahoe: Take US-50 east to Spooner Summit, then turn left onto NV-28 toward Incline Village. Follow NV-28 north along the lakeshore for about 8–10 miles. Just before Sand Harbor (if you see Sand Harbor you’ve gone too far), look for a small lakeside pullout — that’s the unofficial parking for Bonsai Rock. NOTE: you will have to do a U-turn to park, this can be dangerous, so please be careful.
You Only Have Two Parking Options:
There is no easy way to park for Bonsai Rock if it is crowded, so make sure you show up early as there are only two parking options.
Roadside Parking: Along Highway 28 (North Lake Boulevard), you will find limited roadside parking opportunities in a variety of pullouts. These are good for a handful of vehicles, but be aware of the cliff. This option is free, and can be challenging during busy times.
Sand Harbor State Park Parking: The most convenient and recommended option is to park at Sand Harbor State Park then rent a kayak and paddle to Bonsai Rock. This option is safest and best for families. The parking spaces are limited due to the popularity of the area, so show up early. Keep in mind that there are parking fees for this state park.
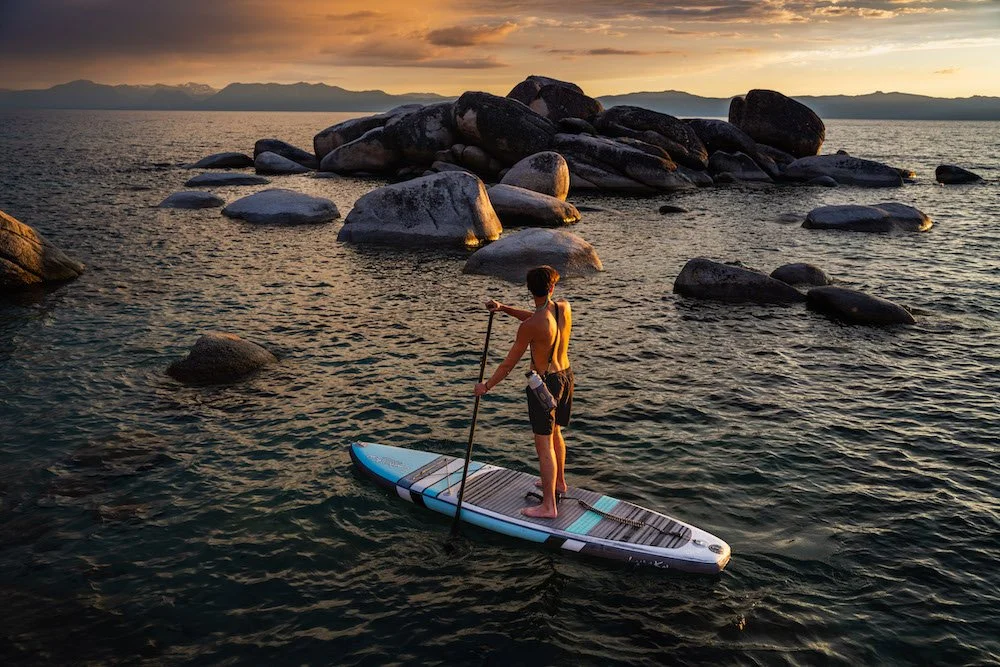
IMPORTANT: When parking at Sand Harbor State Park, please be aware that there is no way to walk from Sand Harbor to Bonsai Rock. If you try and get caught, you will get a ticket. Also, this is very dangerous. Access to Bonsai Rock from Sand Harbor is only by water, making it an ideal starting point for kayaking, paddleboarding, and SUPing adventures.
Make sure to stay until sunset, if you can, because Bonsai Rock at sunset is phenomenal! Follow Dalton Johnson on Instagram for more stunning images & stories
Bonsai Rock Has Something For Everyone, Here Are My Favorite Activities at Lake Tahoe’s Bonsai Rock
Main Activities At Bonsai Rock:
Water Activities; like kayaking, swimming, snorkeling, paddle-boarding
Picnicking; especially at sunset
Jumping off the Bonsai Rock; just be aware of the rocks under the water
Stargazing; if you get a roadside parking spot
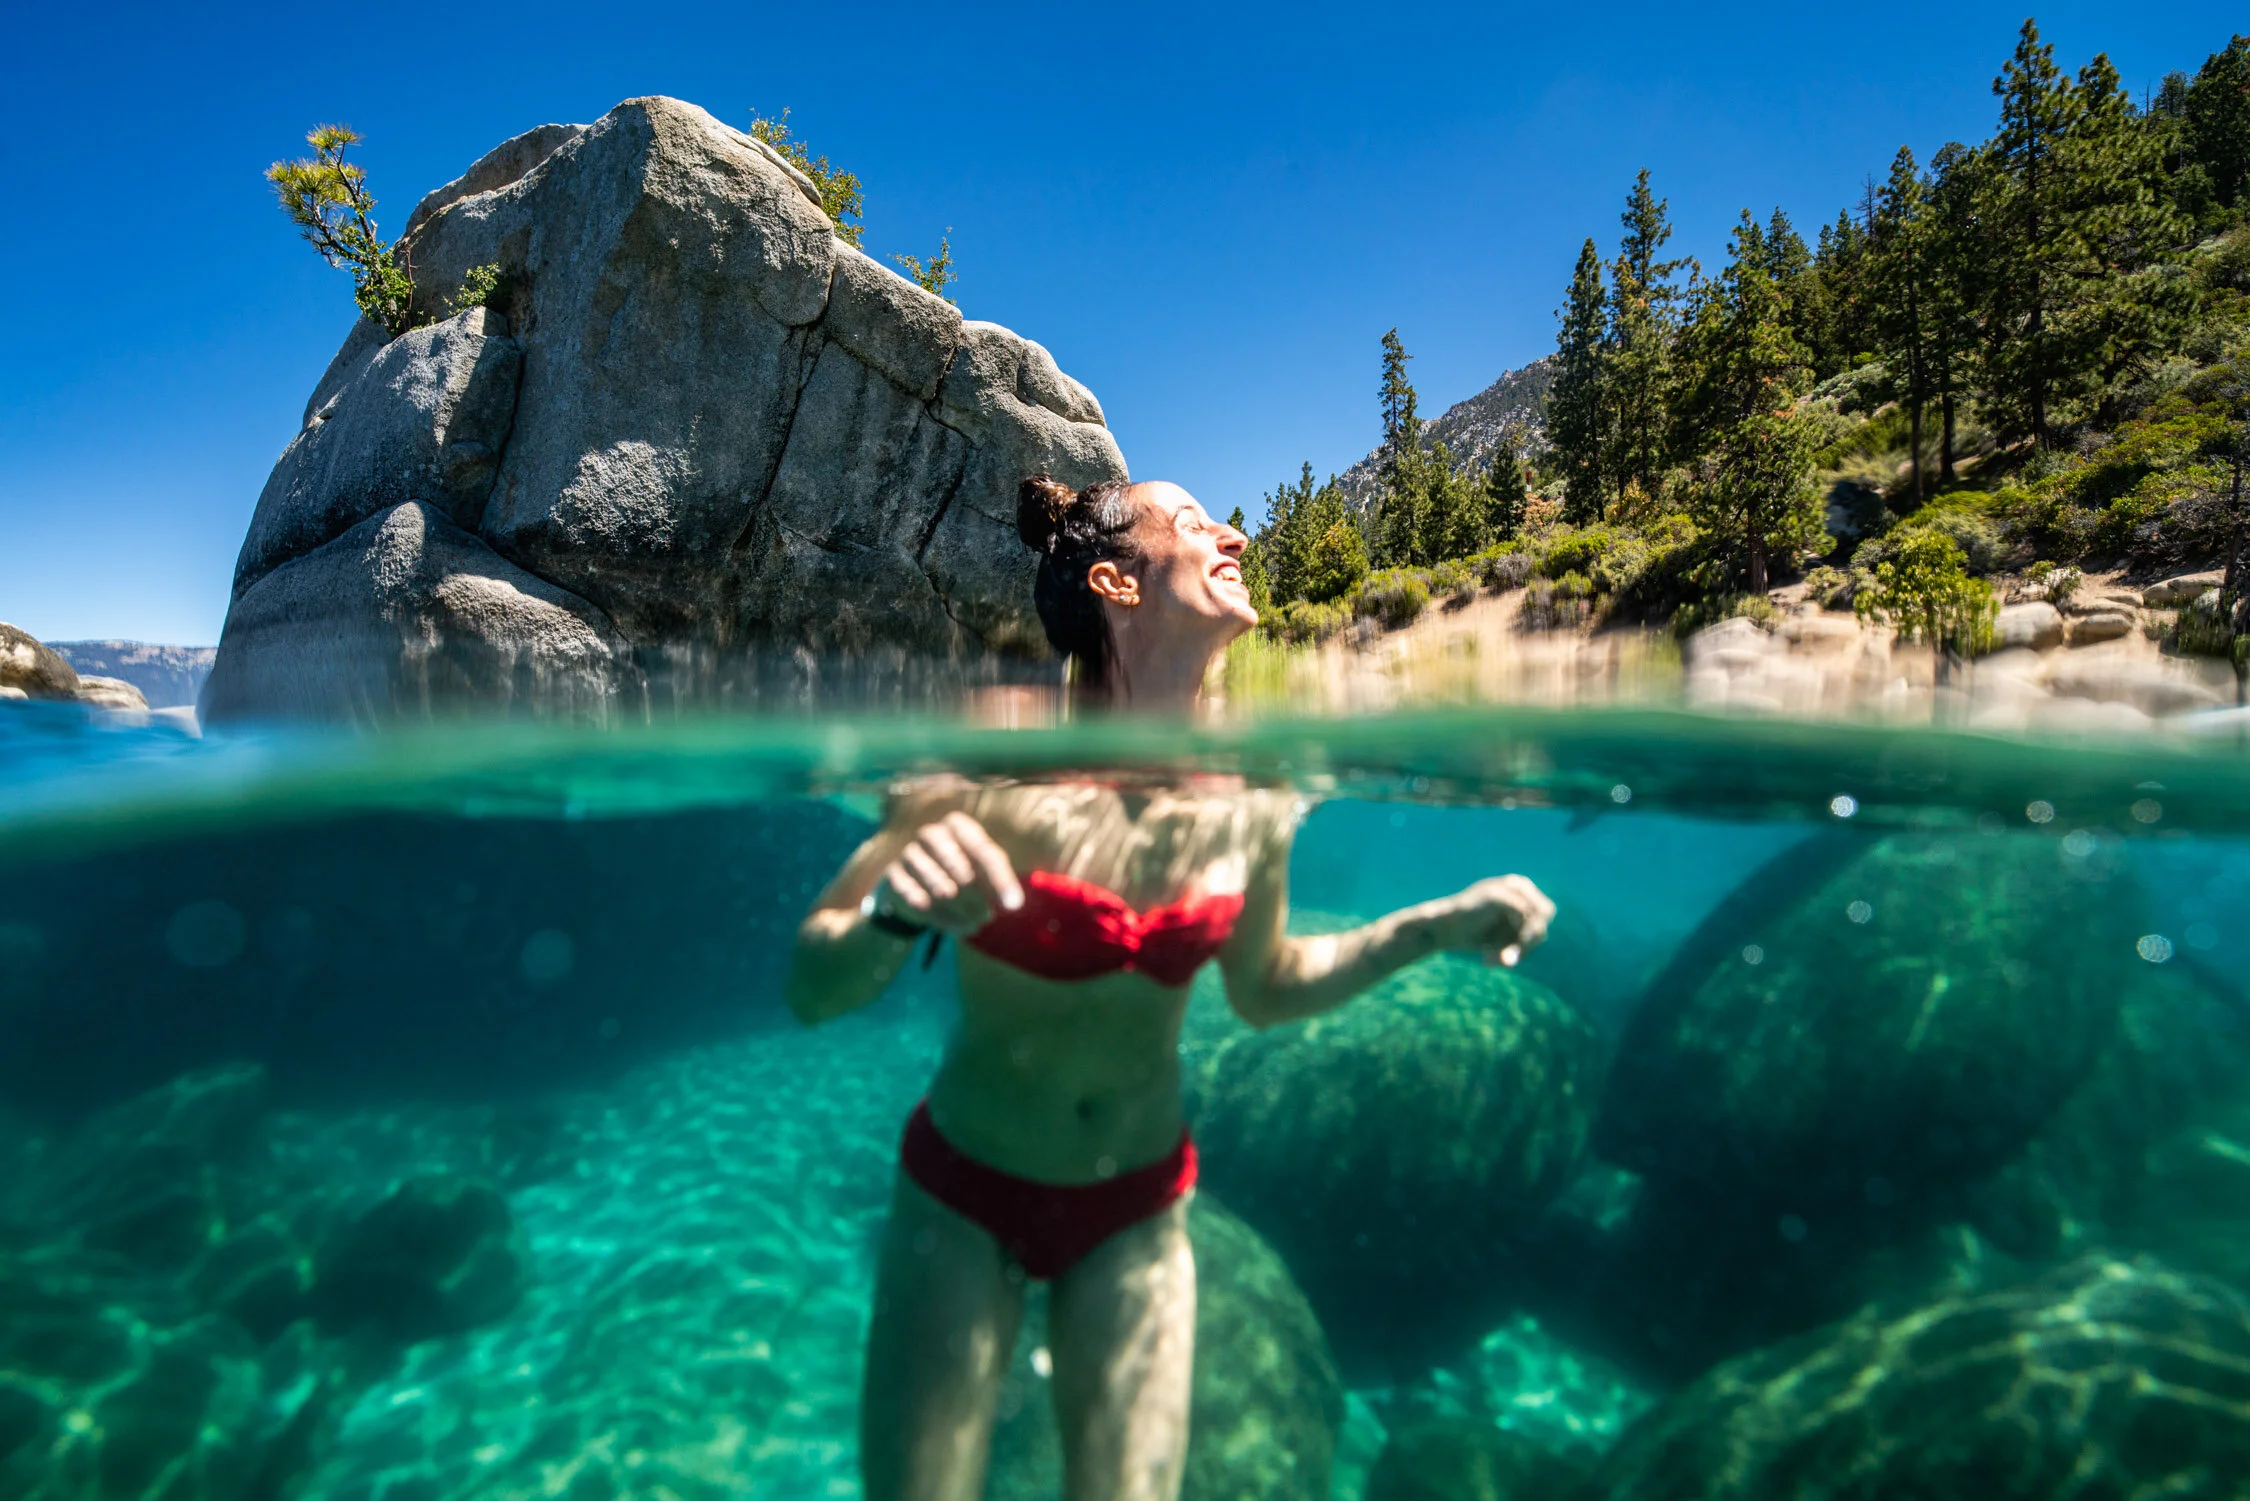
1) Kayaking, SUPing, and Swimming at Bonsai Rock
Bonsai Rock is not only a stunning spot to watch sunset, but a great access point for the lake. If you snagged one of the free parking spots, getting to the water can be challenging for those not accustomed to sandy trails or when you are carrying a kayak or SUP. If you are SUPing or kayaking, the best thing to do would be to park at Sand Harbor and paddle to Bonsai.
What I Pack When Kayaking At Bonsai Rock
Kayak: I personally own a few Oru Kayaks that make walking down to the water easy because they can fold up and be carried like a suitcase, this is the kind I own.
Sunscreen: I’m not sure why, but I really like the Dermatone sport sunscreen. I don’t seem to get sunburnt with it.
PFD: By law, you need a PFD to kayak or sup on Lake Tahoe. Please bring one with you. I’m a fan of the belt kind with a pull string to inflate.
Snacks: You can’t go wrong with a bag full of trail mix, right?!
Towel: I’m a sucker for a good turkish towel and have been using these one’s by Sand Cloud for a few years. They are still holding up.
2) Picnicking at Bonsai Rock
Don’t overcomplicate things when it comes to picnicking at Bonsai Rock in Lake Tahoe. Pack some food (I like burritos) and a few beverages, a large towel, a jacket, and enjoy. Sure, there might be a ton of ticks and tips, which I will put down below, but the jist of a good picnic at Bonsai Rock is to have the things you enjoy and a few good people.
Pack a Picnic: Prepare a picnic basket with your favorite snacks, sandwiches or burritos, and beverages. Don't forget essentials like a blanket, utensils, and napkins.
Scenic Spots: Look beyond the small sandy beach for your picnic by exploring the rocks around the area. If you can find them, there are a few rocks you can off of as well as a rope swing. But, for the most part, just lay down a blanket.
Stay for Sunset: Bonsai Rock for sunset is the best. Bring a romantic partner or your family. Regardless, if you have a good sunset, you’ll never forget this picnic.
Clean Up After Yourself: There are no trashcans, so semember to clean up after your picnic, disposing of trash properly, and following Leave No Trace principles to protect this pristine environment.
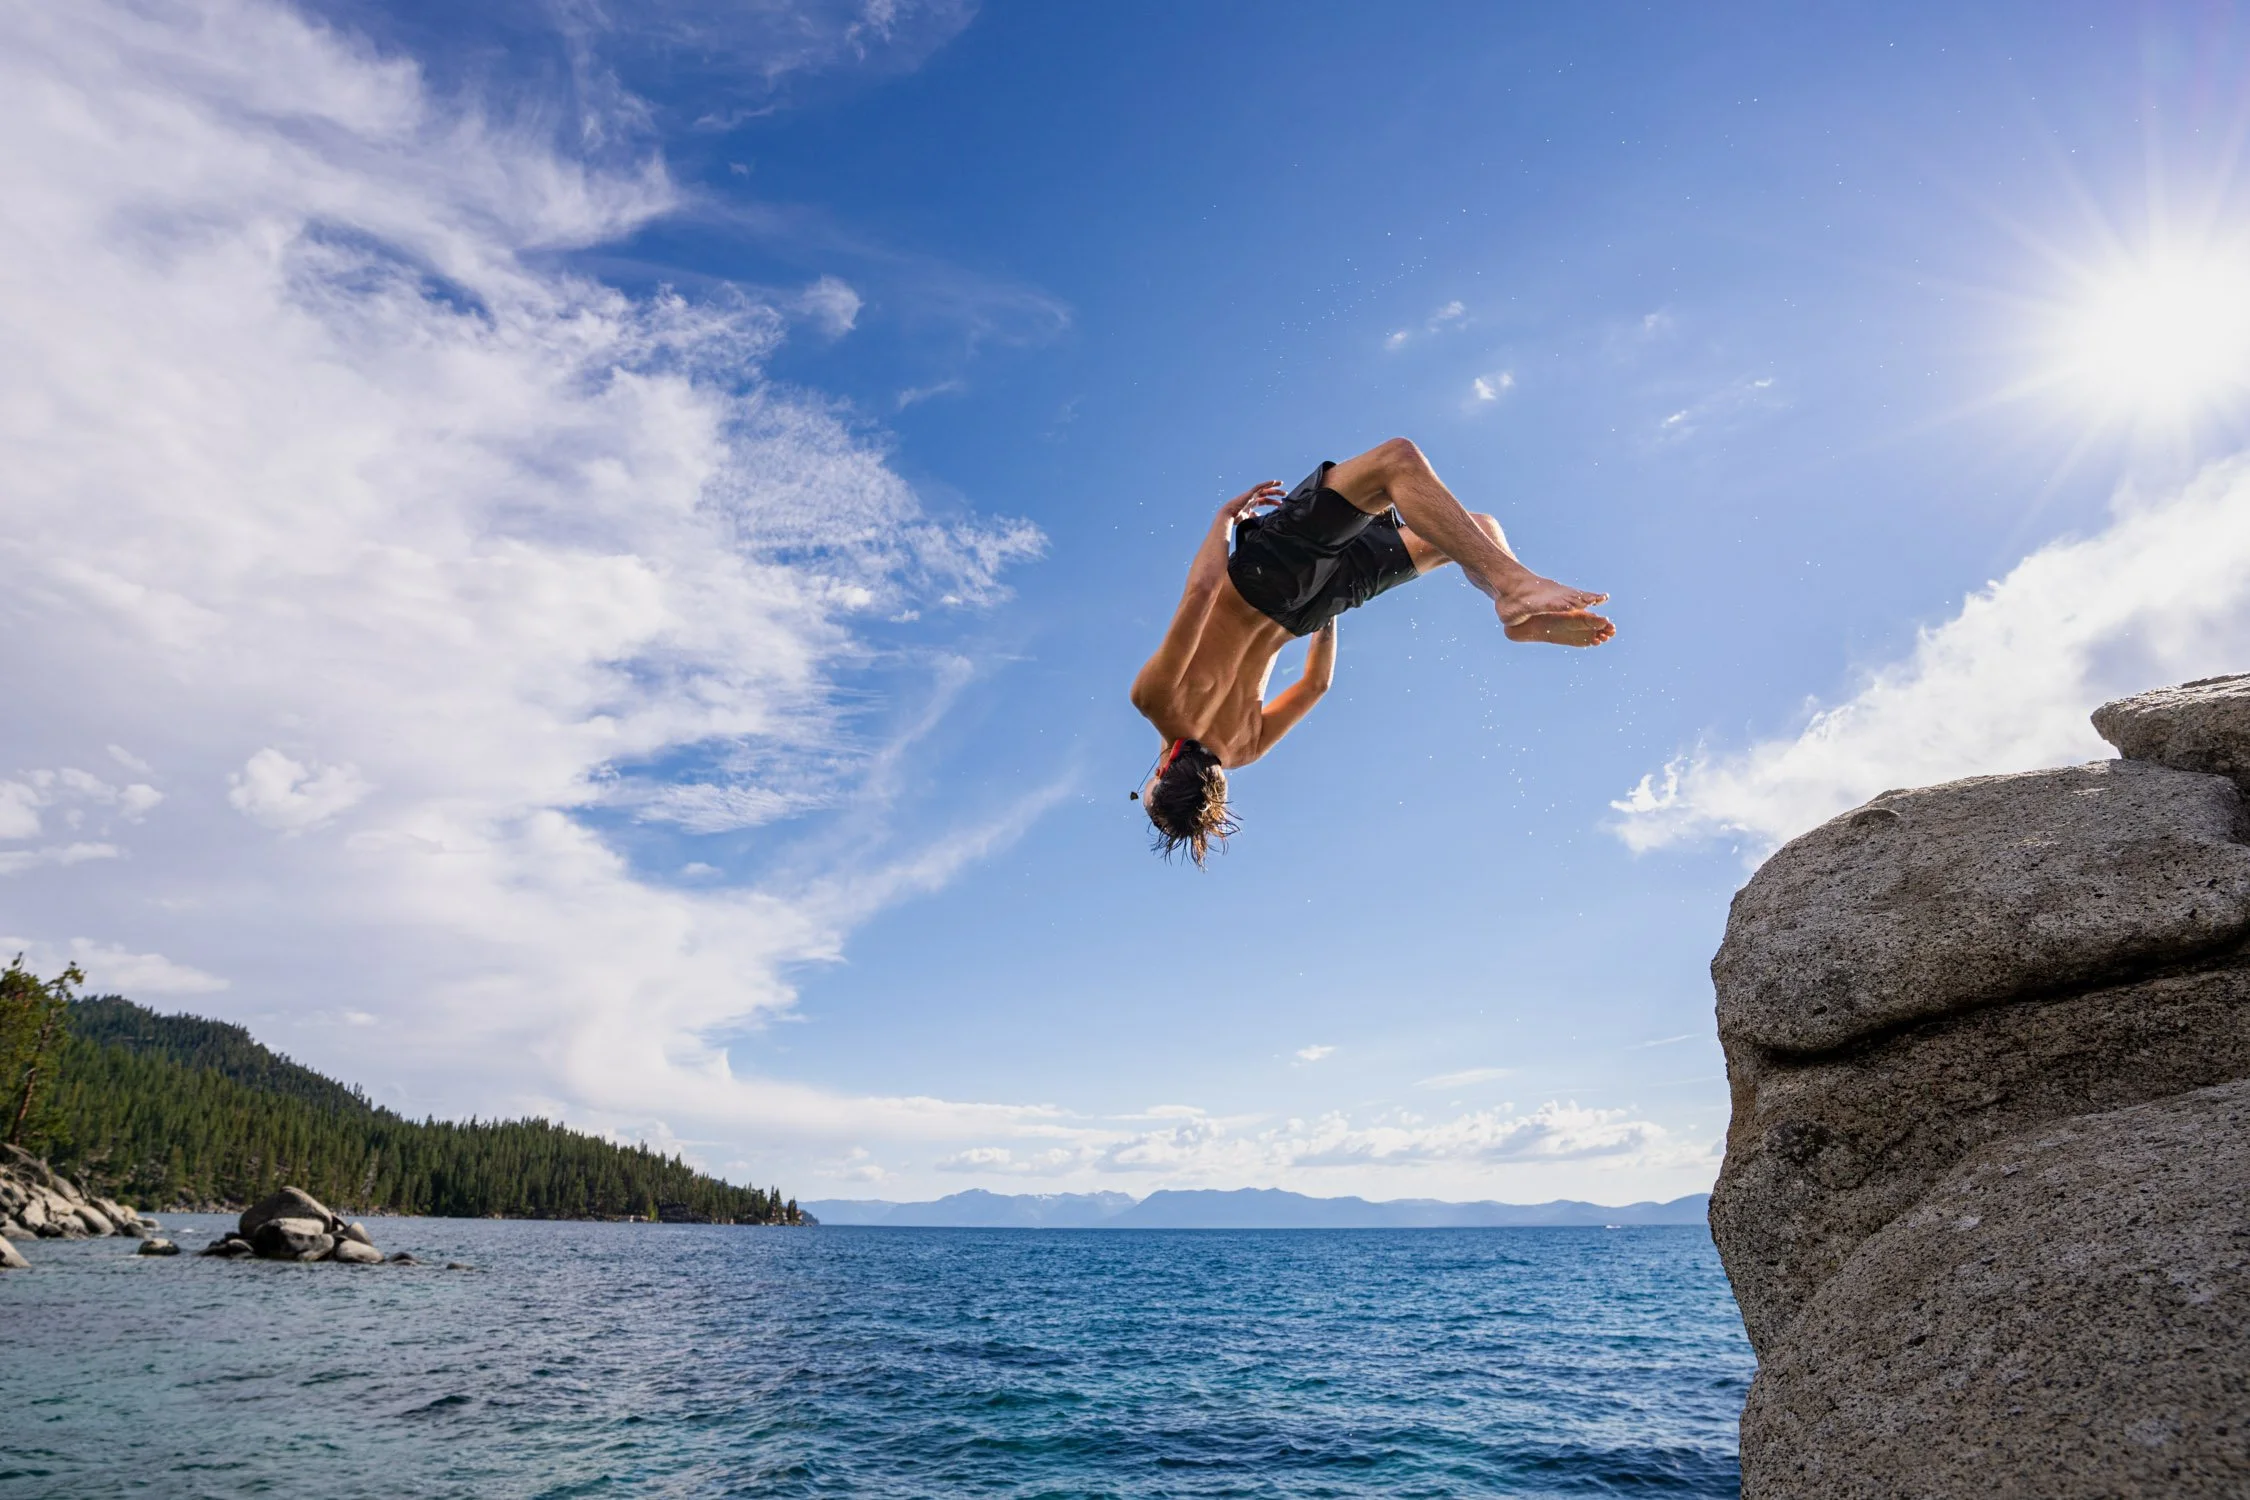
Riley making backflipping off Bonsai Rock look easy. Hint, this is not! Follow Dalton Johnson on Instagram for more stunning images & stories
3) Jumping off Bonsai Rock Into Lake Tahoe
For those not scared of heights, Bonsai Rock is a great spot for rock jumping. Sure you could call it cliff jumping, but it isn’t much of a cliff, so I say rock jumping. Roughly 8-12 feet above the clear waters of Lake Tahoe, you can leap off the rock and splash into the refreshing water below. I’ve done this jump in every season, yes that includes winter, and has been safe every time. Just know your limits
What You Need to Know to Safely Jump off Bonsai Rock:
Safety First: Prioritize safety by evaluating water conditions and potential risks before taking the plunge.
Water Depth: Assess the water depth to ensure a safe landing and watch out for underwater hazards.
Risk Awareness: Rock jumping carries inherent risks, so it's crucial to be cautious and make well-informed decisions. There are a few rocks that you could hit if you jump in the wrong place.
4) Stargazing & Astrophotography At Bonsai Rock
Before we dive into this, make sure you park at the roadside pull-out over Bonsai Rock, otherwise your car will be locked inside the State Park. You don’t want that!
I am a huge fan of stargazing and astrophotography at Bonsai Rock becuase this spot has some of the least amount of light pollution around the entire lake, so seeing the stars and Milky Way is “easy”. Easy is in quotes becuase if you know what you are looking for, it is easy. If you don’t, well you have to learn. I have written a guide for beginner stargazers, if that is you, consider reading it. For now, here are some tips for a successful stargazing adventure at Bonsai Rock:
Best Time To See Milky Way: Late July till early September is the best time to see the Milky Way in Lake Tahoe, so consider the timing of your visit
Bring Warm Layers: Watching the stars from Bonsai Rock can be very cold from wind and the lake chill. The lake can create a micro-climate that is colder than the predicted weather, this is my go to jacket whenever I know it is going to be cold.
Bring a Camera and Tripod: If you are going to watch the stars, consider bringing a camera and tripod to create astrophotography as well. The milky way often aligns perfectly with Bonsai Rock, which is really cool to see and has created one of my favorite images.
Lake Tahoe Prints For Sale


Tips For Photographer’s Visiting Bonsai Rock For The First Time
I’m a photographer by trade and Bonsai Rock has been the center piece of many photoshoots for me. Both fine art prints and lifestyle photo shoots for brands have brought me back here time and time again. Because of this, I can honestly say I might be the photographer who has spent the most amount of time photographing this rock and its surrounding area. So, here are a few things I have learned over the years photographing Bonsai Rock
My Best Tips For Photographing Bonsai Rock:
Golden Hour Magic: The soft, warm light during sunset enhances the textures and colors of the rock and bonsai tree. In other words, the best time to come photograph this spot is sunset. There is no need to do anything fancy, just bring your camera, a tripod, and maybe a filter. That will be more than enough to capture a stunning image of Bonsai Rock.
Sunrise Sucks, Skip It: There is no easy way to say this, Bonsai Rock at sunrise is cloaked in a shadow and is very cold. I don’t suggest you come for that. However, blue hour at Bonsai Rock can be stunning, especially with a long exposure.
Use a Slow Shutter Speed: If you are trying to capture a fine art print of Bonsai Rock, use a slow shutter speed to make the water look like silk. To do this, you will need a tripod and a shutter speed of roughly 3 to 10 seconds. Longer than that, you will need a neutral density filter.
Lifestyle or Fine Art or Instagram: I often joke this spot has been overrun by influencers taking selfies, but that is far from the truth. Most likely you will find other photographers with a tripod and bulky camera sitting at the water’s edge snapping sunset images. So, when you come get creative. Try having a human subject or create a fine art piece or attempt to capture that banger image for Instagram.
I highly recommend staying for sunset at Bonsai Rock, Lake Tahoe. Follow Dalton Johnson on Instagram for more stunning images & stories
Visiting Lake Tahoe’s Bonsai Rock should be on everyone’s list because this spot combines adventure, natural beauty, and creative inspiration (especially if you have a camera). So, don’t miss out on this wild spot that has boulders you can clearly see in the water. Rent, or pack, a kayak and gliding across the lake, attempt to capture print worthy images at sunset through your camera lens, or pack a picnic with your loved ones. Regardless of how you enjoy Bonsai Rock, visiting this spot will surely leave a good impression of Lake Tahoe on you. Or, at least it has for me.
If this article has helped you plan your trip, or inspired you, please consider sharing it. If you have any questions about Bonsai Rock, feel free to shoot me an email: dalton@dalton-johnson.com
About Dalton Johnson:
Over the last 10 years, Dalton’s creative work has taken him to every continent, above the arctic circle, and below the antarctic circle.
His travels are documented in a free, weekly newsletter called UnBound, which is written for adventure-minded, photography-loving humans who want to read great stories every Wednesday.
Here Are More Lake Tahoe Adventures To Consider

I Should Be On Everest Right Now, But I’m In Las Vegas
I am supposed to be on Everest, right now, the broken record in my head repeats. Why am I standing on top of my van watching the sunrise from Las Vegas?
I am supposed to be on Everest, right now, the broken record in my head repeats. Why am I standing on top of my van watching the sunrise from Las Vegas?

Waiting for the rising sun to come with its much needed blanket of warmth. Connect with Dalton on your favorite social media: @storiesbydalton
Have you ever end up somewhere and you just don’t understand how you got there? The confusion hits hard, you want to make the best of your focus, and yet all you can do is dream of being somewhere else. Well, this was one of those times for me.
It was April 2023 and I was supposed to be on Everest, filming a documentary about a blind veteran climbing the tallest peak in the world, not for himself, not to see what the view is like (I hope the oxymoron gives you a chuckle), but to challenge the status quo around blindness and give other wounded solders a role model to say, “yes, I can do thing I thought impossible.”
His name: Lonnie Bedwell
We met on Denali about a year before, while I was filming the award-winning short documentary Climbing For Furley, and as time passed he reached out with a last minute invitation to come film the trip and hopefully make a documentary if the trip is a success.
In many ways, this was a dream assignment of dream assignments. Lonnie’s story is great, the setting couldn’t be more stunning, and I have a personal goal of creating something on all seven summits.
However, with the last minute nature of the trip, bringing me on board 10 days before the expedition left, not all the boxes were checked.
When I arrived at the airport ready to leave, I was denied. My passport, while valid for the next 7 months, did not meet all the requirements. The Nepal Tourism requires all travelers to a passport valid for 6 months after their return date. I was one week shy of that requirement.
My trip ended before it started.
I was devastated.
For 48 hours, I tried to get a new passport, but, the passport office was overwhelmed with 10x the normal inquiries and even with a Congressional push to get me an overnight passport, I still could not.
Breaking the news to the team, I didn’t know what to do with my two month open schedule. So, I packed the van and headed to the desert to lick my metaphorical wounds.


In 2023, I had been in this career for almost 8 years, yet I considered myself a young-gun in the industry. With lots of lessons, like this, still to learn and never repeat, I was in a rut. I was angry. For the most part, I was a climbing dirtbag with a camera, so when the bureaucracy of paperwork held me back, I couldn’t accept my failure.
The time in the desert was a warming respite from the cold I often endure in my career, but I couldn’t get out of my own head.
Kristin, my girlfriend, tried everything she could to cheer me up, but I was in an unbreakable mood. I felt bad she had to experience my mood. I wanted to let her go enjoy herself, but we were traveling in a van together, so she would have had to leave me behind. In many ways, that sounded nice, but I didn’t really want to shrivel up like a piece of jerky out here in the desert.
So, we pushed on together. Driving through Alabama Hills, Death Valley, Valley of Fire, and towards Lake Mead.


A few weeks into the trip, still being a sourpuss, I wanted to turn the corner. Let things go. But, how?
The mishap was out of my control and that is what I needed to accept.
At least, from all of my travel the major lesson I have learned has been: When things are not going your way and the results are out of your control, you need to let it go. I believe this concept is coined “The Traveler’s Mindset”
So, one of the evenings sitting alone lake side, I intentionally watched the light show on the mountains acting as the backdrop to Lake Mead change from a washed out daytime blue to orange to purple to a black bright with stars seeking an internal silver lining.
For the rest of this trip, seeking that silver lining would become my north star, but, it wouldn’t come on this trip. In fact, I would have to wait until June, just when I would have been coming home from Everest, to find my silver lining, which would literally take me around the world.

I sit quietly looking out at the calm waters, trying to make sense of everything that had happened. Connect with Dalton on your favorite social media: @storiesbydalton
The Small Things That Help
Thank you for taking the time to read UnBound. I hope the images and stories have scratched your mid-week wanderlust itch. If they have, would you please consider forwarding this newsletter to a friend?
If you haven’t done so already, consider following me on your favorite social platform:
Related Reads:


Top Destination We Are Drooling Over This Week
Finding new destinations can be hard in today’s digital world where everyone is trying to sell you on something “new”. So, here at UnBound, we have created this space to highlight the best destinations we have explored. These destinations can be far fetched locations that we have fallen in love with, or, backyard hot spots that we just want to share with everyone.
Regardless of the location, these destinations are all places we have personally visited and think you should consider when planning your next trip.
Without further adieu, we give you the top destinations we are drooling over this week:
Our standards for testing and reviewing at UnBound:
UnBound requires first person experience to review and recommend any product, destination, experience, etc. In other words, you’ll never read about a place or product that we have not touched, used, or experienced personally.
In the case a recommendation is sponsored, it will be clearly marked. With that said, sponsored reviews remain honest and true to editorial review. Meaning we share both, the good and the bad.
If you have any questions, or comments, about the product reviews, you can write me at:
dalton@dalton-johnson.com
Trailborn Rocky Mountain - Hotel Review

Rock climbing with KMAC guides at the Fins. Photo by Dalton Johnson
Adventure and hotel don’t belong in the same sentence, so why am I calling Trailborn Rocky Mountain the basecamp for adventurers? The answer I’m crazy. Just kidding. This adventure-forward hotel fosters a sense of community and encourages adventure. A steep task they have taken on, if I say so myself, but here’s how they do it.
First, their lobby feels more like a mountain cafe that you want to sit back and enjoy a book. Speaking of books, they have several picture books (ahem, they are called coffee table books) lining the walls inviting you to grab one and start dreaming. Some of the books are local adventures and others are far flung idea generators from around the world.
We had a rainy day and spent a lot of time in the lobby, drinking lattes, reading books, and enjoying the fireplace.
Second, s’mores. Every night, Trailborn Rocky Mountain cranks the heat on the outdoor fire pit and supplies the s’mores essentials. For Kristin and I, this was a great place to unwind while sharing a beverage and chatting. One of the nights, the fire pit was “crowded” and we struck up some great conversations with other travelers who shared beta for great hikes in the area.
…
Rancho Santana Nicaragua - Surf Escape

The main break just steps from our room. Photo by Dalton Johnson
The Perfect Week In Paradise (At Least In My Opinion)
My girlfriend and I had planned a week-long trip to Rancho Santana and, I might be bias as I share our adventure-packed trip itinerary, but, our trip was one for the record books! Rancho Santana is a paradise escape to a country not overrun by tourism. Promising a perfect blend of relaxation in the sun and adventure.
Itinerary:
Day 1: Arrival, Ocean Time, and a Dinner to Remember
Day 2: Exploring the Beauty of Rancho Santana
Day 3: Surfing, Mountain Biking, and Sunset Views
Day 4: Mombacho, Lake Nicaragua, Granada, and Volcano Masaya
Day 5: Farm Tour and Sunset Horseback Ride
Day 6: Catamaran Adventure
Day 7: Departure – Until Next Time!
…
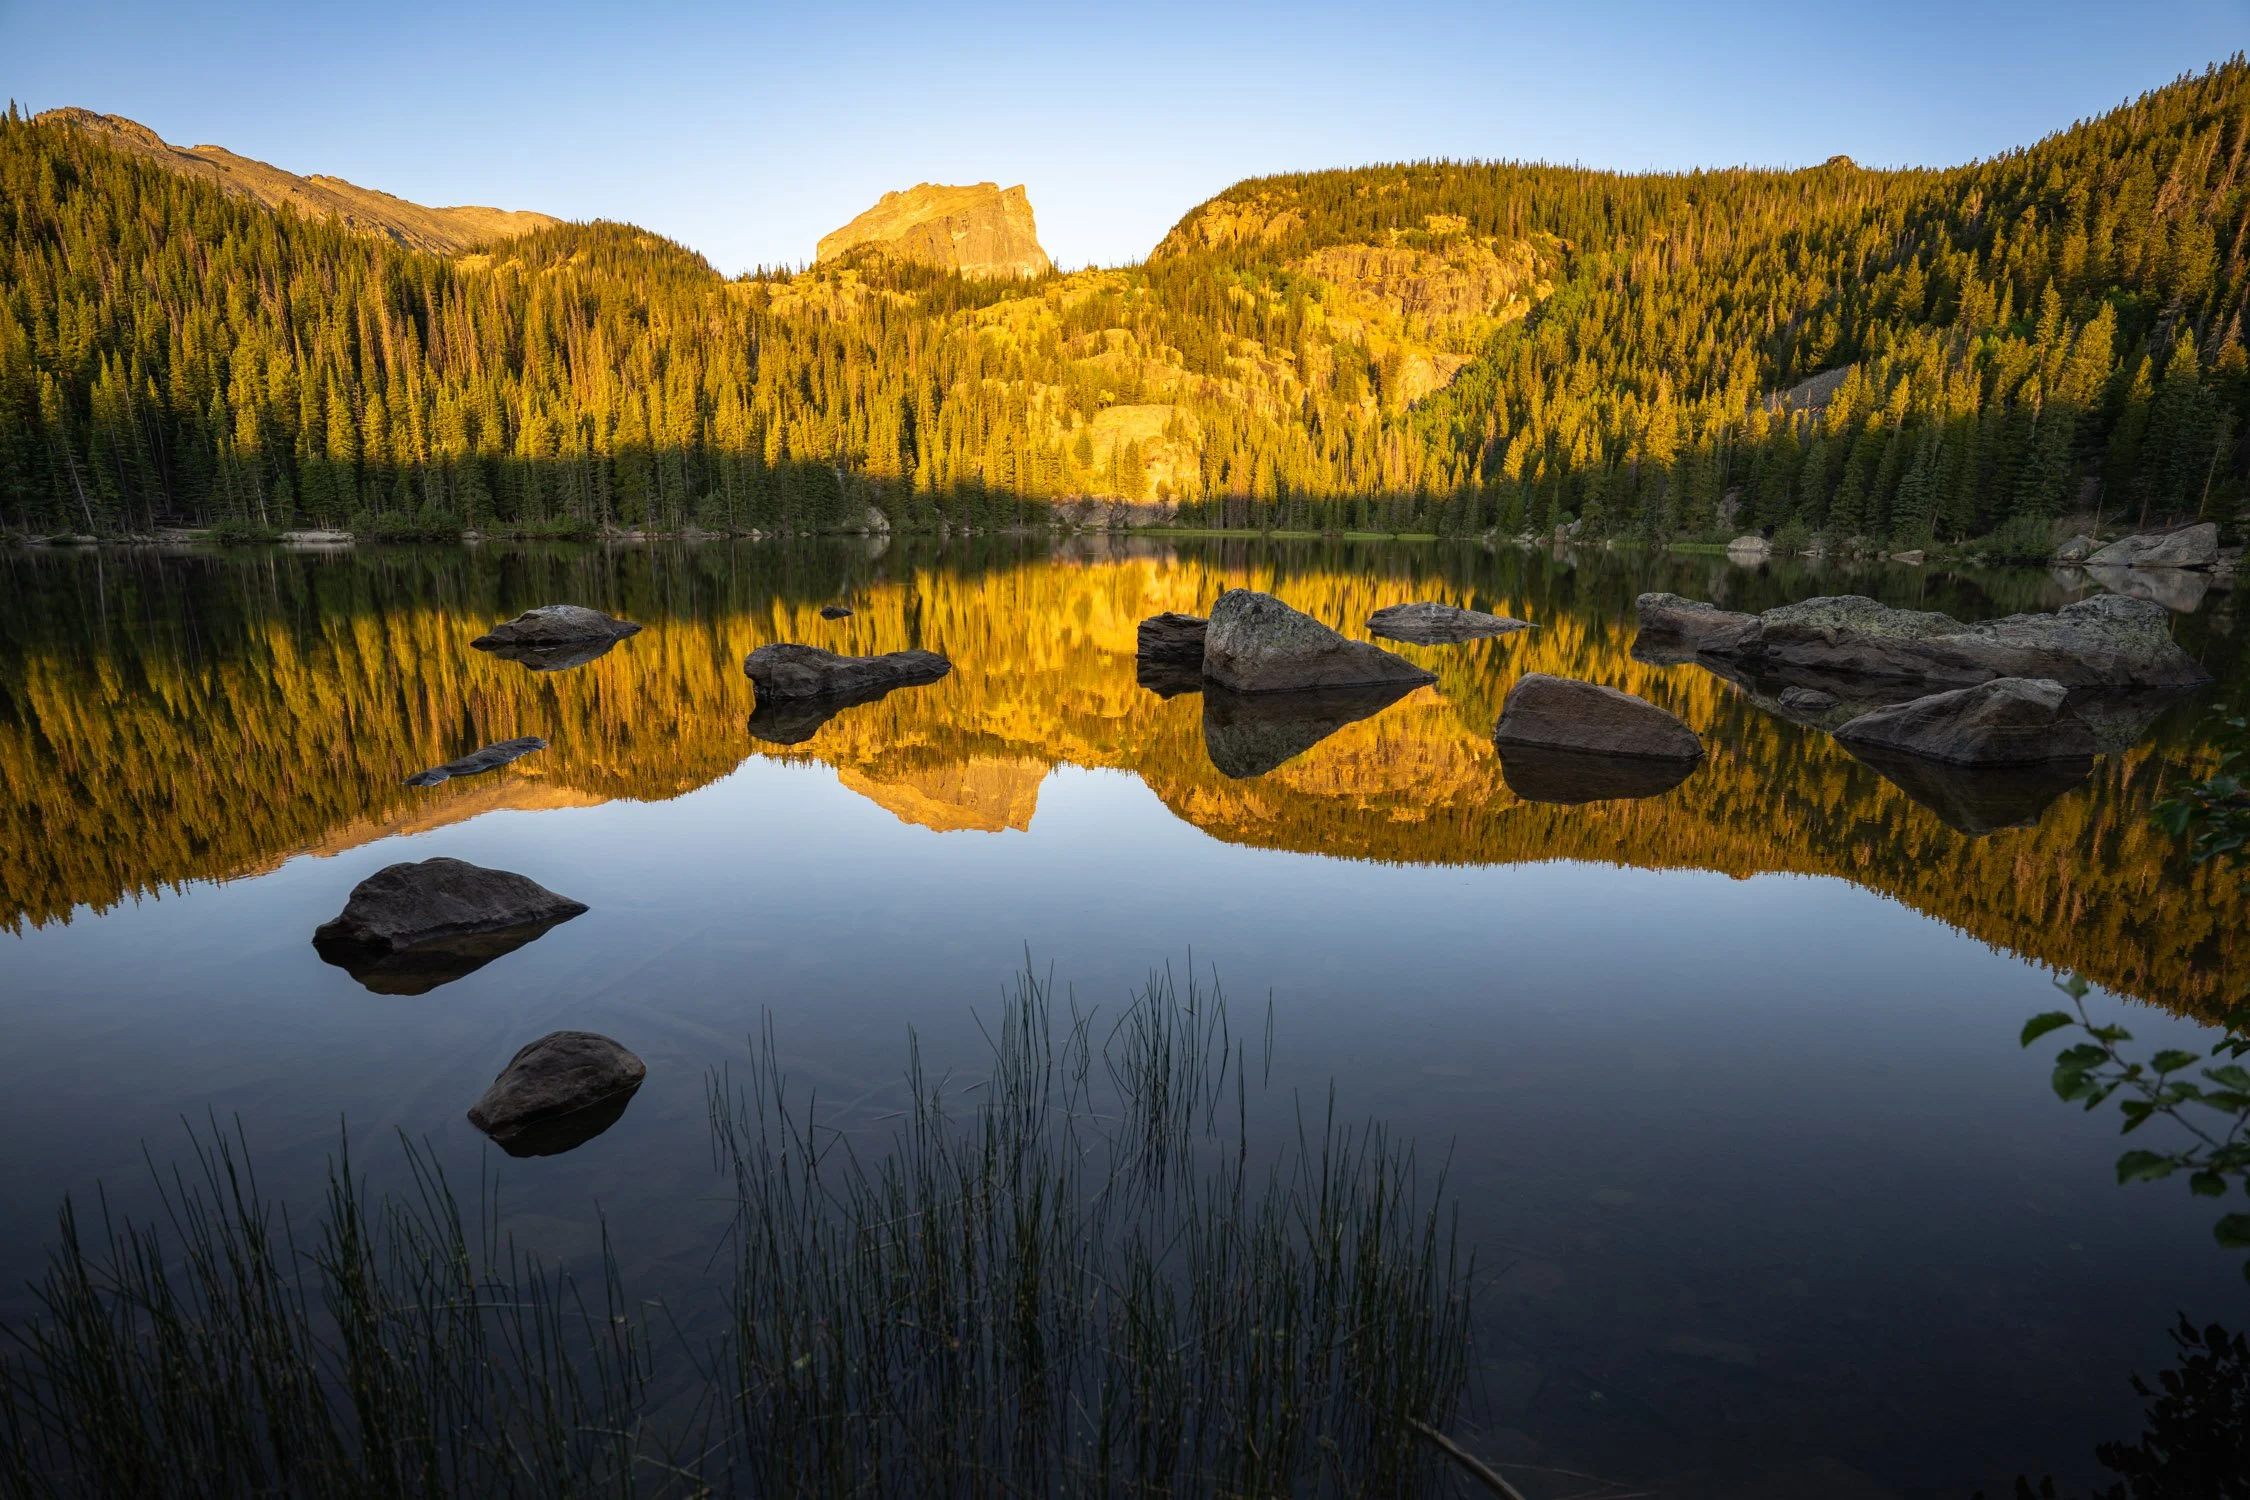
Bear Lake in Rocky Mountain National Park

Sunrise at Bear Lake, CO. Photo by Dalton Johnson
With the timed entry into Rocky Mountain National Park, access to Bear Lake at sunrise takes a little bit of planning. While there are day of permits available, they seem to be impossible to land. So, if you are making the trek out to Rocky Mountain National Park, I suggest you secure your entry permit months beforehand.
With that said, Kristin, my partner, was able to land an entry permit for the morning slot, the night before, during late-summer in the middle of the week. I think we were lucky, but who really knows?!
Now that your permit is secured, it’s time to set your alarm the night before and try to sleep, crossing your fingers you wake up to an early alarm, drive through the dark to the trailhead, and walk the .5 of a mile to Bear Lake.
Yup, the walk is very short, so no need to rush.
I suggest bringing a warm beverage to keep you warm, even if it is the summer as the lake sits at 9,449 feet. From there, set up your camera, enjoy the alpine glow on the cliffs, and push that shutter button.
You can walk around the lake to create different images, I liked the alpine glow in the morning from the eastern bank of the lake and the northern bank of the lake around mid-morning when most of the lake was in full sun.
The above image was snapped from the northern bank of the lake.
If you are a camera-lover, here’s some of the data about the image above:
Camera: Sony a7r4
Lens: Tamron 16-30 f/2.8 G2
Focal length: 30mm
Aperture: f/5.0
Shutter-Speed: 1/320 second
ISO: 250
Beachside Hot Springs in La Ventana, BCS

Photo by Dalton Johnson
Hot springs on the beach sound like a dream, but in La Ventana, they’re a reality. Just north of this kite-surfing addicted city of Baja Sur lies Playa Agua Caliente, a unique beach where you can soak in natural hot springs at low tide along the Sea of Cortez. These hidden treasures bubble right out of the sand, offering an unforgettable experience for those who make the trip north. The trifecta of secluded beach, desert landscape, and floating islands makes this spot dreamy, at least that is how I felt.
Glacier Point in Yosemite National Park

Dancing on the diving board at Glacier Point in Yosemite National Park. Photo by Dalton Johnson
There is an age old debate if Glacier Point is said to be better at sunrise or sunset. My personal preference as a photographer is sunrise, but I would rather you head to Glacier Point and find our for yourself.
On a deeper note, than an endless debate, is the fact that Glacier Point was one of the locations that John Muir brought President Roosevelt to wow the president into turning Yosemite into a National Park. There is an iconic photo of the two standing on the edge of Glacier Point with Yosemite Falls pouring in the background. When I stand in that exact location at Glacier Point, I like to think of this image and thank John Muir for his dedication to this land and conservation. Without him, who knows what Yosemite would be.
Soldier Pass Cave in Sedona, Arizona
Sedona has a city I have returned to several times. I am not sure what exactly draws me back to this town of red dirt, but I find myself here at least once a year. On a recent visit, I hiked the Seven Sacred Pools just after a rain and continued my hike onward to the Soldier Pass Cave. After clinging for dear life on the side of a muddy hill, I finally made it to this cave that everyone rants and raves about on social media and Reddit threads. While I am typically not one to seek out social media spots, Solider Pass Cave caught my eye.
Once I reached the base of this cave, I realized just how massive it really is. Two large opening, one is accessible to scale inside, the other one might require a rope. While I am a rock climber, I opted for the easy scramble inside of the cave. Since I forgot my tape measure, I’ll eyeball and say this cave was 40 to 50 feet tall and 200 feet long. Massive! The entrance crack runs right through the middle of it and there is a “window” you can sit in. This seemed to be the social media photo glamour spot, so I didn’t last long.
Avoiding the crowds, I wandered to the other side of the cave and found a way to scramble to the top. Nobody was up here. Quick note: If you are not a confident rock climber, please don’t scramble to the top, it was dangerous. Soaking in the view from the top and the sun that was breaking through the clouds, I sat and smiled.
This was worth the hike.
Luxor, Egypt
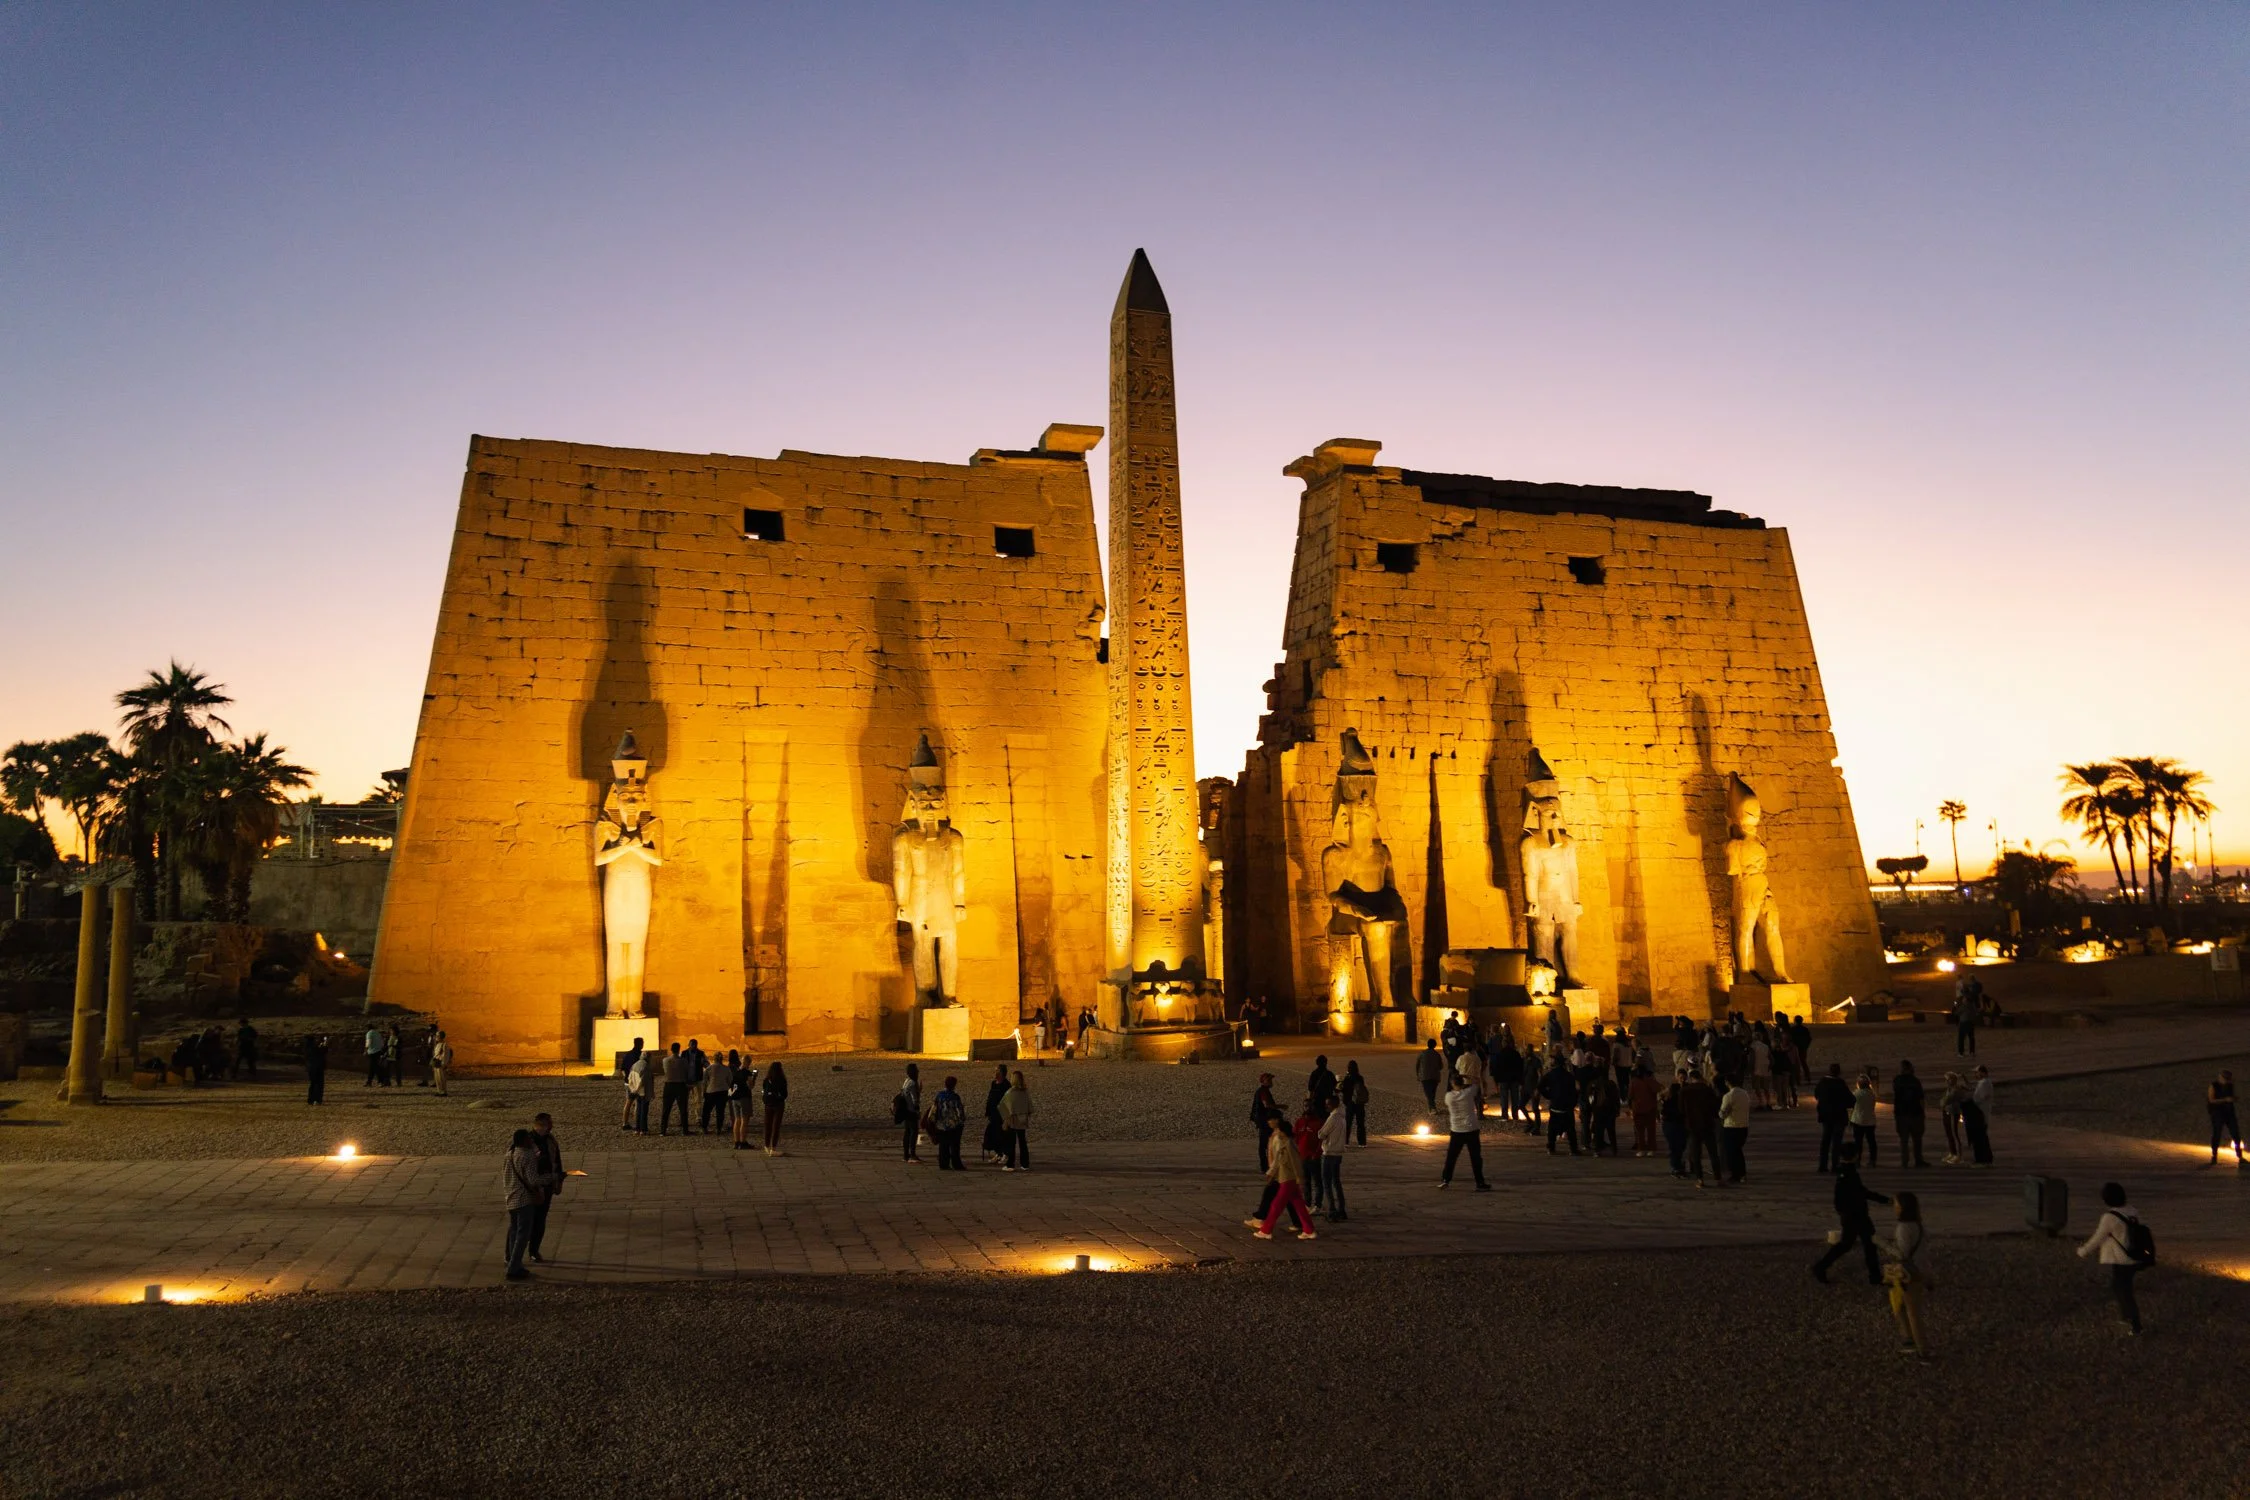
The Luxor Temple glowing at sunset and lit up with lights for a night time tour. Photo by Dalton Johnson
Luxor is a “small town” with ancient roots. When you think about ancient Egypt, you are thinking about the ancient sites of Luxor like the Valley of Kings, Valley of the Queens, the Luxor Temple, the Avenue of Sphinxes, and the Temple of Karnak, just to name a few. This ancient holy site has enough to see along the Nile river that you could easily spend five days exploring the sites and feel as though you have not scratched the surface.
We chose Luxor, Egypt this week for our top destination for that very reason. The history. Known as Thebes during the Roman and Greek reigns of Egypt, this vast area will leave your mind itching to return to fifth grade to relearn your Egyptian history.
While there is not much pure adventure to be found in Luxor, you can get your heart rate to spike as you make your way underground at the Valley of the Kings and Queens exploring the excavated tombs. When here, make sure to soak in the fact that the paint you are looking at could be as old as 3,500 years. Yet, it looks as though it was painted last week.
Our founding editor, Dalton Johnson, just got back from a 10-day river cruise along the Nile and here is what he had to say about the trip with Abercrombie and Kent, “It’s hard to comprehend the timeline and scale of Egypt. The temples tower over you and as you look at the hyrogylphics you realize the temple took 180-200 years to build. It’s mind bending. However, if I didn’t have Mohamed Rehim as my Egyptologist guide, explaining what I was looking at, I don’t think I would have appreciated the temples and tombs as much because I just would not understand.”
Do you have an adventure worth sharing?
If so, reach out to us and pitch your ideas: Pitch Us
Discover more Adventures

Every Adventurer's Basecamp Is Just Outside of Rocky Mountain National Park at Trailborn Rocky Mountain
Adventure and hotel don’t belong in the same sentence, so why am I calling Trailborn Rocky Mountain the basecamp for adventurers? The answer I’m crazy. Just kidding. This adventure-forward hotel fosters a sense of community and encourages adventure. A steep task they have taken on, if I say so myself, but here’s how they do it.
Adventure and hotel don’t belong in the same sentence, so why am I calling Trailborn Rocky Mountain the basecamp for adventurers? The answer I’m crazy. Just kidding. This adventure-forward hotel fosters a sense of community and encourages adventure. A steep task they have taken on, if I say so myself, but here’s how they do it.
Kristin and I soaking in the apline glow at Bear Lake in Rocky Mountain NP. Photo by Dalton Johnson.
First, their lobby feels more like a mountain cafe that you want to sit back and enjoy a book. Speaking of books, they have several picture books (ahem, they are called coffee table books) lining the walls inviting you to grab one and start dreaming. Some of the books are local adventures and others are far flung idea generators from around the world.
We had a rainy day and spent a lot of time in the lobby, drinking lattes, reading books, and enjoying the fireplace.
Second, s’mores. Every night, Trailborn Rocky Mountain cranks the heat on the outdoor fire pit and supplies the s’mores essentials. For Kristin and I, this was a great place to unwind while sharing a beverage and chatting. One of the nights, the fire pit was “crowded” and we struck up some great conversations with other travelers who shared beta for great hikes in the area.
What Are The Rooms Like?
The rooms are newly renovated, to a modern minimalism look and feel. By no means am I an architect, so I can’t name styles, but I can say the room was functional, enjoyable to stay in, and had plenty of storage for our clothing. Also, Chestnut, our dog, had plenty of room to lounge around.
Favorite parts:
They had a window seat that was perfect for sitting and reading, especially on a rainy day.
Our dog could stay in the room and they gave us dog bowls for Chestnut.
The shower was HOT and held the steam inside of the room well.
The complementary coffee and tea was on point! Way better than any other hotel I’ve stayed.
Some improvements/critiques I’d suggest:
The bed could still use an upgrade, I’m not sure what was going on, but ours was kind lumpy.
I’m a huge couch guy and the couch they built was funky. However, the window couch was AMAZING!
The TV is massive, which most people like, but I would have appreciated more art and less TV. I know this is me being picky and not liking TV.
Hotel Preview (Part 1):
Hotel Preview (Part 2):
We Got The Fetch & Stay Package:
Not many hotels allow you to have a dog in Estes Park, CO, so Trailborn Rocky Mountain has leaned into their dog friendly rooms providing a package that levels up the dog’s experience at the hotel. Now, that is a sentence I never imagined writing, but, hey, it’s 2025.
With the Fetch & Stay package your pup gets a bandana, dog bowls in your room, and some CBD treats for your dog. Chestnut was hesitant around the CBD treats but eventually he ate one and really mellowed out. Since this was a first for us and him, we watched him carefully. Nothing happened, thankfully.
The next day, Kristin and I gave him another one and waited for the treat to kick in. Then, we slipped out the door for a day long adventure in the National Park (where dogs are not allowed).
Learn more about the Fetch and Stay package: https://www.trailborn.com/rocky-mountains/outpost-offers/
Estes Park Must Do Adventures:
Rock Climb
Hike to Bear Lake for sunrise (you need a permit, I show you how in the linked article)
Trail Run in Rocky Mountain National Park. I ran the Cub Lake loop and really enjoyed it, despite getting lost and adding 5 miles.
Drive the old fall river road
Run around lake Estes in the rain… only kidding about the rain because we got caught in a summer rain storm. What the video here: https://youtu.be/wbJgUebvZqw
Hike / Climb Longs Peak
A day out climbing at the Fins with KMAC guides in Estes, Park. Photo by Dalton Johnson
Like I said at the start of this article, Trailborn Rocky Mountain has taken on a bold stance to become the basecamp for all adventurer’s coming to Estes Park, CO and I must say, they are off to a good start. Sure, they have some more tweaks to make, but all great things come with time. My guess, in five years their brand will expand and become synonyms with adventure.
So, if you are looking for a dog friendly place to call basecamp, give Trailborn Rocky Mountain a try.

Dear Vanlife, This Year Has Been Complicated
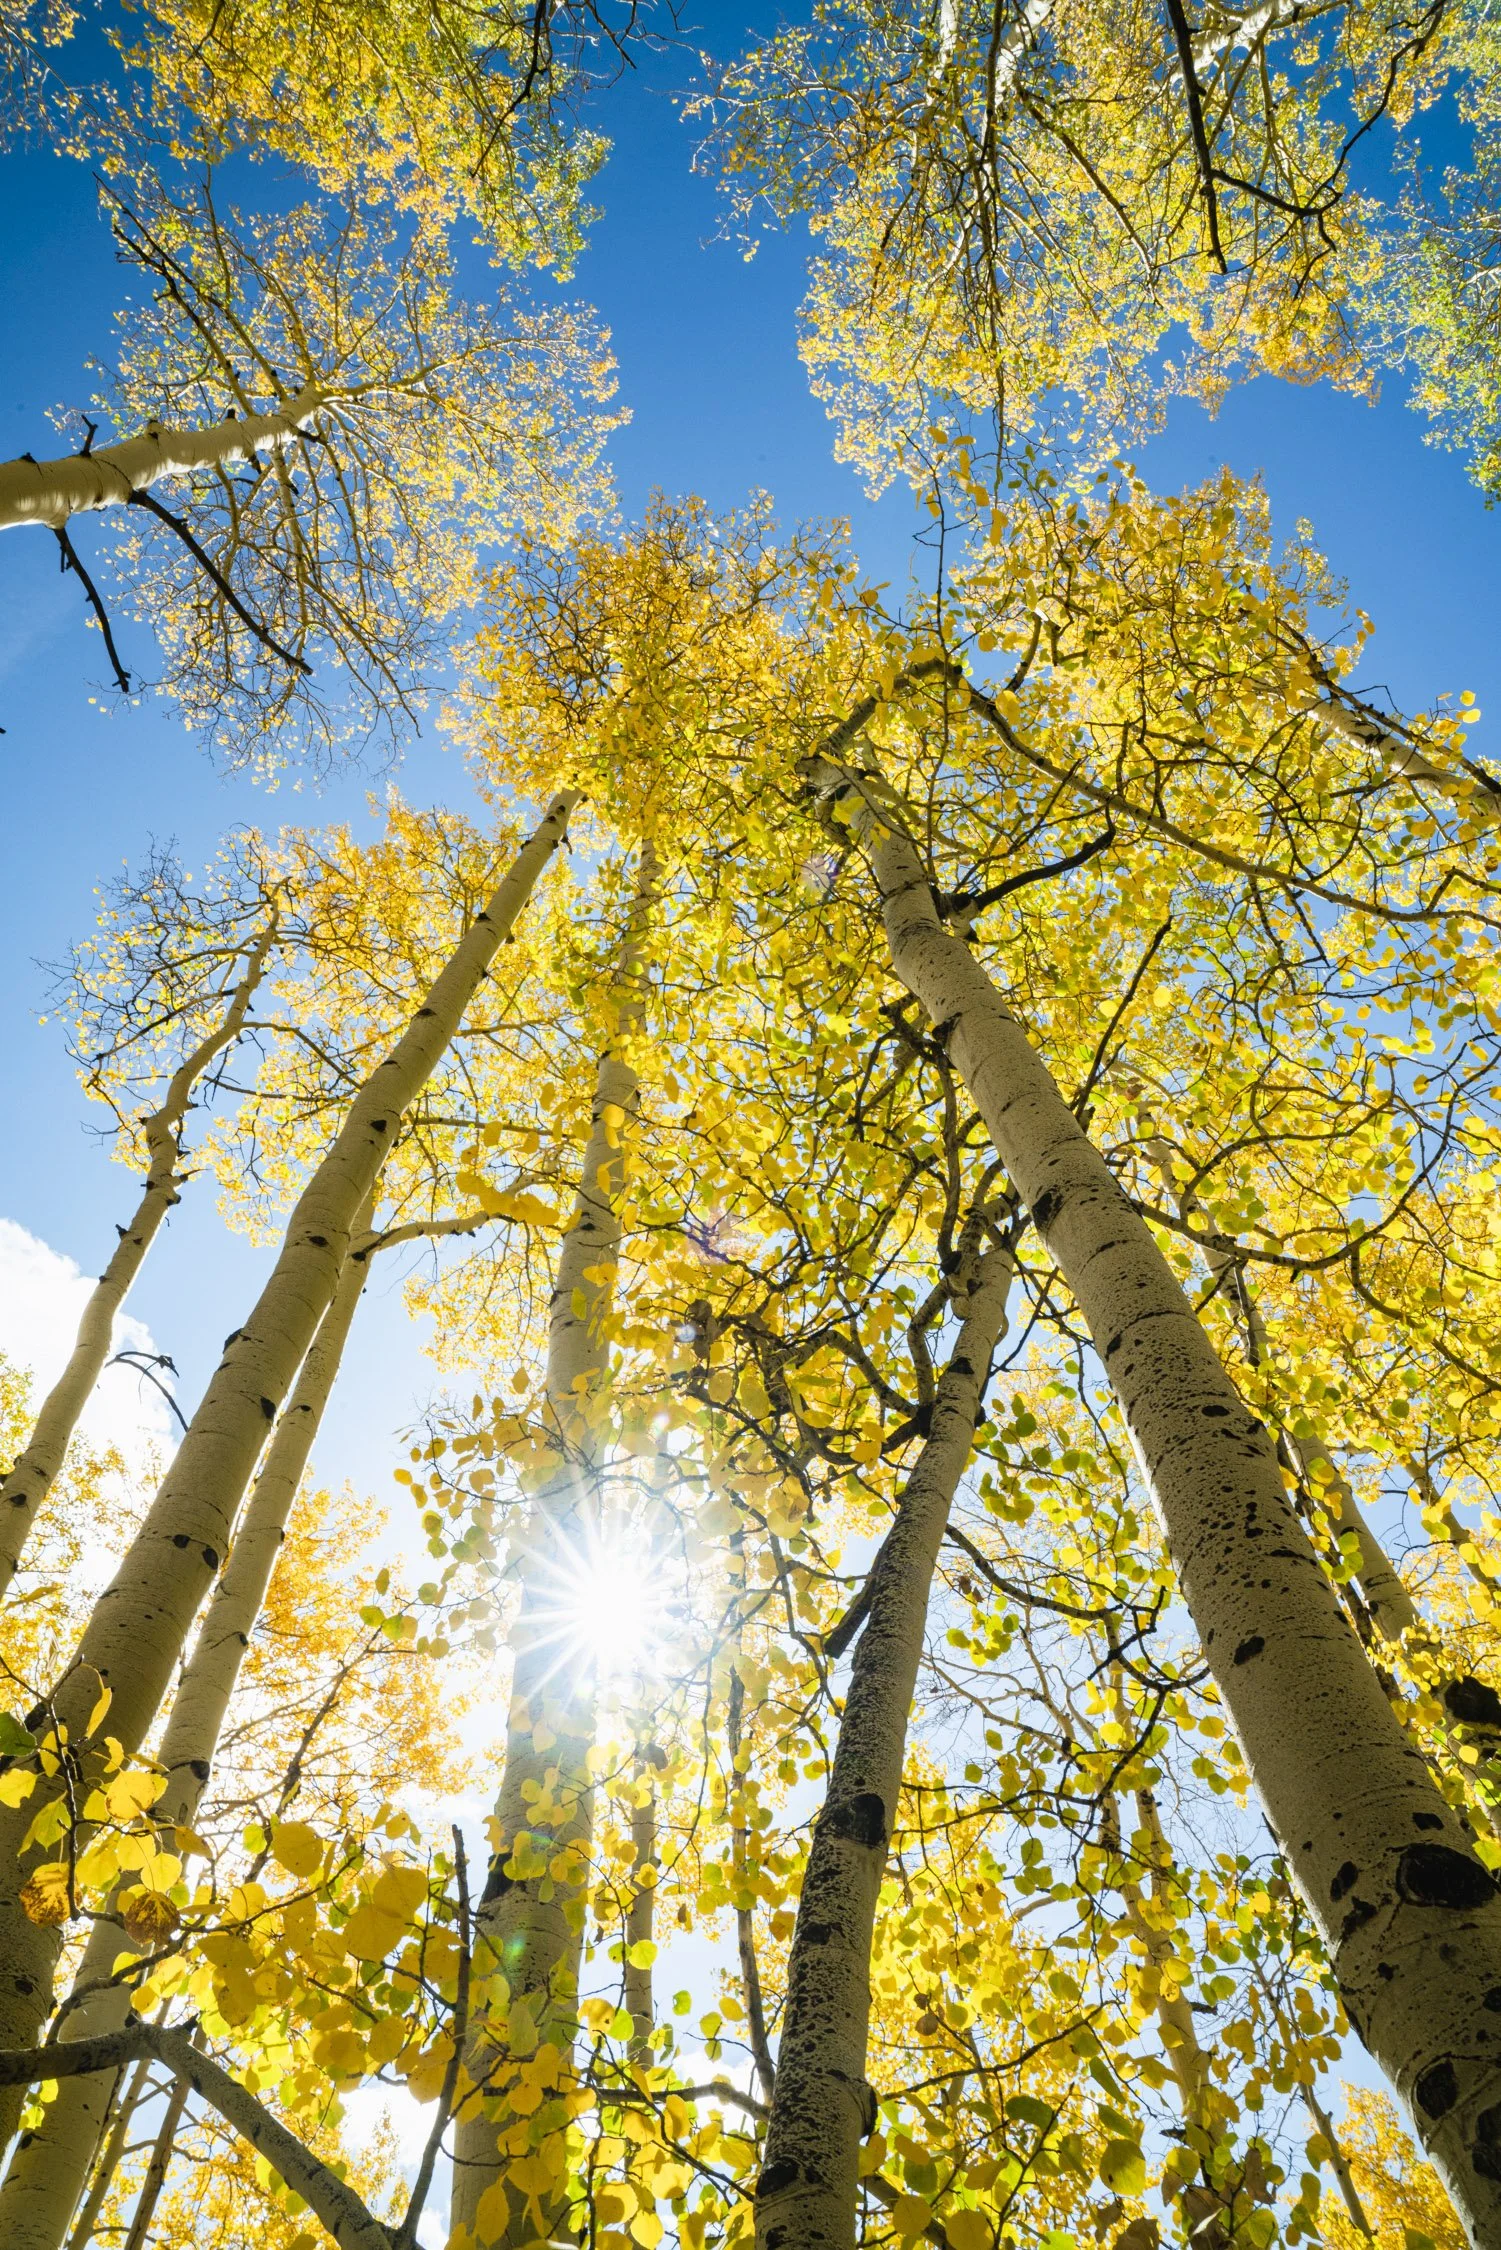
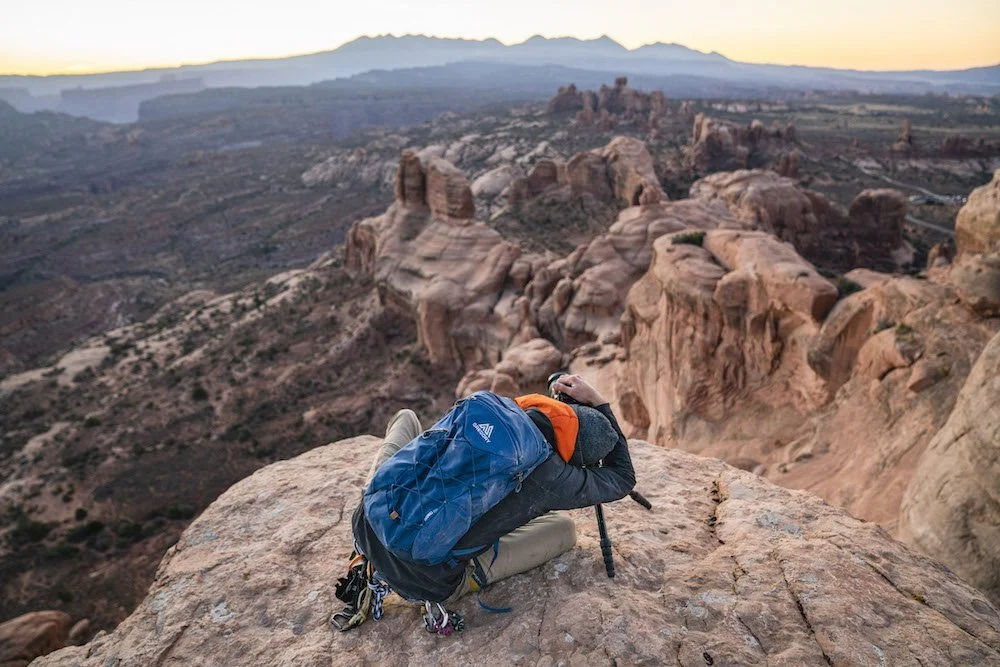
Just over a year ago, we parted ways, and it had been coming for years. You saw it coming and so did I. Heck were were together full-time for 8 years! Yet, the off-and-on nature this year has been, well, complicated. With a little a spring tease wandering the secluded roads of Idaho looking for hot springs to soak in under the milky way to the month long summer fling to the mountains of Colorado, I’d say I am a bit… confused. Yes, we said it would be a casual, but I don’t really think this is casual.
Dear Vanlife,
Just over a year ago, we parted ways, and it had been coming for years. You saw it coming and so did I. Heck were were together full-time for 8 years! Yet, the off-and-on nature this year has been, well, complicated. With a little a spring tease wandering the secluded roads of Idaho looking for hot springs to soak in under the milky way to the month long summer fling to the mountains of Colorado, I’d say I am a bit… confused. Yes, we said it would be a casual, but I don’t really think this is casual.
For the next few months, we don’t have any plans, which is disappointing, but the distance will help diminish the lust I have to explore the open roads and fall colors with you. Gosh, those were the days! Do you remember when we were in Utah for the spring? We did everything together! Off-roading the best we can to reach remote crags to go rock climbing, chasing the aspens changing colors, and, oh, that freak snow storm that covered the Utah desert towers in a blanket of white.
Those were good times!


I’m sorry that I couldn’t make living together, full-time work for my lifestyle work any longer. I really am!
I know I should have just gotten rid of some stuff, my main baggage, and the cause of many fights for us, but I do think the house is a better place to keep things that aren’t really needed all the time. 72 square feet is tight and hard to figure out where to put things when you were bursting at the seams, litterally! I mean, do you remember when your factory seals on your room all popped in Sedona, AZ and then it rained and snowed, INSIDE OF YOU! That was a wet and miserable experience.
I’m sorry for filling you so full, I could have come up with better solutions. A prime example, the surfboards. I mean, having three surfbaords while climbing mountain passes in Wyoming was kinda crazy!
Like, it worked, we worked, but gosh those surfboards and kayaks and rock climbing gear and camera gear and clothing and ski gear and fire pit and backpacking gear and not to mention the normal living stuff like food, pots & pans, spices, jackets, etc. all made the space so cramped and built up an anxiety at the thought of opening the back doors, or cabinet drawers, because something was surely going to plummet out onto my feet.
Now that I think about it, a storage unit would have work just fine for all the stuff, but what about Chestnut or Kristin? I couldn’t really just kick them to the curb so we could be together all of the time. Maybe that is what you wanted, but I think the Idaho trip was a perfect example of how we can all travel together. Yes, yes, yes, the Colorado trip was a bit hard because we were back to the cramped life with to much stuff, but we are learning.
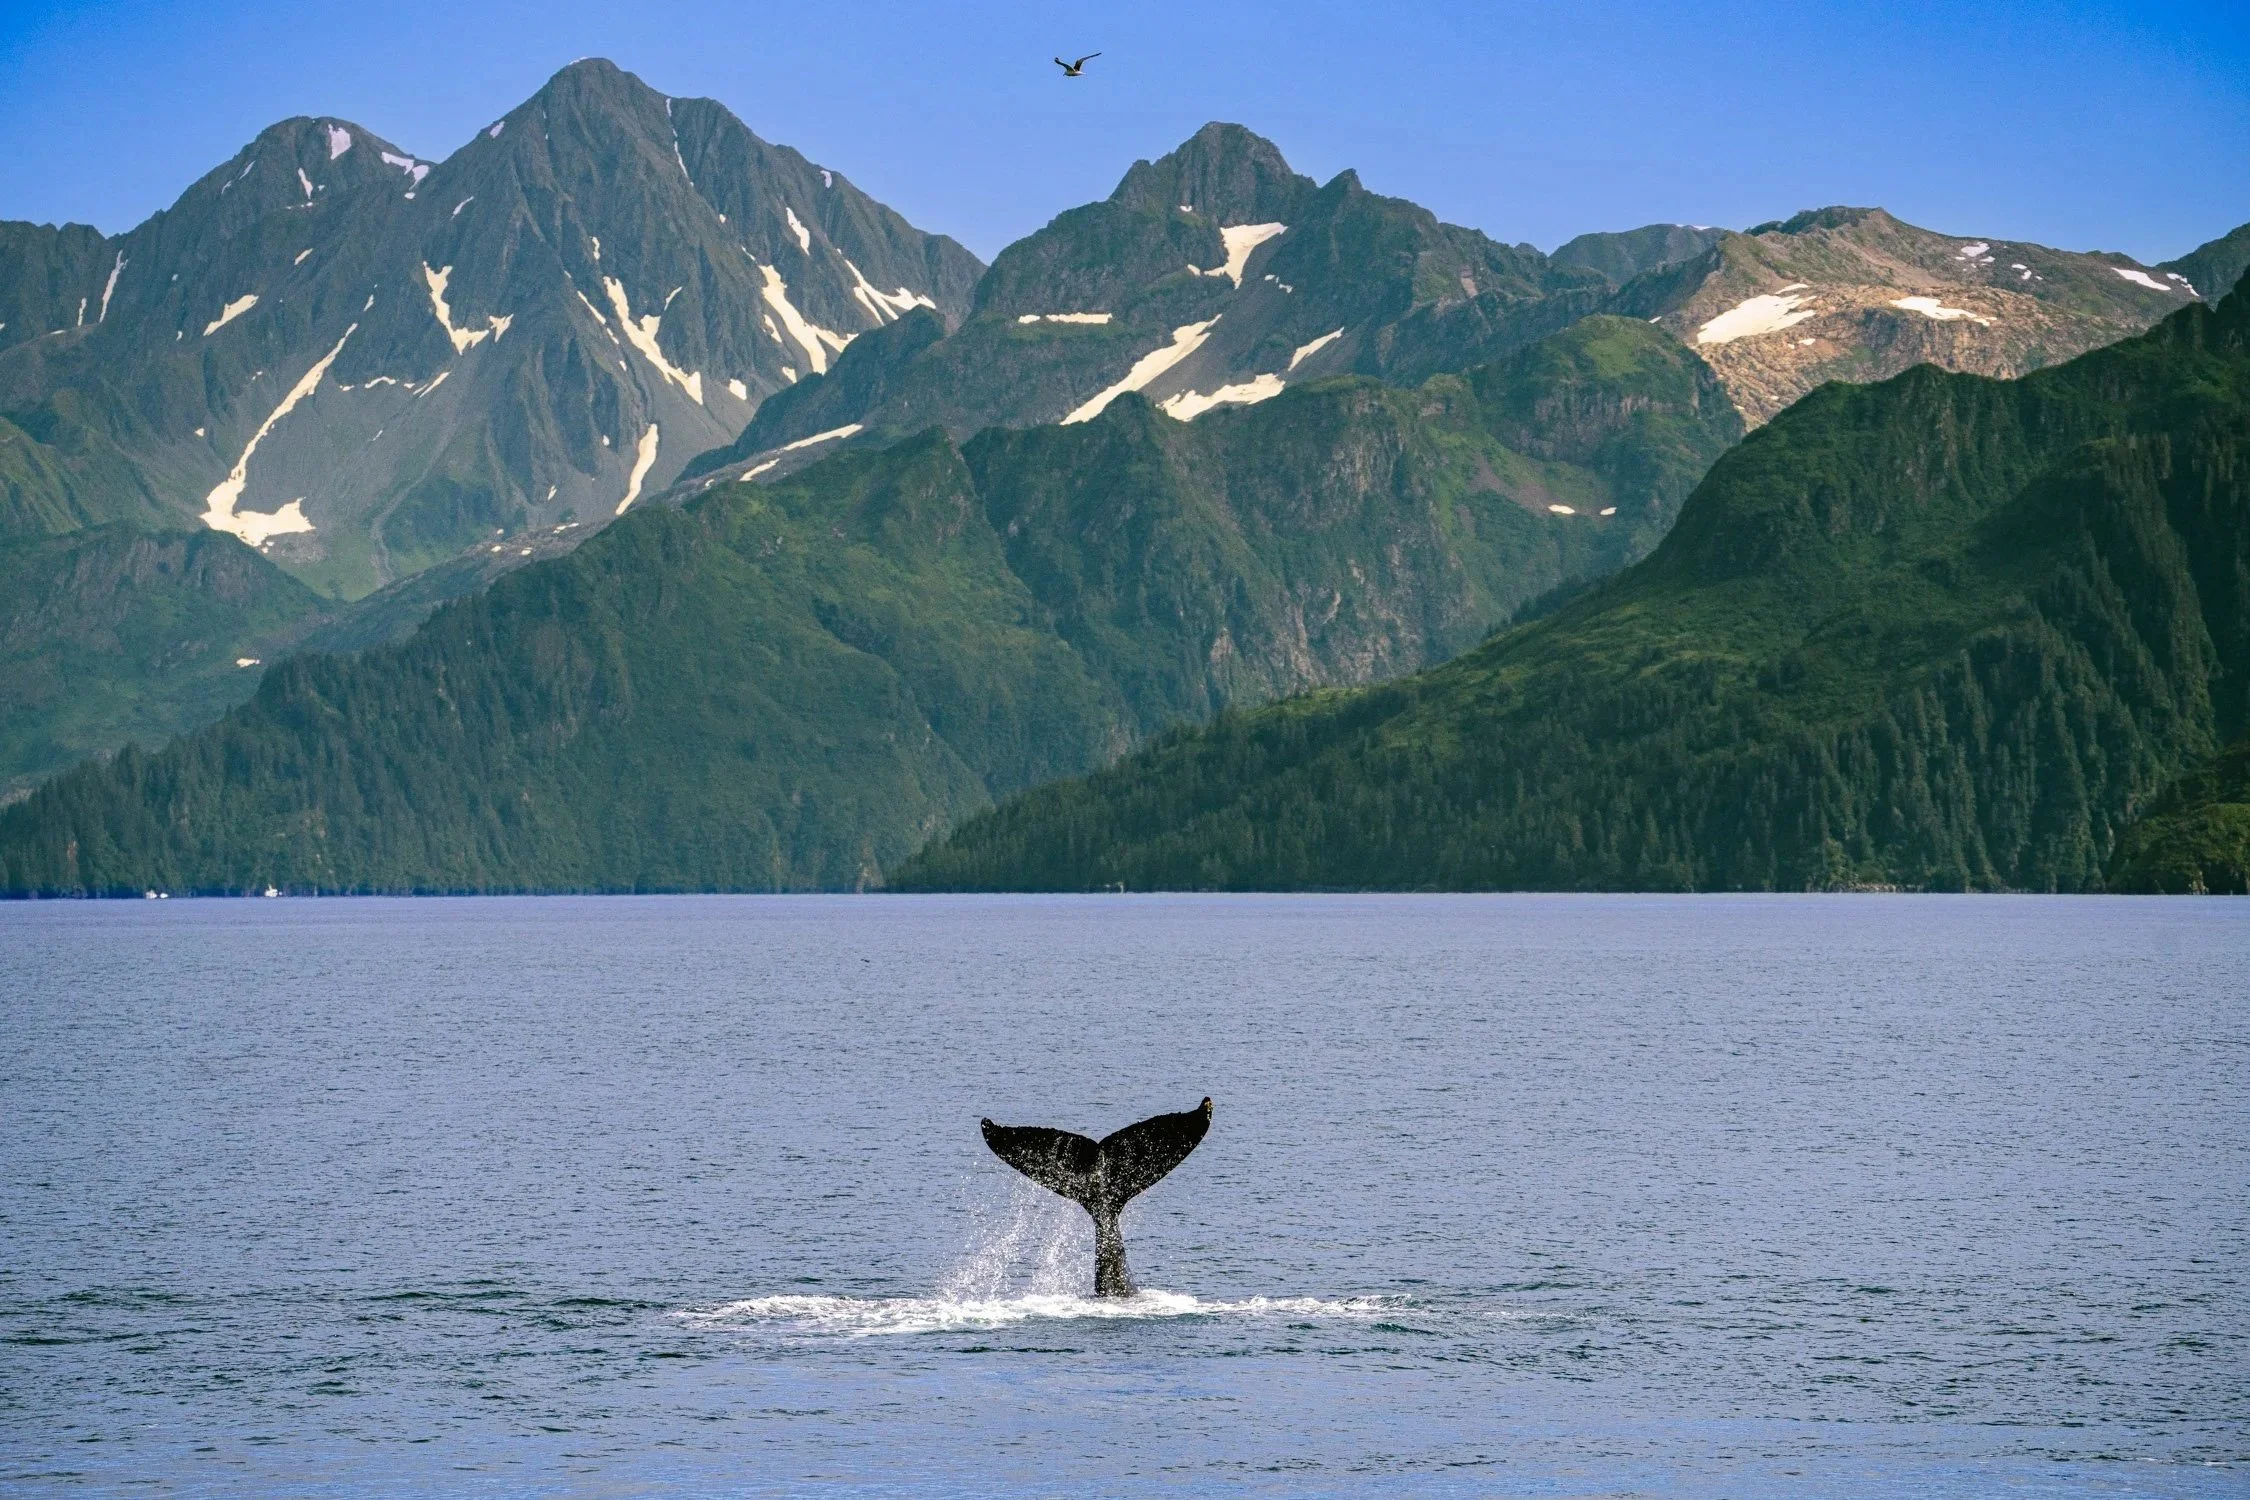
Yeah, we probably should have figured it out when we road tripped together for three months through Alaska, but we didn’t. Before this dives into a full fledge arguement of what should have happened, can we just think about some of the highlights from that Alaska trip?
starting a rock climb at 9, or was it 10 pm, and climbing under the midnight sun
surfing the boretide, you looked over me from the shore, thank you :-)
camping on the beach of Kenai Lake for a few days, just playing around in the water
I know you didn’t get to see them, but taking that wildlife cruise and getting to see Orcas, whales, puffins, and so many other creatures… wow! It was so much fun getting back from that and sharing all those images with you while I editing those images.
staring out at eagles soaring over head
the bears that would look-both-ways before crossing the highway


What special times we have made together.
I know right now it is all complicated, especially since I just bought a condo, but I truly look forward to our next adventure together. I mean, six to eight weeks in Baja, exploring dirt roads, looking for surf spots, keeping our eyes peeled for whales breaching on the horizon. The trip this winter is going to be well worth the long wait this fall.
I still love you,
Dalton
P.S. We will see how this winter goes, but I am hopeful it’s the perfect teaser to re-energize our long-standing dream of driving the Pan-American highway together!
The 5 Stages of Visiting Bear Lake in Rocky Mountain National Park
With the timed entry into Rocky Mountain National Park, access to Bear Lake at sunrise takes a little bit of planning. While there are day of permits available, they seem to be impossible to land. So, if you are making the trek out to Rocky Mountain National Park, I suggest you secure your entry permit months beforehand.
Before diving into the 5 stages of Bear Lakes, here’s a little backstory you should know before visiting Bear Lakes for yourself:
With the timed entry into Rocky Mountain National Park, access to Bear Lake at sunrise takes a little bit of planning. While there are day of permits available, they seem to be impossible to land. So, if you are making the trek out to Rocky Mountain National Park, I suggest you secure your entry permit months beforehand.
With that said, Kristin, my partner, was able to land an entry permit for the morning slot, the night before, during late-summer in the middle of the week. I think we were lucky, but who really knows?!
Now that your permit is secured, it’s time to set your alarm the night before and try to sleep, crossing your fingers you wake up to an early alarm, drive through the dark to the trailhead, and walk the .5 of a mile to Bear Lake.
Yup, the walk is very short, so no need to rush.
I suggest bringing a warm beverage to keep you warm, even if it is the summer as the lake sits at 9,449 feet. From there, set up your camera, enjoy the alpine glow on the cliffs, and push that shutter button.
You can walk around the lake to create different images, I liked the alpine glow in the morning from the eastern bank of the lake and the northern bank of the lake around mid-morning when most of the lake was in full sun.
Now, let’s explore the 5 stages of visiting Bear Lakes:
1) Arriving In Pitch Black Wondering Where Bear Lake Is At

Camera: Sony a7r4
Lens: Tamron 28-75 f/2.8 G2
Focal length: 44 mm
Aperture: f/5.0
Shutter-Speed: 1/40 second
ISO: 400
2) Patiently Waiting For The Alpine Glow To Start

Camera: Sony a7r4
Lens: Tamron 16-30 f/2.8 G2
Focal length: 16 mm
Aperture: f/2.8
Shutter-Speed: 1/30 second
ISO: 400
3) Standing In Excitement The Glow Has Arrived, But Also Realizing You Are Cold From Sitting To Long
Camera: Sony a7r4
Lens: Tamron 16-30 f/2.8 G2
Focal length: 16 mm
Aperture: f/2.8
Shutter-Speed: 1/100 second
ISO: 400
4) Realizing There Is More To Bear Lake And Start Walking Around, Feeling Hard Core FOMO You Didn’t Do This Before
Camera: Sony a7r4
Lens: Tamron 16-30 f/2.8 G2
Focal length: 16 mm
Aperture: f/2.8
Shutter-Speed: 1/320 second
ISO: 250
5) Looking Over Your Shoulder And Thinking, “Dang! Bear Lake has it going on!”

Camera: Sony a7r4
Lens: Tamron 16-30 f/2.8 G2
Focal length: 30mm
Aperture: f/5.0
Shutter-Speed: 1/320 second
ISO: 250

How to Climb Mount Massive in Colorado
Mount Massive lives up to its name. At 14,421 feet, it’s the second-highest peak in Colorado and just 14 feet shorter than Mount Elbert. What sets it apart is its long, hulking summit ridge—the mountain stretches over three miles and features five summits above 14,000 feet, more than any other peak in the Lower 48. Climbing Massive is a true alpine experience, and the standard East Slopes route offers a non-technical but strenuous path to the summit.
Getting to the Trailhead
From Leadville, head south on U.S. Highway 24 for about 3 miles, then turn right onto Colorado 300. After 0.8 miles, turn left onto Lake County Road 11. After 1.2 miles, keep right at the fork onto Halfmoon Road. The Mount Massive Trailhead is just before the North Mount Elbert Trailhead. In summer, most vehicles can make it to the trailhead, though the dirt road can get rough in places.
Route Overview: East Slopes
The route begins at 10,050 feet and follows the Colorado Trail for the first 3.2 miles. It’s a gentle start through lodgepole pine forest, gradually gaining elevation. After crossing Willow Creek, look for a marked junction where the Mount Massive Trail branches off to the right.
Once on the Mount Massive Trail, the climbing begins in earnest. The trail steepens as it climbs through treeline at about 11,500 feet and transitions into alpine tundra. The views open up quickly, with Mount Elbert looming to the south.
The route continues up long switchbacks along the east slopes before reaching the summit ridge—a broad, undulating ridge that offers sweeping views of the Sawatch Range. From here, it’s a final push to the true summit. The round-trip distance is about 13.6 miles with 4,500 feet of elevation gain.
Tips for Climbing Mount Massive
Get an early start. This is a long day, and much of the trail is above treeline and exposed to afternoon storms.
Though non-technical, the trail is steep and sustained. Come prepared with plenty of snacks, water, and layers.
Poles help immensely with both the climb and descent.
Because of its elevation and length, acclimatizing beforehand is a good idea.
The summit ridge can be windy and deceptively long—pace yourself and enjoy the views.
Mount Massive offers a big day out in the Colorado high country. It’s long, scenic, and truly massive—ideal for hikers looking for a challenging but rewarding summit.


How to Climb Mount Elbert in Colorado
Mount Elbert stands as the tallest peak in Colorado at 14,440 feet and is the second-highest mountain in the contiguous United States. Despite its impressive height, Mount Elbert is one of the more accessible 14ers, making it a favorite for first-time summit attempts. The standard Northeast Ridge route offers a well-traveled Class 1 trail with expansive alpine views, moderate grades, and a steady climb through forest and tundra.
Getting to the Trailhead
From Leadville, head south on U.S. Highway 24 for about 3 miles, then turn right (west) onto Colorado 300. After 0.8 miles, turn left onto Lake County Road 11 and follow it for 1.2 miles until you reach a fork—stay right on Halfmoon Road. Continue past the Mount Massive trailhead until you reach the clearly signed Mount Elbert Trailhead (North Elbert Trailhead). Most passenger vehicles can reach the parking area in summer conditions, though the road can be rough in spots.
Route Overview: Northeast Ridge
From the trailhead (10,040 ft), the route starts with a gentle walk through pine forest and quickly begins to climb via well-maintained switchbacks. Around 11,600 ft, the trail exits treeline and transitions into alpine tundra, where views of the surrounding Sawatch Range open up.
From here, the route becomes more strenuous, with a few false summits along the way. The final ridge is wide and gradual but feels unrelenting due to the altitude. With steady effort, you'll reach the summit and be rewarded with 360-degree views that stretch as far as the Elk Mountains and the Mosquito Range.
The hike is approximately 9.2 miles round trip with 4,400 feet of elevation gain.
Tips for Climbing Mount Elbert
Start early—afternoon storms are common, and much of the trail is above treeline.
Though it’s a Class 1 hike, the altitude and elevation gain make it a physically demanding climb.
Bring plenty of water and sun protection. There is little shade after 11,600 feet.
Trekking poles help reduce fatigue on the long descent.
While non-technical, proper acclimatization is key—Elbert’s height can bring on altitude sickness if you're not prepared.
Mount Elbert may be Colorado’s tallest, but it’s a surprisingly approachable summit for hikers willing to put in the work. Don’t underestimate it—but with good preparation, this iconic 14er is one of the most rewarding climbs in the state.


How to Climb La Plata Peak in Colorado
La Plata Peak, rising to 14,336 feet, is the fifth-highest summit in Colorado and one of the most scenic 14ers in the Sawatch Range. Its name—Spanish for “The Silver”—reflects the mining history of the area, but today it draws hikers with its massive elevation gain, alpine views, and challenging terrain. The standard Northwest Ridge route is a tough but rewarding Class 2 climb with a bit of everything: forests, streams, switchbacks, talus, and ridge hiking.
Getting to the Trailhead
From the town of Twin Lakes, drive west on Highway 82 toward Independence Pass. After about 14 miles, look for the well-marked La Plata Peak Trailhead on the left (south) side of the road. The parking area sits at roughly 10,000 feet and is accessible by most vehicles in summer. There’s room for several cars, but it fills quickly on weekends.
Route Overview: Northwest Ridge
From the trailhead, cross a footbridge over the creek and begin a mellow climb through thick forest. After about 1.3 miles, the trail crosses South Fork Lake Creek and begins a steeper ascent through willows and talus. This stretch can be wet and muddy in early season, but is well-marked and easy to follow.
At around 12,000 feet, the route climbs a long, rocky ridge. The final 2,000 feet of gain is sustained and demanding, with some light route-finding through talus fields and brief Class 2 scrambling in the last half-mile. The summit is broad and offers exceptional views of the rugged Elk Mountains to the west and the surrounding Sawatch peaks.
The round-trip distance is approximately 9.25 miles with 4,500 feet of elevation gain.
Tips for Climbing La Plata Peak
The trail is well-defined early but becomes rocky and steep—expect slower travel above treeline.
Start early—most of the route is exposed after the creek crossing.
Trekking poles are useful for both the climb and the descent.
Snow can linger on the ridge well into June; traction may be required in early season.
Wildflowers line the lower trail in July and August, making for a scenic start and finish.
La Plata Peak is a big mountain that delivers a big mountain experience. With alpine terrain, a rugged summit ridge, and fewer crowds than nearby Mount Elbert, it’s a rewarding challenge for fit hikers looking for a classic Colorado 14er.


How to Climb Missouri Mountain in Colorado
Missouri Mountain, standing tall at 14,067 feet, is one of the more scenic peaks in the Sawatch Range. Known for its striking summit ridge and wide-ranging views, it offers a slightly more adventurous feel than its nearby neighbors, Mount Belford and Mount Oxford. While still non-technical, Missouri’s summit ridge adds just enough spice to make this 14er a standout.
Getting to the Trailhead
Missouri Mountain shares the same access point as Belford and Oxford: the Missouri Gulch Trailhead off County Road 390. From U.S. 24, turn west between the towns of Leadville and Buena Vista and follow CR 390 for 7.8 miles. The road is usually passable for most passenger vehicles in summer, and the parking area fills quickly on weekends.
Route Overview: Northwest Ridge via Missouri Gulch
From the trailhead (9,650 feet), start up the well-maintained Missouri Gulch Trail. The first few miles climb steadily through forest, passing an old log cabin and eventually breaking treeline. After 3.5 miles, you’ll reach the split for Elkhead Pass (used for Belford and Oxford) and Missouri Mountain.
Turn left at the signed junction and continue up Missouri’s northwest ridge. This is where the trail steepens and narrows. The final push includes a bit of mild scrambling and exposure, but nothing that exceeds Class 2 difficulty. The ridge section is narrow in spots but manageable for most hikers with a head for heights.
Expect roughly 10.5 miles round-trip with 4,500 feet of elevation gain.
Tips for Climbing Missouri Mountain
The northwest ridge is exposed—avoid this route in bad weather or high winds.
Trekking poles help on the steep descent.
The views from the summit are spectacular: look for Huron Peak to the south and the rugged Elkhead Basin below.
While the trail is popular, it’s generally less crowded than Belford and Oxford.
Wildflowers light up Missouri Gulch in July and August, making it one of the more beautiful approaches in the Sawatch.
Missouri Mountain is perfect for hikers looking for a scenic summit with just a touch of alpine challenge. Its classic ridge and peaceful setting make it one of Colorado’s more underrated 14ers—and one that belongs on any serious peakbagger’s list.


Here's How to Climb Mount Oxford in Colorado
Mount Oxford, rising to 14,153 feet, is often summited as a tag-along to nearby Mount Belford. While not typically climbed on its own due to its remote location, Oxford offers rewarding solitude, stunning ridgeline hiking, and a true sense of accomplishment. It’s best suited for experienced hikers ready for a big day in the mountains.
How to Climb Mount Oxford in Colorado
Mount Oxford, rising to 14,153 feet, is often summited as a tag-along to nearby Mount Belford. While not typically climbed on its own due to its remote location, Oxford offers rewarding solitude, stunning ridgeline hiking, and a true sense of accomplishment. It’s best suited for experienced hikers ready for a big day in the mountains.
Getting to the Trailhead
Like Mount Belford, the standard route to Oxford begins at the Missouri Gulch Trailhead. From the town of Granite, turn west on County Road 390 and follow it for 7.8 miles to the trailhead. This dirt road is usually passable for most vehicles in summer, and there’s a well-used parking area at 9,650 feet.
Route Overview: Belford-Oxford Traverse via Missouri Gulch
You’ll first climb Mount Belford (14,197 feet) via its steep northwest ridge—about 4.5 miles and 4,500 feet of gain to reach the summit. From Belford, the real work begins. The route to Oxford follows a clear, defined ridge, dropping roughly 700 feet into the saddle before climbing another 600 feet to the summit of Oxford.
The out-and-back to Oxford from Belford adds about 3 miles round-trip and 1,200 feet of extra elevation change. While the trail remains Class 1, the terrain is entirely above treeline, fully exposed to wind, sun, and fast-changing weather.
On Mount Oxford's summit, you'll enjoy sweeping views across the Sawatch Range, with close-up looks at Harvard, Missouri, and the Elkhead Basin.
Tips for Climbing Mount Oxford
Consider Oxford only if you're feeling strong at the top of Belford. The return climb back up Belford’s ridge is steep and taxing.
Start early—this is a long, exposed route with minimal shelter from thunderstorms.
Carry at least 3 liters of water per person. There are no reliable water sources after leaving Missouri Gulch.
Expect few crowds. Many stop at Belford, so Oxford offers a quieter summit experience.
Pack layers. Wind and temperature can shift rapidly above 13,000 feet.
Mount Oxford might not be the flashiest 14er, but it offers classic high-alpine terrain and a true endurance challenge. For those looking to push their limits or cross multiple peaks in a single day, the Belford-Oxford combo is one of the best two-for-one routes in the state.


Here's How to Climb Mount Belford in Colorado
Mount Belford, standing tall at 14,197 feet, is one of Colorado’s Collegiate Peaks and a favorite for hikers aiming to summit multiple 14ers in a day. Its close proximity to Mount Oxford makes it an ideal two-peak outing, though Belford alone offers a satisfying challenge with big elevation gain, well-maintained trail, and expansive alpine views.
How to Climb Mount Belford in Colorado
Mount Belford, standing tall at 14,197 feet, is one of Colorado’s Collegiate Peaks and a favorite for hikers aiming to summit multiple 14ers in a day. Its close proximity to Mount Oxford makes it an ideal two-peak outing, though Belford alone offers a satisfying challenge with big elevation gain, well-maintained trail, and expansive alpine views.
Getting to the Trailhead
The Missouri Gulch Trailhead is the standard starting point. From the town of Granite, head west on County Road 390 (a well-graded dirt road) and continue for 7.8 miles to the trailhead parking area at 9,650 feet. The lot fills quickly in summer—arrive early, especially if you’re attempting the Belford-Oxford combo.
Route Overview: Northwest Ridge via Missouri Gulch
The hike begins with a steep series of switchbacks through dense forest, gaining nearly 1,500 feet in just the first mile. After crossing a footbridge over Clear Creek, the trail opens into the scenic Missouri Gulch. Take your time here—the scenery is stunning, especially in the morning light.
Continue climbing past treeline and a few old mining ruins until you reach a junction at about 12,000 feet. Go right to begin the long switchbacks up Belford’s northwest ridge. The trail is well-defined but steep, gaining over 1,500 feet in the final mile.
At the summit, you'll be rewarded with panoramic views of the Sawatch Range, including nearby Missouri Mountain, Mount Harvard, and Mount Oxford. The round-trip distance is approximately 7 miles with 4,500 feet of elevation gain.
Tips for Climbing Mount Belford
Start early—this route gains elevation quickly and is fully exposed above treeline.
Expect windy conditions on the upper ridge. Dress in layers and bring a windbreaker.
Bring plenty of water and snacks. The strenuous grade demands steady energy.
If continuing to Mount Oxford, expect an additional 3 miles and 1,200 feet of gain/loss.
Wildflowers are abundant in late July and early August—one of the prettiest gulches in the Sawatch.
Mount Belford offers a classic Colorado 14er experience: steep trail, sweeping alpine vistas, and a satisfying summit. Whether you climb it solo or tack on Mount Oxford, you’ll walk away with strong legs and a deeper appreciation for the rugged beauty of the Sawatch Range.

Here's How to Climb Mount Columbia in Colorado
Mount Columbia, at 14,073 feet, is part of Colorado’s Collegiate Peaks and lies just north of its loftier neighbor, Mount Harvard. Once notorious for its steep, eroded slopes, recent trail improvements have made this a more enjoyable hike—though it’s still a serious effort. The standard route via the new Columbia Trail remains Class 2, with long mileage, big gain, and sweeping views across Horn Fork Basin.
How to Climb Mount Columbia in Colorado
Mount Columbia, at 14,073 feet, is part of Colorado’s Collegiate Peaks and lies just north of its loftier neighbor, Mount Harvard. Once notorious for its steep, eroded slopes, recent trail improvements have made this a more enjoyable hike—though it’s still a serious effort. The standard route via the new Columbia Trail remains Class 2, with long mileage, big gain, and sweeping views across Horn Fork Basin.
Getting to the Trailhead
From Buena Vista, head north on US 24 and turn west on County Road 350. After about 2 miles, turn right onto County Road 365 and follow it to the North Cottonwood Creek Trailhead at 9,880 feet. The road is graded dirt and generally passable to most vehicles in summer. The parking area is small and fills early—arrive before sunrise or consider overnighting in the basin.
Route Overview: West Slopes via Horn Fork Basin
Start on the Horn Fork Basin Trail, the same approach used for Mount Harvard. The trail climbs steadily through pine forest and opens up into alpine tundra around 11,400 feet. At roughly 11,600 feet, a signed junction marks the turnoff for the Mount Columbia Trail—take a right and begin climbing Columbia’s western slopes.
The new trail is well-built and makes use of long switchbacks to gain the ridge, avoiding the steep and eroded fall line that gave this mountain a bad reputation. Once on the ridge, follow the cairned route over rock and tundra toward the summit. The final push involves some loose talus and a faint trail, but nothing technical.
From the summit, you’ll get clear views of Mount Harvard, Mount Yale, and the surrounding wilderness. Total round-trip distance is about 11 miles with 4,250 feet of elevation gain.
Tips for Climbing Mount Columbia
The climb is best done late June through September—snow lingers on the upper trail in early season.
If combining with Mount Harvard, prepare for a steep and rugged ridge traverse—there’s no easy connection between the two.
Bring plenty of water; there are no reliable sources once you leave the main Horn Fork trail.
Trekking poles help significantly on the descent.
Be ready for wind exposure above treeline, especially on the summit ridge.
Mount Columbia is no longer the muddy mess it once was. Thanks to thoughtful rerouting, this peak offers a more enjoyable trail experience while still delivering the wild beauty and solitude of the Collegiate Peaks.


Here's How to Climb Mount Yale in Colorado
Mount Yale rises to 14,200 feet and sits just west of Buena Vista in the Collegiate Peaks Wilderness. Known for its steady trail, big views, and non-technical route, it’s one of the most accessible 14ers in the Sawatch Range. The Southwest Slopes route offers a straightforward Class 2 climb—no scrambling, just sustained effort and elevation gain.
How to Climb Mount Yale in Colorado
Mount Yale rises to 14,200 feet and sits just west of Buena Vista in the Collegiate Peaks Wilderness. Known for its steady trail, big views, and non-technical route, it’s one of the most accessible 14ers in the Sawatch Range. The Southwest Slopes route offers a straightforward Class 2 climb—no scrambling, just sustained effort and elevation gain.
Getting to the Trailhead
From Buena Vista, head west on County Road 306 (toward Cottonwood Pass). After about 12 miles, look for the Denny Creek Trailhead on the right at 9,900 feet. The parking area is paved but small, and it fills up quickly on weekends and summer mornings. Plan to arrive early, especially during peak season.
Route Overview: Southwest Slopes
Begin at Denny Creek Trailhead on a wide, shaded trail that climbs gradually through lodgepole pine and aspen. After a couple of mellow miles, the trail steepens, with tight switchbacks and a more rugged surface. As you ascend past 11,000 feet, the forest thins and opens into alpine tundra.
Above treeline, the trail remains well-defined but climbs sharply toward Yale’s southeast ridge. At around 13,800 feet, the trail transitions into rockier terrain. You’ll follow cairns through a final stretch of loose talus to gain the summit ridge. The last few hundred feet require careful footing but no scrambling.
From the summit, expect big views of the Arkansas River Valley and neighboring 14ers like Mount Princeton, Harvard, and Columbia. Round-trip stats: approximately 9.5 miles and 4,300 feet of elevation gain.
Tips for Climbing Mount Yale
Start early—afternoon thunderstorms are common and the route is fully exposed above treeline.
The trail is well-built but steep. Trekking poles are useful on both ascent and descent.
Bring plenty of water; reliable sources are limited once you leave the lower forest.
Watch your footing in the final half-mile. Though the route stays Class 2, the loose talus demands focus.
Cell service is limited—download maps or GPS tracks ahead of time.
Mount Yale is a rewarding climb for those seeking a classic Colorado 14er without technical challenges. The elevation gain is no joke, but the well-maintained trail and scenic summit make it one of the most popular and satisfying peaks in the state.


Here's How to Climb Mount Princeton in Colorado
Mount Princeton stands tall at 14,197 feet and dominates the skyline west of Buena Vista. It's one of the more visually striking 14ers in the Sawatch Range, thanks to its dramatic rise from the Arkansas River Valley. The East Slopes route is a non-technical Class 2 hike, but it’s far from easy—expect loose talus, a long approach, and big elevation gain.
How to Climb Mount Princeton in Colorado
Mount Princeton stands tall at 14,197 feet and dominates the skyline west of Buena Vista. It's one of the more visually striking 14ers in the Sawatch Range, thanks to its dramatic rise from the Arkansas River Valley. The East Slopes route is a non-technical Class 2 hike, but it’s far from easy—expect loose talus, a long approach, and big elevation gain.
Getting to the Trailhead
From Buena Vista, head west on Chaffee County Road 306 and turn south on County Road 321. After about a mile, turn right onto Mount Princeton Road (Forest Service Road 322). The lower trailhead sits around 8,900 feet. If you have a high-clearance 4WD vehicle, you can drive up a steep and rocky road for 3 miles to a parking area near the radio towers at 11,000 feet.
The road is narrow, exposed in places, and has limited pullouts—don’t attempt it in poor weather or without experience on rough roads. If you start from the lower lot, plan for a much longer day.
Route Overview: East Slopes
From the radio towers, continue up the 4WD road for about another mile. At around 11,800 feet, look for a large cairn where a singletrack trail cuts left across the talus. This is where the hike leaves the road and the real climbing begins.
The trail is rough and rocky, traversing steep, loose slopes. Route-finding is mostly straightforward in summer, but snow or fog can obscure the path. Around 13,000 feet, the trail steepens as it climbs toward the summit ridge. From there, it’s a final short push on blocky talus to reach the summit.
Round-trip stats from the upper radio towers: roughly 6.5 miles and 3,200 feet of gain. From the lower trailhead: about 13 miles and 5,300 feet of elevation.
Tips for Climbing Mount Princeton
Start early—this mountain is notorious for being fully exposed above treeline.
If hiking from the lower lot, expect a very full day. The road walk adds time and wear.
Bring trekking poles and sturdy footwear—the trail is loose underfoot.
There's no reliable water source above the lower trailhead, so pack extra.
Mount Princeton blends high alpine terrain with one of Colorado’s most iconic summit views. Whether you grind it out from the bottom or shave off mileage by driving higher, it’s a challenging but rewarding day in the Collegiate Peaks.


